| Chapter 6. Define | ||
|---|---|---|

|
 |
|
| Chapter 6. Define | ||
|---|---|---|
|
|
|
|
Table of Contents
This section describes the Define section of Klaros-Testmanagement. In this section, Projects, Iterations, Requirements, Test Environments, Systems under Test, Test Segments Test Cases and Test Suites may be created and edited. There is a menu entry on the left-hand side for each of these artifact types.
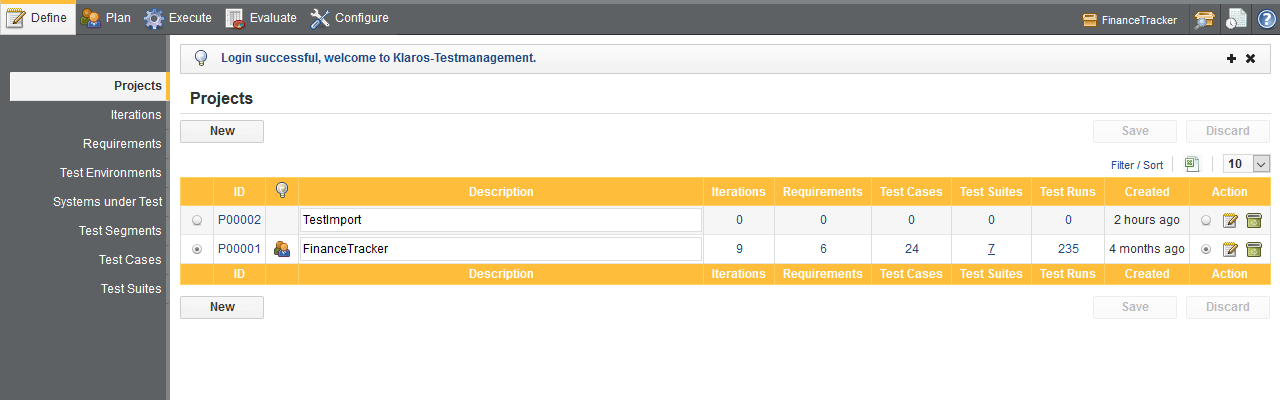
The Projects section allows managing projects in Klaros-Testmanagement. Projects are collections of all test artifacts for a given product and the related results and jobs. Test artifacts are objects like test cases and test suites.
When accessing Klaros-Testmanagement for the first time it is necessary to create a project to work with. To create a new project select the menu entry Projects ( Figure 6.1) and follow Section 6.1.1, “Creating a Project”.
After at least one project has been created, users may select one from the table.
After a successful login the Projects screen is shown. It gives the user an overview of the projects stored in the Klaros-Testmanagement database. Projects may be created, removed and updated on this page ( Figure 6.1). The displayed projects may be filtered and sorted as described in Section 5.2.6, “Filtering and Sorting”.
In order to use the test management functions of Klaros-Testmanagement, the user is required to select a project. Projects are selected by clicking on the check box of the desired project in the leftmost or rightmost column.
![[Note]](images/note.png) |
Choosing a project with the project quick-select drop-down field |
|---|---|
|
The header bar of Klaros-Testmanagement contains a drop-down field labeled Project. With this drop-down field the active project can be switched quickly on any Klaros-Testmanagement page. You will be directed to the top page of your current category (Define / Execute etc.). |
If no projects have been created, the user must create one before proceeding. The process of creating a project is described in the next section.
After a project is selected, the disabled functions in the navigation bar are made available.
New projects may be created by clicking the button ( Figure 6.1). An empty row is added at the beginning of the table. The Project ID is automatically assigned by Klaros-Testmanagement, and the description can be specified.
When the
![]() Delete icon is clicked, the project will be locked and removed
from the list of selectable projects.
Delete icon is clicked, the project will be locked and removed
from the list of selectable projects.
|
Why is the button sometimes disabled? |
|---|---|
|
Projects that already contain some test results can no longer be deleted by users,
so their delete icon is disabled (
|
When the
![]() restore icon is clicked, a previously locked project is
restored to the list of selectable projects. Only an administrator is able to restore
a locked project.
restore icon is clicked, a previously locked project is
restored to the list of selectable projects. Only an administrator is able to restore
a locked project.
When the
![]() purge icon is clicked, a previously locked project is purged
from the database. Only an administrator is able to purge a locked project. This
operation cannot be undone.
purge icon is clicked, a previously locked project is purged
from the database. Only an administrator is able to purge a locked project. This
operation cannot be undone.
The project description can be used to give a short overview over the project. Clicking on the Description field allows the user to directly change the current value ( Figure 6.1).
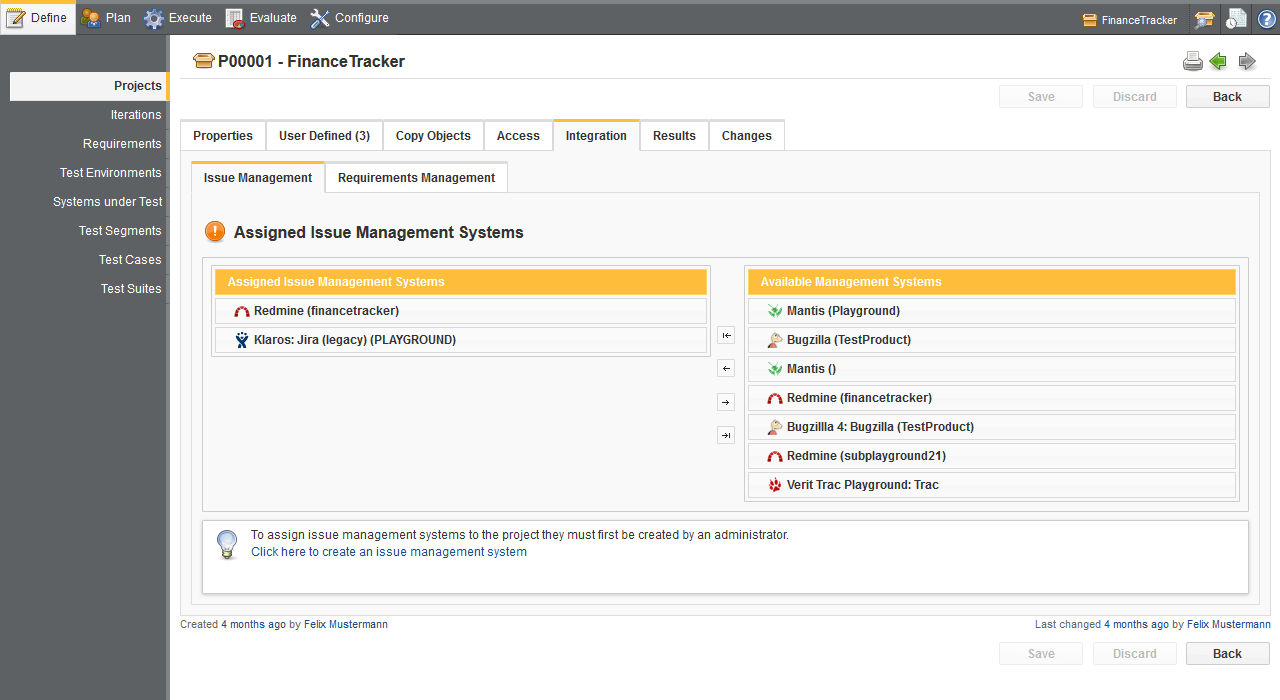
This section allows in-depth editing of an individual project, including adding/removing issue management systems and user-defined properties. The executed test results and the change history of this project are also visible in this section.
The list of issue management systems that are in use in the project can be edited
on the project details page, which may be reached by pressing the (
![]() ) edit
icon beside a project on the projects page
( Figure 6.1).
) edit
icon beside a project on the projects page
( Figure 6.1).
|
Creating issue management systems |
|---|---|
|
Before issue management systems are available for assignment, they must be created by an administrator. For instructions on the creation of issue management systems see Section 10.5.1, “Issue Management”. |
The project properties page in the project details section
( Figure 6.2, “The Project Properties Page”)
shows two tables: The upper table contains the issue management systems that are
already in use in the project, the lower table shows all issue management systems
that are configured in Klaros-Testmanagement and not in use by the project. Pressing the
![]() add icon adds the corresponding issue management system to the project. The issue
management system is removed from the lower table and added to the upper table.
add icon adds the corresponding issue management system to the project. The issue
management system is removed from the lower table and added to the upper table.
On this page it is also possible to edit the Description of the project.
![]() Feature only available in Klaros-Testmanagement Enterprise Edition
Feature only available in Klaros-Testmanagement Enterprise Edition
See Section 10.5.2, “Requirements Management” for more information about how to connect remote requirements management systems to Klaros-Testmanagement.
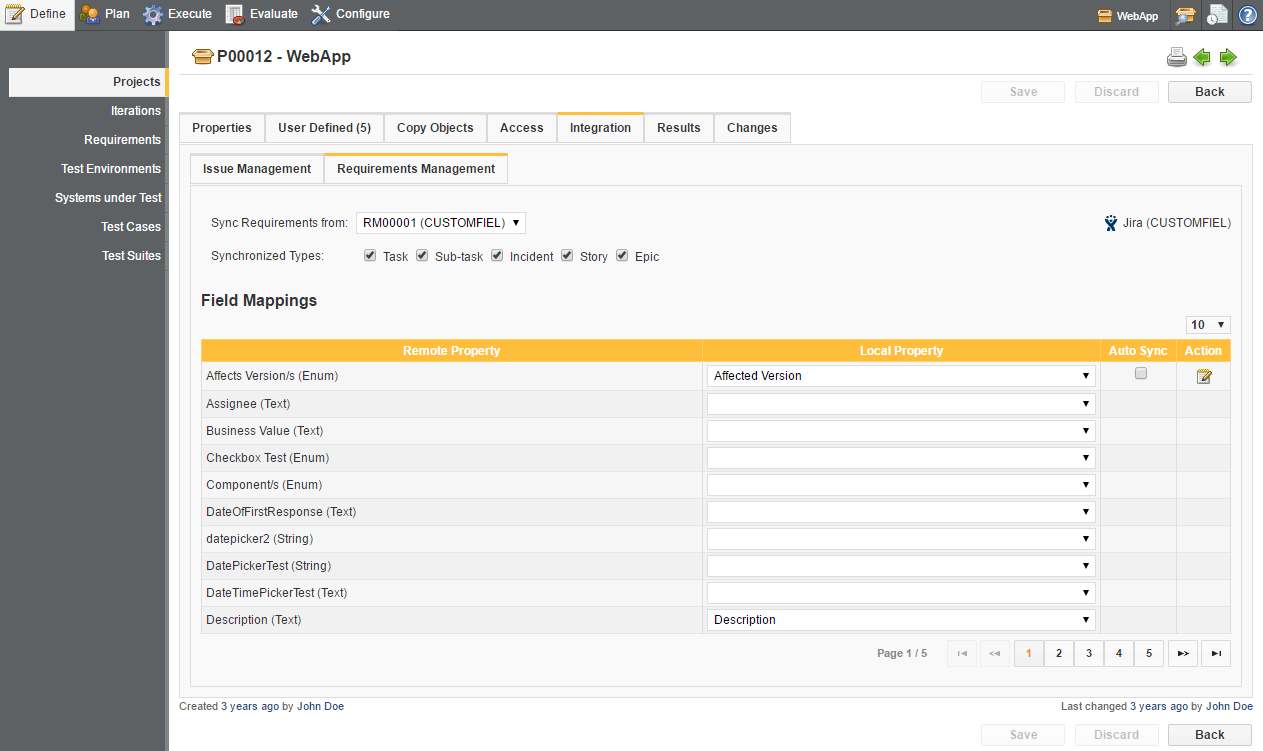
A project can be connected to an requirements management system via the the Requirements Management tab on the project details page. This tab will show a dropdown list of all available requirements management systems applicable for this project.
![[Important]](images/important.png) |
Important |
|---|---|
|
In order to connect a RMS with a project, the RMS has to be configured in the Configure section first (see Section 10.5.2, “Requirements Management”). |
After pressing the button, an background synchronization will start that will retrieve all requirements from the configured RMS and stores them in Klaros-Testmanagement.
|
Note |
|---|---|
|
Synchronizing requirements can take up a huge amount of time depending on the number of requirements on the remote side. Klaros-Testmanagement has a built-in scheduler that will synchronize all requirements of all connected requirements management systems for all enabled projects in Klaros-Testmanagement in specified intervals. |
![[Warning]](images/warning.png) |
Warning |
|---|---|
|
When Switching to a remote RMS, if any local requirements have been created, they will become disabled and therefore invisible for all users and will not appear in any report anymore! Switching back to local requirements management will enable those requirements again, though. |
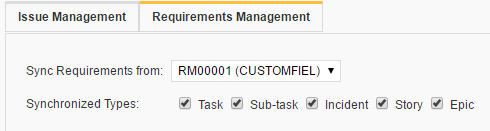
After selecting a RMS from the dropdown list of all available requirements management systems, a list of types appears right below this dropdown box. As per default, all types are selected, which means that a background synchronization will synchronize all requirements of the linked RMS.
Administrators and project managers can link individual fields between the remote requirements management system and Klaros-Testmanagement. When using Jira, as per default, the Description, Priority and Summary fields from the remote RMS (if they are available) are linked to the Description, Priority and Name fields in Klaros-Testmanagement. In addition to that, the Jira Status field is automatically mapped to a dedicated Status field that is only displayed if RMS synchronization is enabled.
There are three types of fields for both sides, String, Enum and Boolean.
|
Note |
|---|---|
|
An enum-field in Klaros-Testmanagement can only be linked to an enum-field of the remote RMS, but an enum field of the RMS can be linked to a string or boolean field in Klaros-Testmanagement. |
When linking enum fields of both sides, it is necessary to indicate which enum values should be linked together. Otherwise, all values of the RMS will be mapped to the default enum value of the Klaros-Testmanagement field.
Pressing the
![]() of an enum linking opens up a popup where individual values can be
linked.
of an enum linking opens up a popup where individual values can be
linked.
|
Note |
|---|---|
|
Multiple enum values of a remote enum property can be linked to the same enum value of a property in Klaros-Testmanagement. |
When linking enum fields, it is often tedious to keep the list of selectable values in sync. For this, an automated synchronization mechanism for enumeration values is available for enumeration values in the Auto Sync column.
Using AutoSync requires that the remote property consists of an enum property. In addition the local property should be set to a custom enum property of the requirements. Once done the Auto Sync checkmark field will appear in the list.
|
Note |
|---|---|
|
It is not necessary to specify all the enum field values for the custom enum property. Once the Auto Sync flag is set, Klaros-Testmanagement will automatically query the remote system for available values and create them dynamically for the local enum property that has been specified, removing existing values if necessary. |
The Requirements Management System of a project can be changed any time by a user with sufficient rights. As with switching from local to remote requirements management, all currently existing requirements for the project will be disabled as long as another RMS is used.
![]() Feature only available in Klaros-Testmanagement Enterprise Edition
Feature only available in Klaros-Testmanagement Enterprise Edition
User defined properties can be used to customize objects within Klaros-Testmanagement by adding custom fields. This process is described in Section 5.2.13, “User Defined Properties”.
![]() Feature only available in Klaros-Testmanagement Enterprise Edition
Feature only available in Klaros-Testmanagement Enterprise Edition
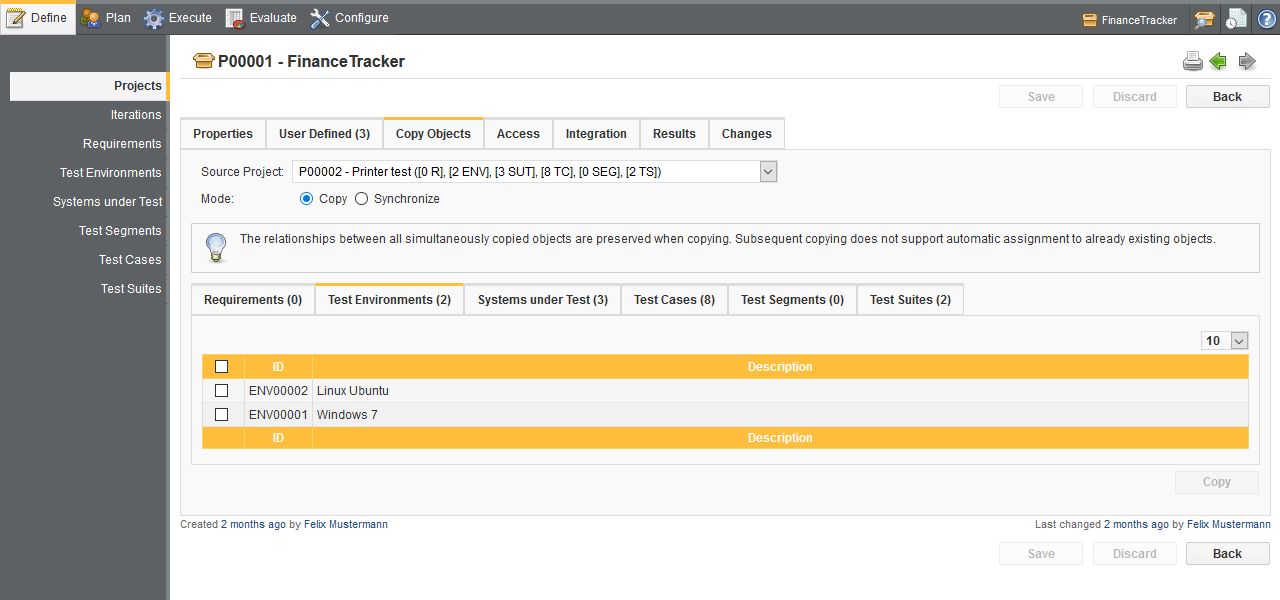
It is possible to transfer objects from another project to the current one. This function can be accessed by the Copy Objects tab on the project details page (see Figure 6.2, “The Project Properties Page”). To copy objects, first a project has to be selected from the Source Project drop down box. This opens up several tabs with requirements, test environments, systems under test, test segments, test cases and test suites from the source project.
There are two modes available to the copy function.
In the Copy-Mode copies of the selected objects are created which are independent of their original objects and can be used and edited as any other object. These copies will not have any back-references to the objects they originate from, so changes to the source project will not be reflected in the target project.
In the Synchronize-Mode the selected objects will be linked to their original objects in the source project. The synchronized objects will not be editable in the target project yet changes in the source project can be synchronized to the target project at any time.
![[Tip]](images/tip.png) |
Why should I need synchronized objects? |
|---|---|
|
Synchronized objects help you to keep a shared pool of test cases in a reference project which you may reuse in other projects. Since they are only editable in this single location all synchronized copies can be updated to this content easily. |
When changes are made to the synchronized objects in the source project an update icon
(
![]() ) will be shown in the application. This will allow to update the synchronized
object with all pending changes, including all their revisions if supported by the object.
) will be shown in the application. This will allow to update the synchronized
object with all pending changes, including all their revisions if supported by the object.
|
Not all object types are currently supported in synchronize mode |
|---|---|
|
Currently only test cases and test suites are supported for synchronized copy mode. |
Depending on the currently selected copy mode the content of the displayed tabs will be changing. Already synchronized objects which have no pending changes will not be shown in this list. Using the button these can be also shown.
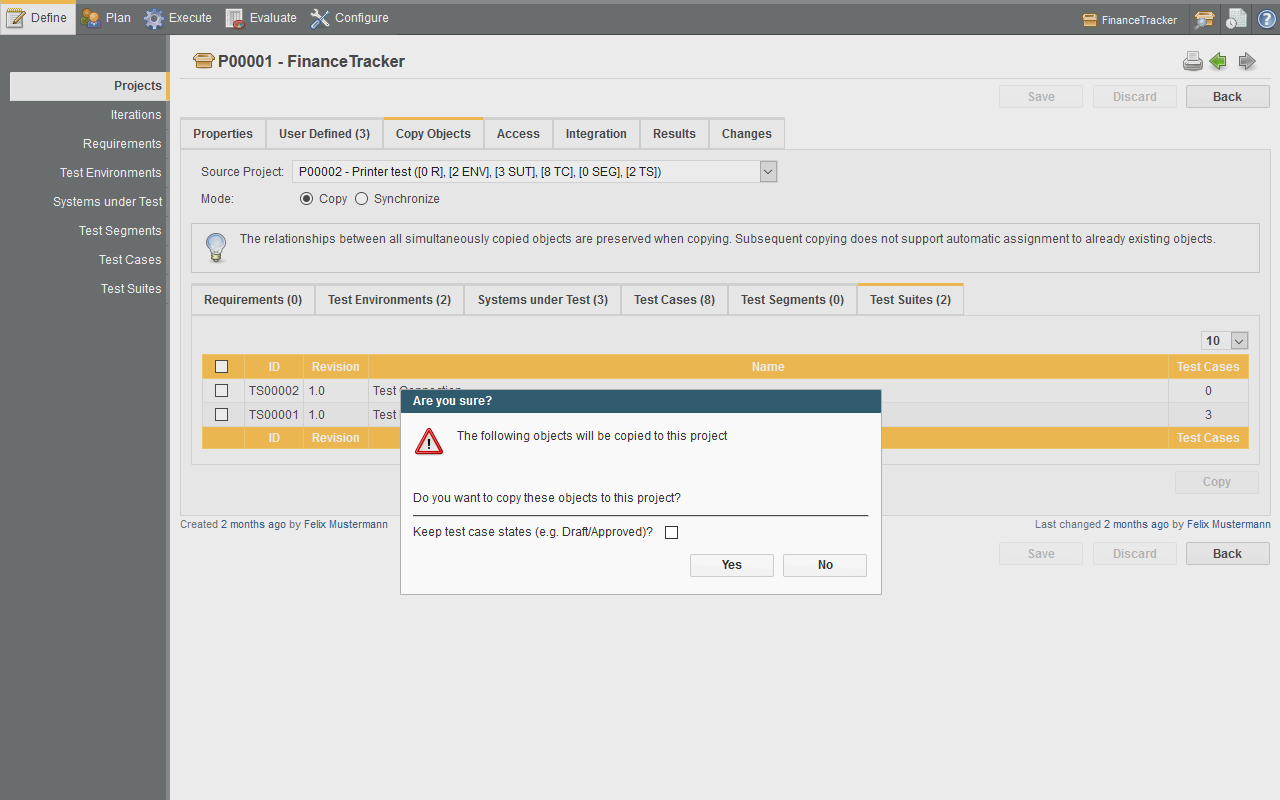
After selecting the desired objects, pressing the button opens up a popup with a summary of all objects that are going to be transferred to the current project. Pressing the button closes the popup and starts the copy process (see Figure 6.7, “Copying Objects from another Project”).
Checking the Keep test case states checkbox upholds the state of all test cases while copying. Unchecking this checkbox sets all test case states to Draft.
|
Note |
|---|---|
|
When copying a test suite, all test cases that are part of this test suite are also being copied. |
A project can be secured by checking the Disable anonymous project access flag. If this flag is checked, a user must be logged into Klaros-Testmanagement to view bookmarked pages. More information about bookmarking is available at Section 9.9, “Bookmarking Results”.
![]() Feature only available in Klaros-Testmanagement Enterprise Edition
Feature only available in Klaros-Testmanagement Enterprise Edition
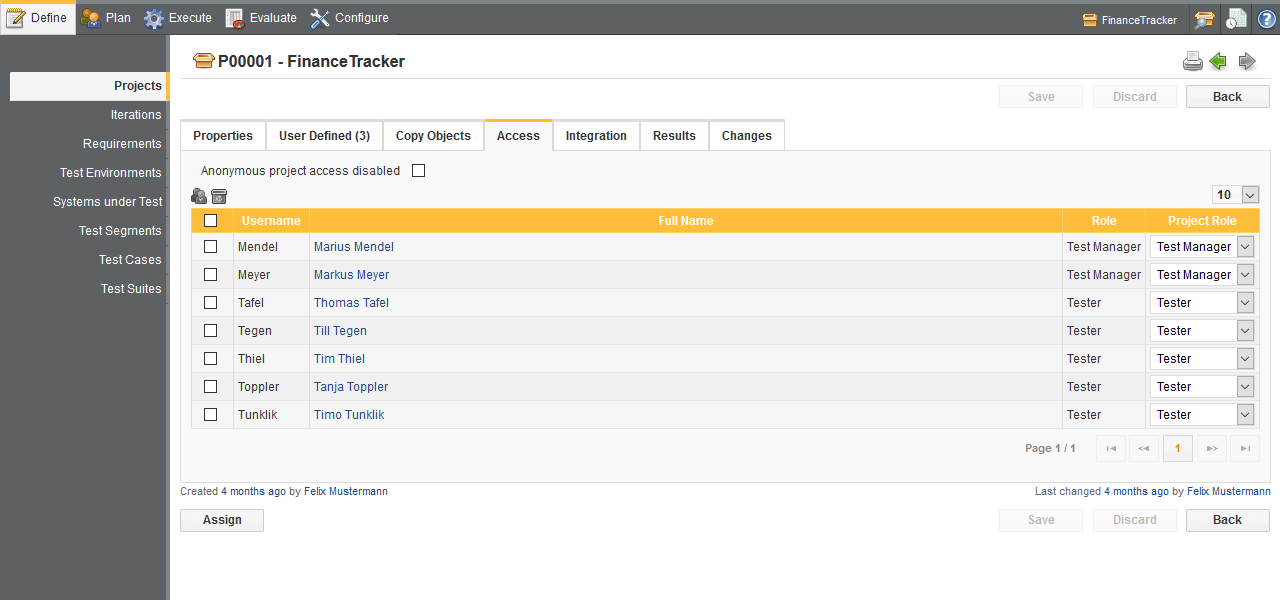
Klaros-Testmanagement Enterprise Edition integrates a rights and role system with its user management system (see Section 10.3, “Users”). In the Access tab administrators and test managers can assign and change project roles for individual users. For example, a user which has the global role tester can be assigned to one project as a tester and to another project as a test manager.
Initially, every project can be accessed by every user. If at least one tester or test manager has been assigned to a specific project, access to this project is restricted for all other users without an assigned role.
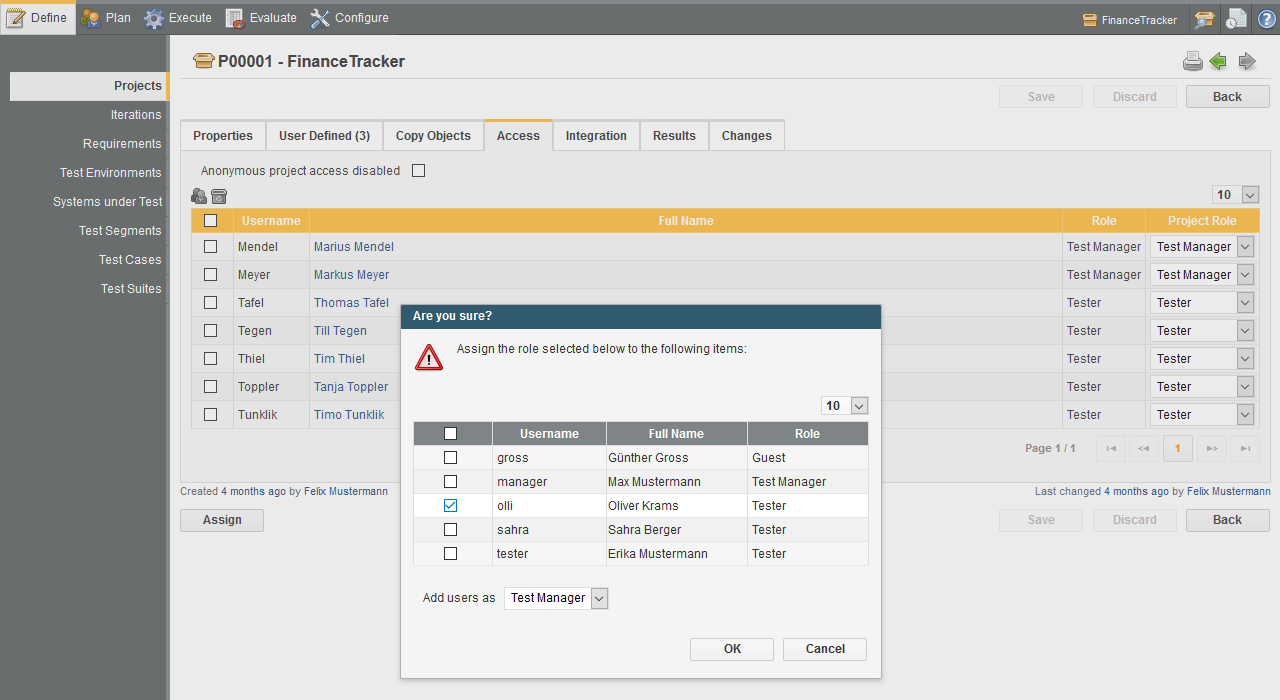
Pressing the button opens up a popup (see Figure 6.9, “The Project Access Popup”) where new users can be added to the project.
|
Every project needs at least one test manager |
|---|---|
|
A project needs at least one assigned test manager. When trying to save a project which has no assigned test manager, a warning message will be displayed in the log panel (see Section 5.2.2, “The Log Panel”). |
The result tab is further divided into a Test Runs, Test Case Results and a Test Suite Results tab showing the test results related to this project as described in Section 5.2.17, “Related Test Runs and Results”.
|
|
|
|
| Chapter 5. Functional Overview |  |
6.2. Iterations |