| Chapter 5. Functional Overview | ||
|---|---|---|

|
 |
|
| Chapter 5. Functional Overview | ||
|---|---|---|
|
|
|
|
Table of Contents
This chapter gives a coarse overview of the usage of the application.
![[Warning]](images/warning.png) |
Warning |
|---|---|
|
The browser back button is not supported by Klaros-Testmanagement. The behavior of the web application is unpredictable when it is used. |
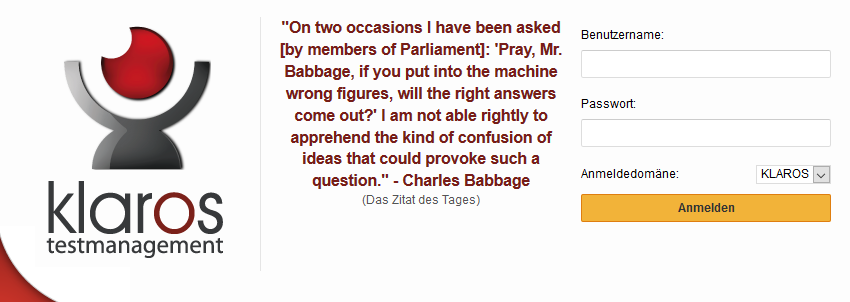
Figure 5.1 shows the login screen of Klaros-Testmanagement. To login just enter the user name in the User name field and the associated password into the Password field.
The Klaros-Testmanagement database predefines three default users accounts with following roles:
Administrator
Username: admin / Password: admin
Manager
Username: manager / Password: manager
Tester
Username: tester / Password: tester
For a description of the users roles and the permissions associated with each role, see Appendix A, Role Permission Overview.
Confirm the login to Klaros-Testmanagement by clicking the button.
![]() Feature only available in Klaros-Testmanagement Enterprise Edition
Feature only available in Klaros-Testmanagement Enterprise Edition
Klaros-Testmanagement Enterprise Edition supports the login using LDAP. See Section 10.5.5, “LDAP” on how to configure Klaros-Testmanagement to use an external directory service for authentication.
![[Note]](images/note.png) |
Automated creation of Klaros-Testmanagement users |
|---|---|
|
If a user that isn't registered in the Klaros-Testmanagement database logs into Klaros-Testmanagement using LDAP authentication, then a user account of the role 'tester' is automatically created for this user. The fullname and e-mail attributes are transferred from LDAP into the newly created user account then. |
|
Klaros-Testmanagement is multilingual |
|---|---|
|
By default Klaros-Testmanagement chooses the language that is determined by the locale settings of the server Klaros-Testmanagement is installed on. If you want to choose a different language you may select the corresponding flag at the bottom right corner of the login screen. The language of the user interface changes immediately and the choice will be stored automatically. |
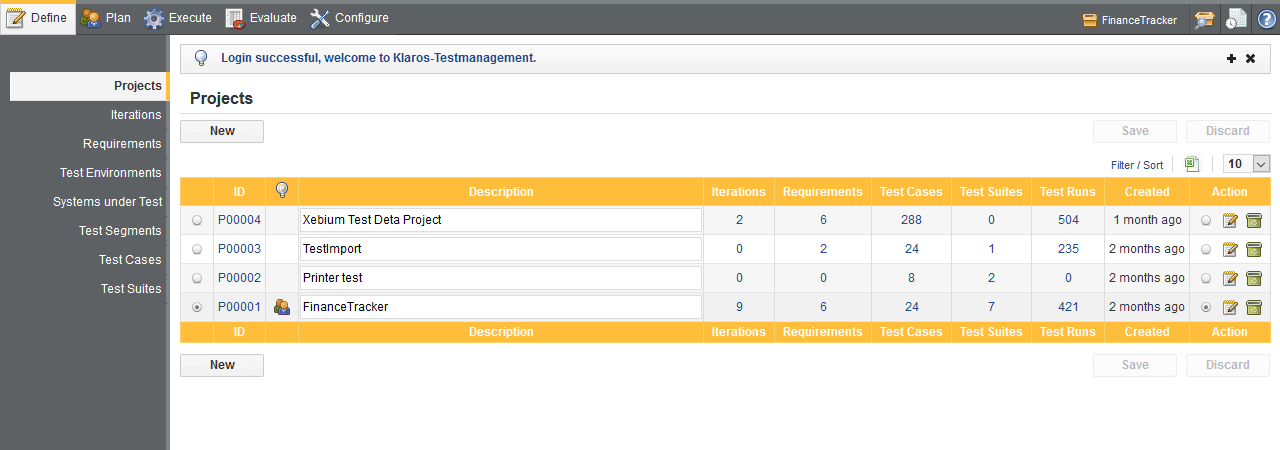
After a successful login the Maintain Project page is shown ( Figure 5.2).
Klaros-Testmanagement uses a horizontal menu on the top of the screen. These categories resemble activities in the testing project. The function categories presented in this menu are:
|
Define |
In the Define section of Klaros-Testmanagement all artifacts that are needed in a project can be defined and viewed. These artifacts are the project itself, the test environments, the systems under test, the test cases and the test suites. For the Klaros-Testmanagement Enterprise Edition and this list also includes project iterations and requirements. |
|
Plan |
The Plan section of Klaros-Testmanagement is used to define and maintain jobs, e.g. the execution of tests which can be assigned to individual users and tracked accordingly. This section is only available in Klaros-Testmanagement Enterprise Edition and . |
|
Execute |
The Execute section of Klaros-Testmanagement allows execution of jobs, manual test cases and manual test suites. Before a test is executed, the tester must select a combination of system under test and test environment for which he executes the test. He is then guided step by step through the manual test. Comments can be added at each step. If the tester is interrupted during the execution of a long test suite, he can stop execution at any time and continue the test suite execution later. |
|
Evaluate |
The Evaluate section provides all functionality for analyzing the project. It provides coarse overview reports in the dashboard, as well as fine-grained information, so that each execution of a test can be traced and visualized. |
|
Configure |
The Configure section contains access to administrative tasks, e.g. the system settings, user management or the import and export of projects. |
The following chapters will describe each category in detail.
This section describes the use of some common features of Klaros-Testmanagement.
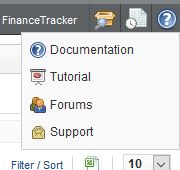
The help menu provides quick links to various Klaros-Testmanagement resources. Pressing the help menu icon opens a menu appears displaying the following links:
The Help Menu
|
Documentation |
Opens up the section of the Klaros-Testmanagement documentation corresponding to the currently displayed page. |
|
Tutorial |
Opens up the Klaros-Testmanagement tutorial. |
|
Message Boards |
Opens up the Klaros-Testmanagement message boards. |
|
Contact Support |
Prepares an e-mail to be sent to the Klaros-Testmanagement support team. This option should be used when experiencing an issue using Klaros-Testmanagement which can't be solved using the documentation or the message boards. |
The log panel shows status messages (like warnings or information) to the user. Initially, only the latest status message is displayed. By clicking on the + icon on the right side of the log panel, all status messages since the last login are displayed. Clicking the x icon closes the log panel. It can be opened again at any time by clicking on the log panel icon in the navigation bar.
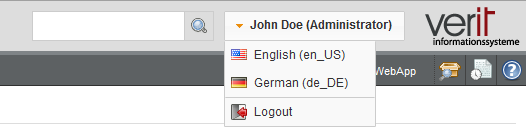
The user menu button on the upper right of Klaros-Testmanagement displays the full name of the user that is currently logged in.
Pressing the user menu button opens up the user menu, where the user can change the language and log out of Klaros-Testmanagement.
Depending on the Klaros-Testmanagement edition, the upper right corner (see Figure 5.8) either contains a search field for fast navigation to elements with a given ID or for a fully featured full-text search in the current selected project. These are described in the following sections.
![]() Feature only available in Klaros-Testmanagement Enterprise Edition
Feature only available in Klaros-Testmanagement Enterprise Edition
The Search field allows the user to search for object ids or words or phrases contained in fields of objects. This search function uses Apache Lucene, which provides a powerful syntax for searching individual fields or with wildcards. This syntax is described on the Apache Lucene website.
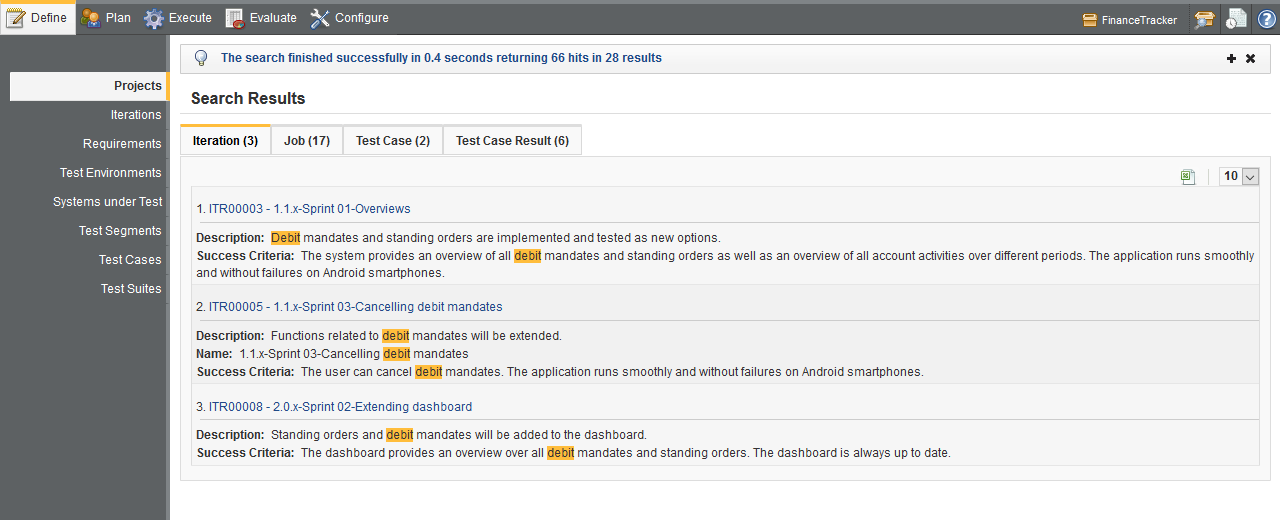
Figure 5.9 shows the Search Results page. This page displays each object containing the search term, and highlights the occurrences.
Figure 5.10 shows the message which appears in the log panel upon completion of a search.
Since the full text search is only available in the Klaros-Testmanagement Enterprise Edition, a quick navigation field for known element ids (like e.g. TC00001) is present in Klaros-Testmanagement Community Edition instead. It currently supports the following element types:
Please note, that ids will usually be searched for in the current project only.
|
Abbrevation Support |
|---|---|
|
It is possible to use case independent abbreviated forms of IDs, eg.
|
It is possible to apply the full text search functionality as shown in Section 5.2.4.1, “Full Text Search” to many list pages as well.
By entering a search term into the the input field above the table all the text fields of the displayed entries are searched for the given search term and the list is filtered accordingly.
It is possible to filter and sort the displayed objects on most pages in Klaros-Testmanagement. The Filter / Sort link above the table opens the panel, which contains two tables. The left-hand table contains the active filters, and the right-hand table contains the active sort orders.
Below the two tables are two buttons:
|
|
The button applies the filters and orders to the table below. |
|
|
The button clears the filters and orders from the table so that the table shows all objects again. |
Each row in the filter table represents a filter which is applied to the table.
Clicking the
![]() icon adds a new, empty filter to the
filter table. Each row has four columns:
icon adds a new, empty filter to the
filter table. Each row has four columns:
The Field column denotes the field in the table that the criterion filters for. The fields which can be filtered in the Filter / Sort panel vary from page to page, but generally include the main attributes of the objects which are displayed, including user defined properties if available.
The Type column denotes the operator that is used for the criterion. The following operators are available in Klaros-Testmanagement:
|
Equals |
Only the items that exactly match the value of the criterion are shown. |
|
Not equals |
The items that do not equal the value of the criterion are shown in the result table. |
|
Greater than or equals |
Items that are greater than or equal the value of the criterion are shown. |
|
Less than or equals |
Items that are less than or equal the value of the criterion are shown. |
|
Greater than |
Items that are greater than the value of the criterion are shown. |
|
Less than |
Items that are less than the value of the criterion are shown. |
|
Like |
Items that have a part that matches value of the criterion are shown. |
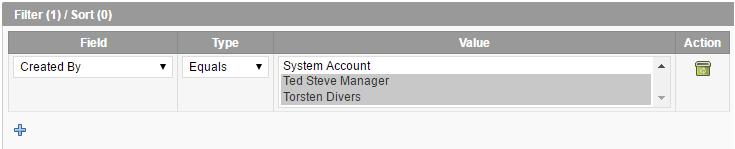
The Value column defines the value for the filtering criterion. This can be a text input field, a boolean selection or a date/time selector. Some fields have instead one or more predefined values available to choose from (e.g. test environments or test case states). In this case one or more of these values can be selected by holding down the button (see Figure 5.12).
The Action column contains a button (
![]() )
for deleting the criterion on the current line.
)
for deleting the criterion on the current line.
The objects displayed in Klaros-Testmanagement can be sorted. The criteria for the sorting are specified in the right-hand table in the Filter / Sort panel. It is possible to specify more than one sorting option.
If there is more than one sorting option, the uppermost row in the sorting criterion table has the highest priority and the lowest row has the lowest priority.
When the
![]() icon is clicked, a new empty row for a sorting criterion is
appended at the bottom of the table. Each row in the sorting options table has a
delete button (
icon is clicked, a new empty row for a sorting criterion is
appended at the bottom of the table. Each row in the sorting options table has a
delete button (
![]() ) in the Action column. Pressing this
button removes the sorting criterion.
) in the Action column. Pressing this
button removes the sorting criterion.
The sorting options table contains three columns:
The Order By column denotes the field in the results table that the sorting applies to. The fields that can be sorted vary from page to page, but generally include most attributes of the objects being displayed.
The Type column defines the direction of the sorting sequence, i.e. descending or ascending.
The Action column contains a button for deleting the sorting criterion.
![]() Feature only available in Klaros-Testmanagement Enterprise Edition
Feature only available in Klaros-Testmanagement Enterprise Edition
Most objects in Klaros-Testmanagement may be viewed on a printer-friendly page. This print page
is viewed by clicking on the print icon
![]() .
This icon appears in the Action column of the table,
above tables with bulk options and as a large icon at the top right of
Details pages.
.
This icon appears in the Action column of the table,
above tables with bulk options and as a large icon at the top right of
Details pages.
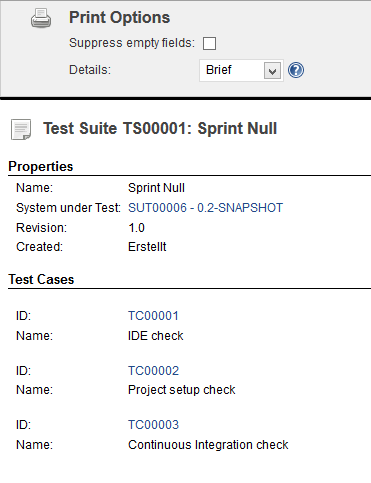
The print page displays all of the fields of the object on a single page. The print pages for objects which contain other objects (e.g. test suites contain test cases) also contain print options at the top. These allow the user to limit the information which is printed, e.g. the Details option on the test suite print page limits the displayed test case information to the ID and Name of the test cases contained in the test suite. By selecting the Suppress empty fields checkbox, all fields which do not contain contents are suppressed from the print view. Figure 5.13 shows the print page for a test suite.
|
Note |
|---|---|
|
The selected print options will preserved during a user session. |
![]() Feature only available in Klaros-Testmanagement Enterprise Edition
Feature only available in Klaros-Testmanagement Enterprise Edition
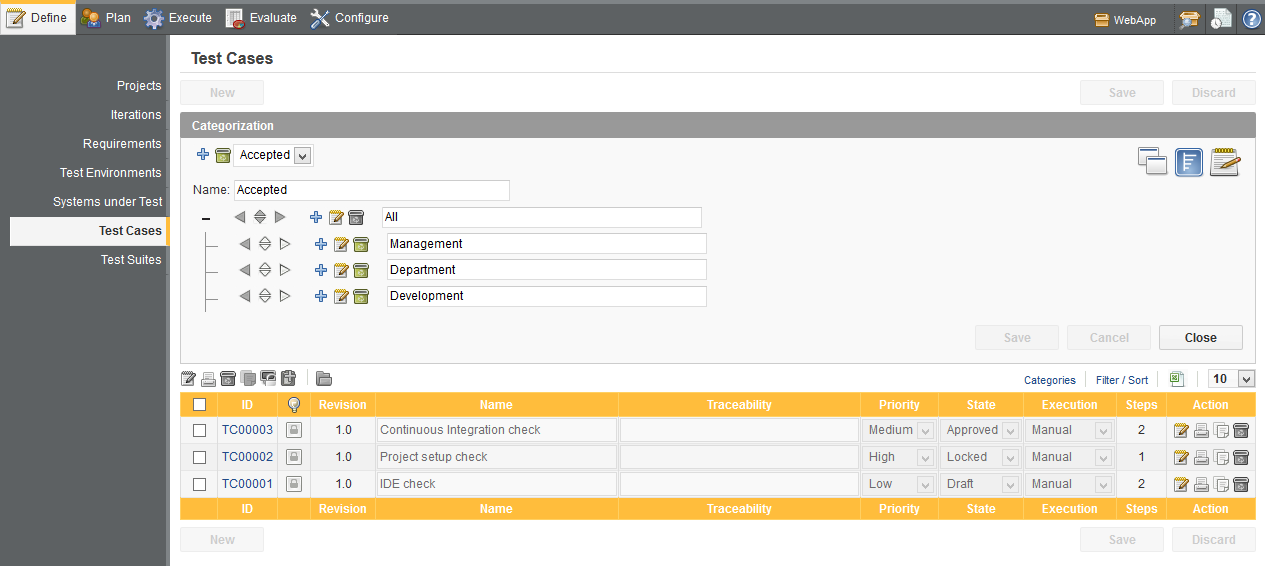
In order to manage a large number of artifacts, it is possible to categorize them using arbitrary criteria. This feature can be used with Iterations, Requirements, Systems under Test, Test Environments, Test Cases and Test Suites. The categorization panel is opened by clicking the Categories link above the table in question.
In the categorization panel, users may create Category Groups and Categories. Objects may be assigned to one category in each group. There is no limit on the amount of categories or category groups which can be created.
In order to apply categorization, the Categories panel must be open. The Categories panel contains 3 different views, the Edit view, the Tree view and the Menu view. If no categories have been defined, only the edit view can be used. Each view allows selection of the active category group through the use of a dropdown menu, or selection of the blank category group to disable categorization.
This view allows the creation and naming of category groups and categories, as
well as the organization of category hierarchies. Pressing the
![]() add button at the top of this view creates a new category group, and enables the use
of the category group dropdown menu. If a category group is selected, it can be
renamed in this view.
add button at the top of this view creates a new category group, and enables the use
of the category group dropdown menu. If a category group is selected, it can be
renamed in this view.
Categories may also be added and edited in this view. Pressing the
![]() add button on a category adds a new sub-category. By default, a new category tree
contains one category, and all future categories are added as sub-categories of
this Root Category.
Categories may be renamed by changing the value in the name field and also given a
description through use of the
add button on a category adds a new sub-category. By default, a new category tree
contains one category, and all future categories are added as sub-categories of
this Root Category.
Categories may be renamed by changing the value in the name field and also given a
description through use of the
![]() edit button.
edit button.
Changing the hierarchy of categories and ordering them is also possible in the editview through use of the arrow buttons.
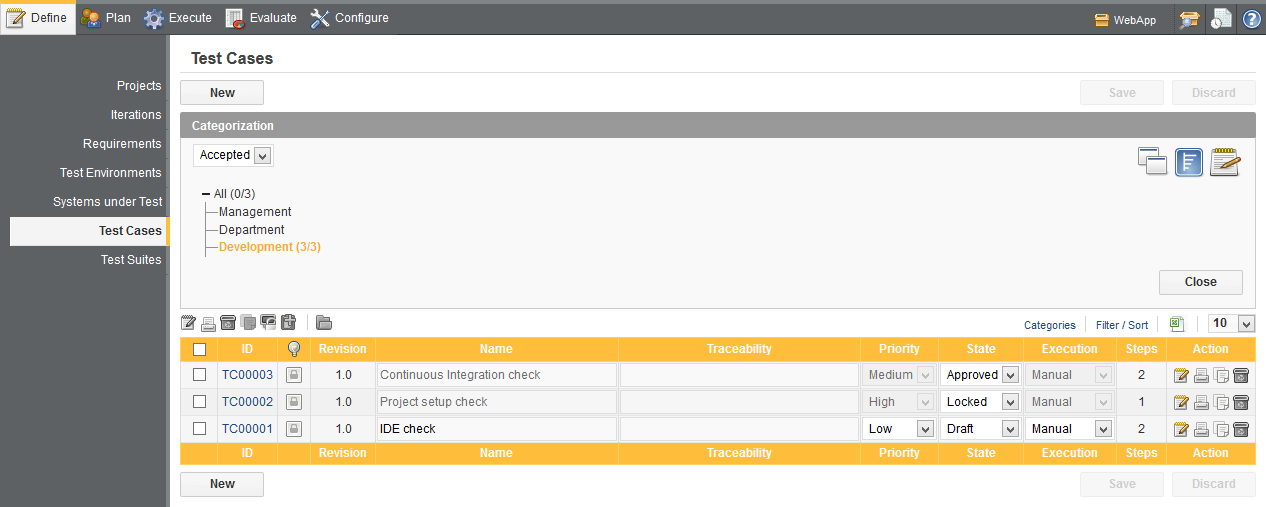
This view shows an overview of the category structure. The available categories are represented as a collapsible tree, with the name of each category is shown, along with the number of objects it contains. The description of each category is shown as a tooltip when its name is hovered over with the mouse pointer.
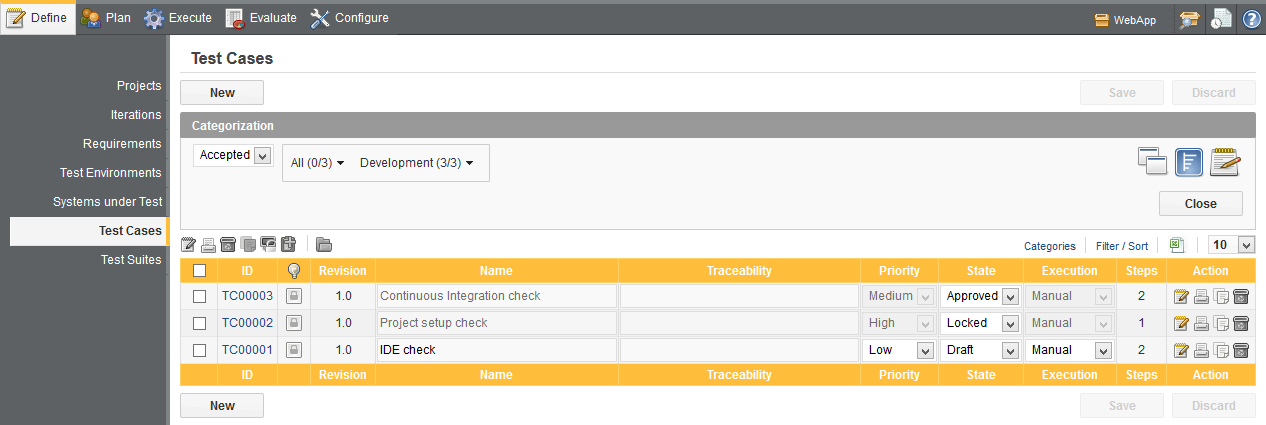
This view allows more compact use of the category panel. It contains a drop-down menu which enables the user to choose any of the available categories, through a submenu system.
It is also possible to move objects between categories. For this the category panel must be open and either the Tree view or the Menu view should be active.
Then select the objects whose category you want to change by first
activating the category to which the objects are assigned and select
the checkboxes to the left of the desired objects. Afterwards,
click on the folder icon
![]() above the table. A pop up window will
appear.
Choose the appropriate category to which you want to
assign the objects and click on the button. Now the
objects are moved to the other category.
above the table. A pop up window will
appear.
Choose the appropriate category to which you want to
assign the objects and click on the button. Now the
objects are moved to the other category.
Please note, you can not assign objects from multiple categories to a single category at once. In case that the desired objects are assigned to different categories you must repeat the step for each category.
Klaros-Testmanagement allows for conflict resolution in a multi-user environment.
When saving an object, Klaros-Testmanagement attempts to automatically resolve any possible conflicts with concurrent changes made by other users. Non-conflicting changes (i.e. any changes made by other users which do not affect fields which the current user has changed will be merged with no additional user input.
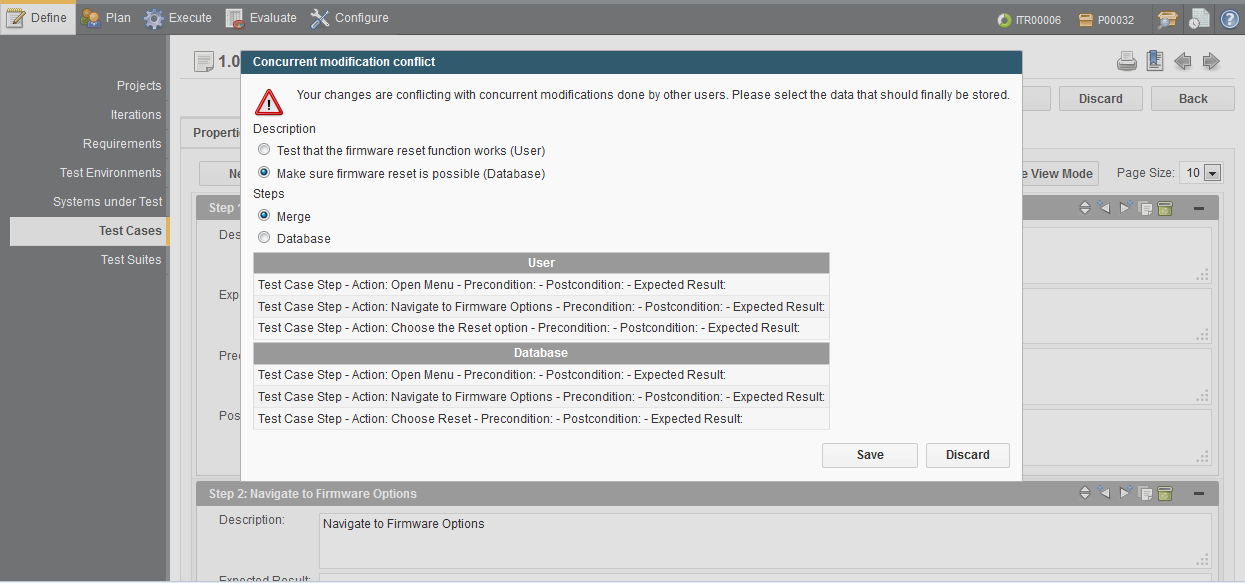
If there are any conflicting changes, i.e. changes to fields which were also changed in the mean time by another user, the Conflict Resolution Dialog will be displayed to allow the user to choose how the conflicts should be resolved.
Figure 5.17 shows the Conflict Resolution Dialog for a conflicting test case change.
For each conflict, the user has the choice of saving the artifact with the value they previously chose or the current value in the database. In the case of lists, e.g. the list of test steps in a test case, the user has the option to Merge the changes or to use the version which is currently in the database. This is to prevent the inadvertent loss of data through the deletion of objects which were added by other users.
The Merge option builds a list containing all of the elements of both lists (user and database) in an approximation of the correct order.
Clicking the button persists the chosen changes to the database, and clicking the button discards the user's changes.
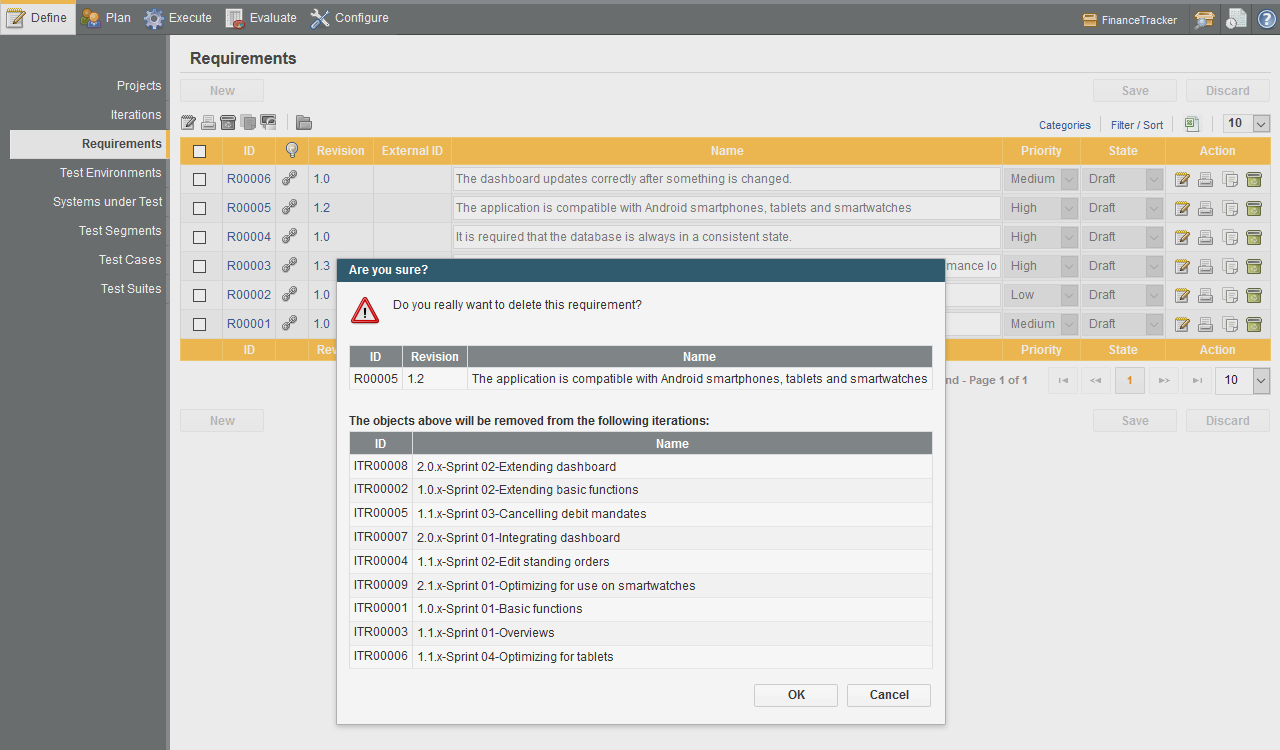
Many objects in Klaros-Testmanagement can be deleted by pressing the
![]() icon. If the object to be deleted is linked to other objects (e.g. a requirement which is
linked to a test case or contained in other objects (e.g. a test case which is
included in a test suite), a popup will be displayed before deleting the object
(see Figure 5.18).
icon. If the object to be deleted is linked to other objects (e.g. a requirement which is
linked to a test case or contained in other objects (e.g. a test case which is
included in a test suite), a popup will be displayed before deleting the object
(see Figure 5.18).
![]() Feature only available in Klaros-Testmanagement Enterprise Edition
Feature only available in Klaros-Testmanagement Enterprise Edition
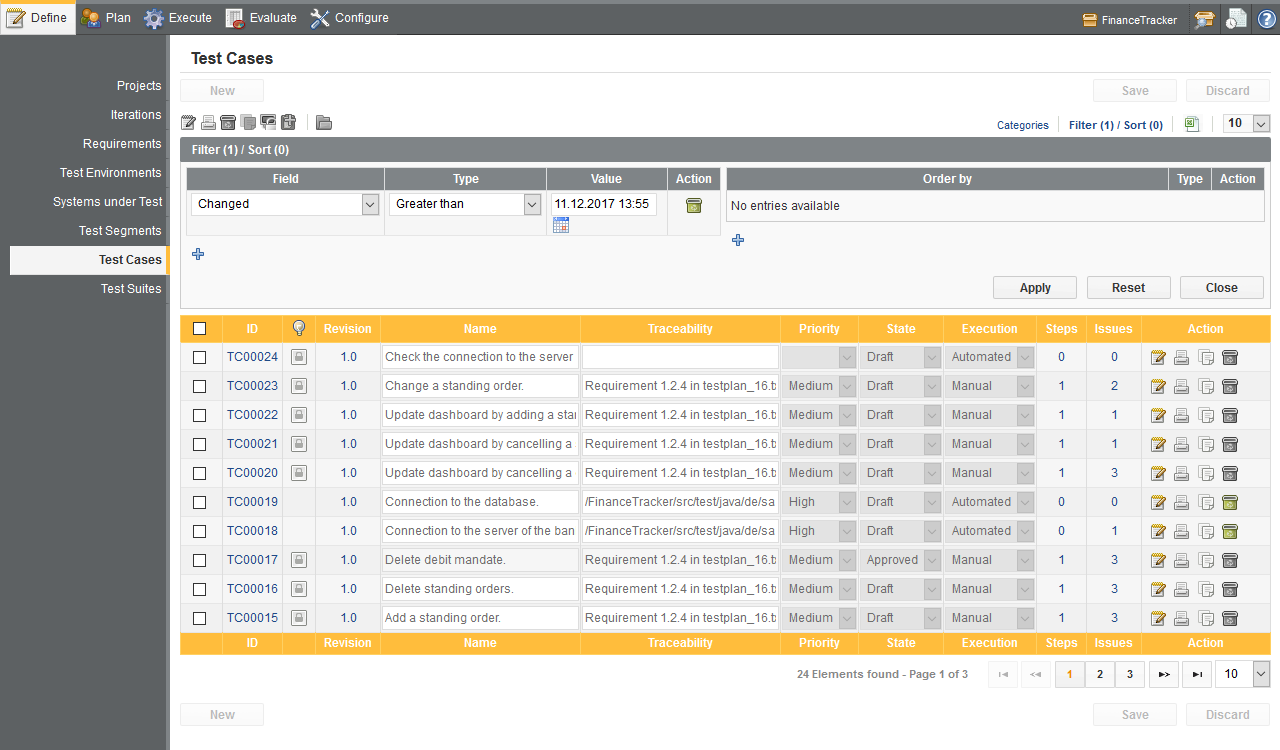
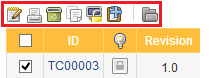
Pages in Klaros-Testmanagement which allow editing of a list of objects often also allow bulk actions on these objects. These allow the user to select multiple entries in the list and, e.g., display the print page for them or delete, duplicate or revision them. Assigning objects to a category is also carried out through a bulk action.
In order to use a bulk action, the user must first select one or more objects in the list using the check-boxes to the left of the table. The buttons above and to the left of the table then become active. Figure 5.19 shows the bulk action buttons on the test case list page.
Before any bulk action is carried out all changes must be saved. A save changes dialog appears if a bulk action button is pressed while there are unsaved changes.
A bulk action confirmation dialog is displayed once a bulk action button has been clicked and any changes have been saved. These dialogs describe the action which will be carried out and sometimes contain input fields, e.g. to enter the revision comment for the bulk new revision action. All changes are written to the database as soon as this dialog is confirmed.
![]() Feature only available in Klaros-Testmanagement Enterprise Edition
Feature only available in Klaros-Testmanagement Enterprise Edition
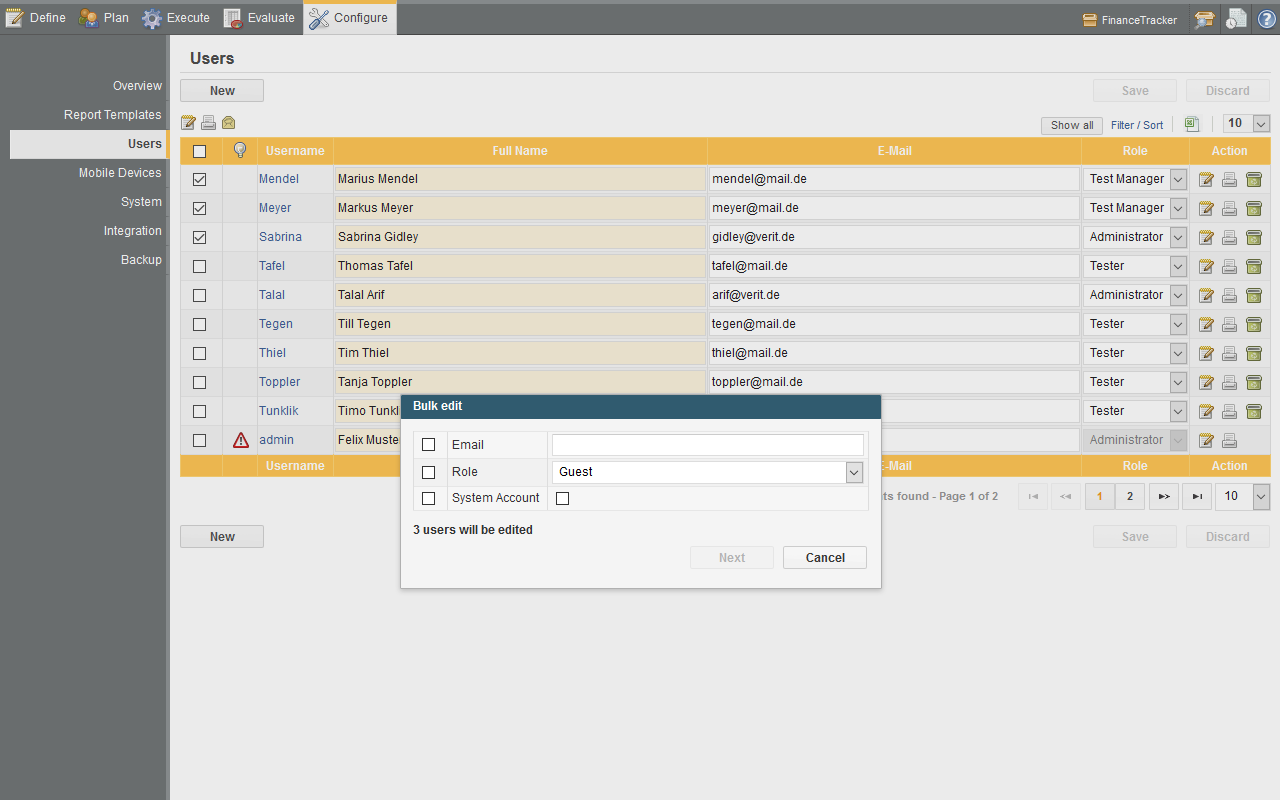
It is possible to bulk edit objects in Klaros-Testmanagement.
Pressing the
![]() bulk action icon opens up a popup where fields of multiple
objects can be edited at once (See
Figure 5.20).
bulk action icon opens up a popup where fields of multiple
objects can be edited at once (See
Figure 5.20).
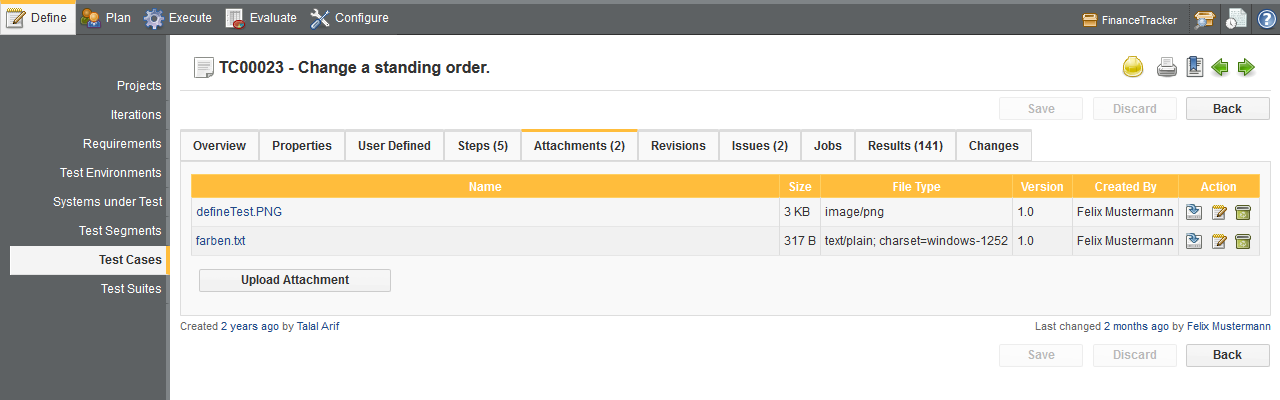
Attachments may be uploaded and linked to certain objects within Klaros-Testmanagement. This can be done within the Attachments tab on the relevant details page or during execution of a test case. Clicking the button opens the upload attachment dialog. Clicking the Browse... button opens the Open File dialog, which allows the user to select a file to upload. Clicking the button uploads the selected file to Klaros-Testmanagement.
After the attachment is saved, it is possible to download the file by clicking on the
![]() icon.
icon.
Clicking on the
![]() icon causes the attachment to be removed from the
Klaros-Testmanagement database. The Save button must be pressed to persist
this change.
icon causes the attachment to be removed from the
Klaros-Testmanagement database. The Save button must be pressed to persist
this change.
![]() Feature only available in Klaros-Testmanagement Enterprise Edition
Feature only available in Klaros-Testmanagement Enterprise Edition
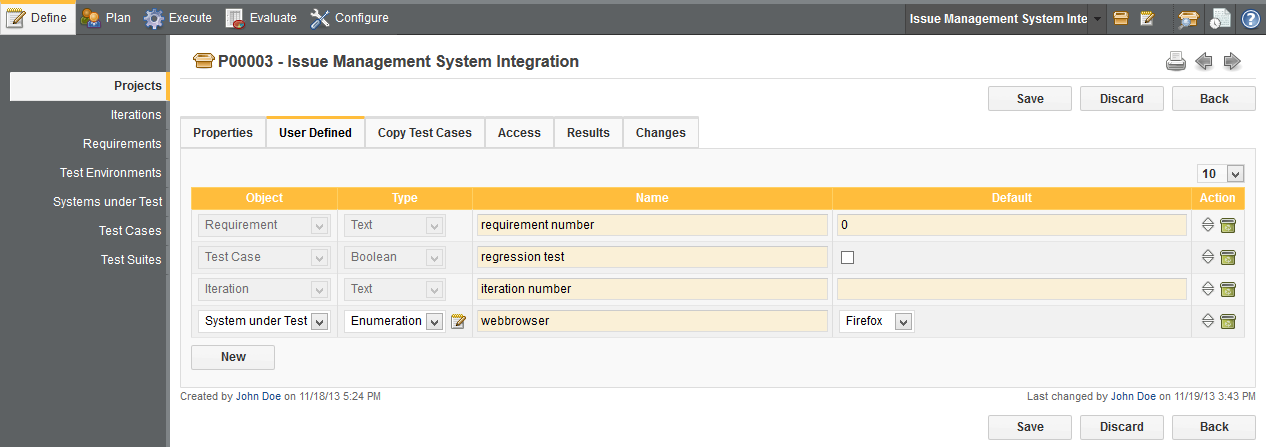
In Klaros-Testmanagement, Iterations, Requirements, Test Environments, Systems under Test, Test Cases, Test Suites and Test Runs can all be extended by extra fields using user defined properties. These are defined on a per project basis in the User Defined tab of the Project Details page. This tab is shown in Figure 5.22.
Pressing the button adds a new user defined property to the list. After adding a new property, the entity and property type must be chosen.
There are seven possible entity types:
Iteration
Job
Requirement
System under Test
Test Environment
Test Case
Test Suite
Test Run
The four possible property types are:
|
Text |
The property will be a single-line text field |
|
Text Field |
The property will be a multi-line text field |
|
True/False |
The property will be a simple check box |
|
Enumeration |
The property will be a drop down box to select a single entry from a predefined list of values |
The default value of the property can also be set here.
After the new property is saved the entity type and property type can no longer be changed. The name of the property and the list of enumeration values can always be changed.
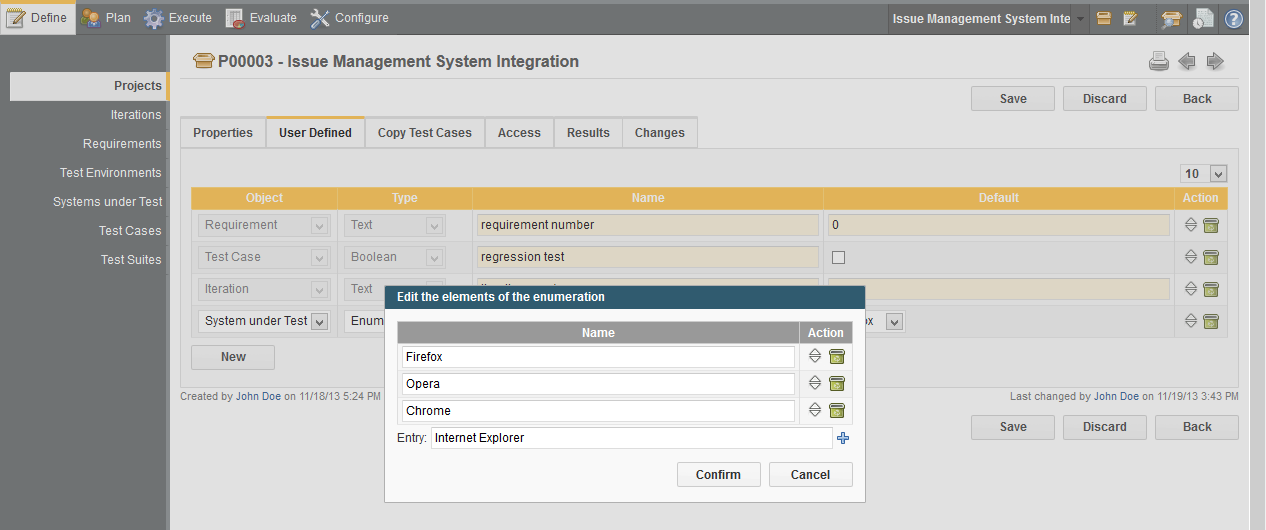
The button beside the enumeration property names opens the menu to edit the values of the enumeration property as shown in Figure 5.23
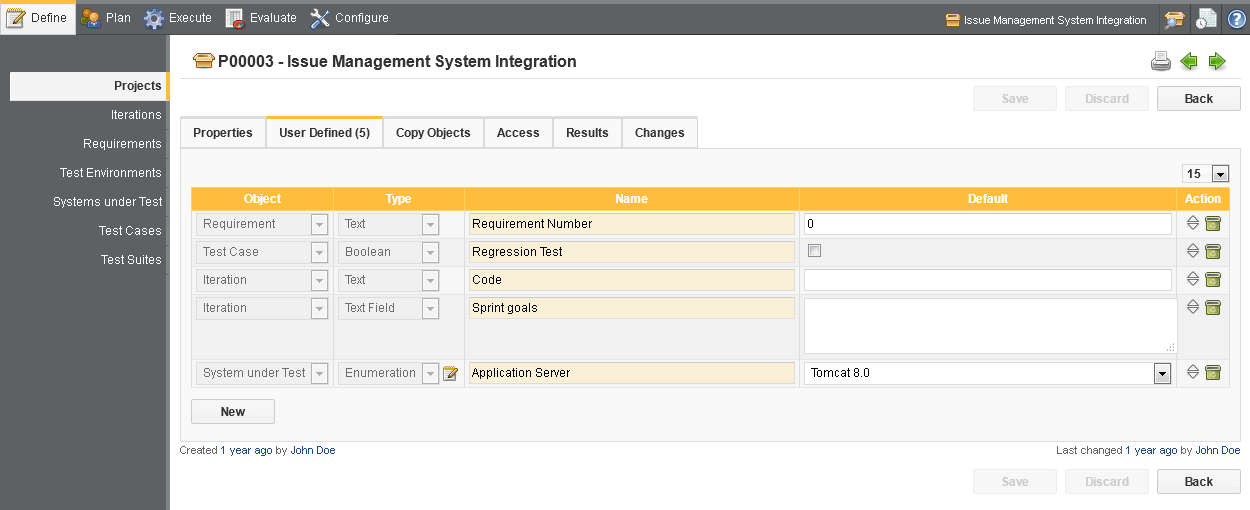
Once user defined properties are configured, they can be edited in the User Defined tab of the relevant object ( Figure 5.24).
|
Note |
|---|---|
|
If no user defined properties are configured for the object type, this tab will only contain a link to the project's user defined tab in order to create some. |
The values of user defined properties for test runs are set in the execute dialog as shown in Figure 8.3.
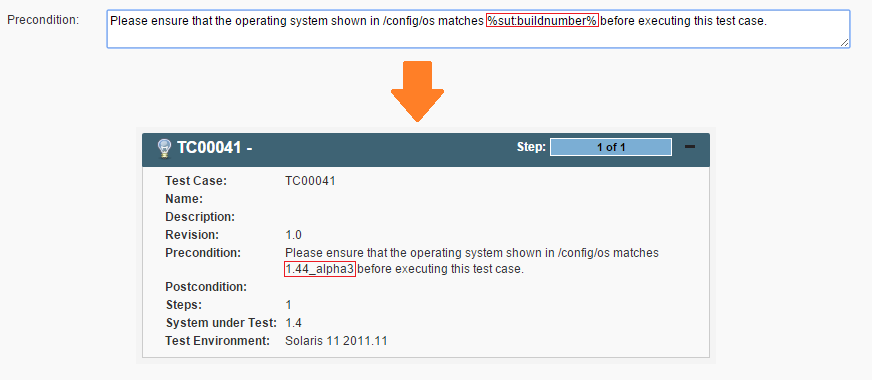
Common and user defined properties ( Section 5.2.13, “User Defined Properties”) can be referenced and resolved in the displayed text fields while executing jobs, test cases or test suites. For example, the following test case precondition references the system under test in which it is executed:
"Please ensure that the operating system shown in /config/os matches %sut:buildnumber% before executing this test case."
When executing this test case, %sut:buildnumber% gets replaced by the value of the user defined property "buildnumber" of the system under test in which the test case is executed. Assuming the this value equals "1.44_alpha3" the text is rendered as follows:
"Please ensure that the operating system shown in /config/os matches 1.44_alpha3 before executing this test case."
Propery substitution is supported both for the common pre-defined attributes of an artifact (e.g. the name or id) as well as the user defined properties. The name of the common attributes can be derived from the corresponding bean methods defined in de.verit.klaros.core.model.
Properties of the following artifacts are currently supported:
Supported Artifacts
|
Iteration |
itr
|
|
Job |
job
|
|
System under Test |
sut
|
|
Test Case |
tc
|
|
Test Environment |
env
|
|
Test Run |
tr
|
|
Test Segment |
seg
|
|
Test Suite |
ts
|
Assume that the following example text is used in the test case precondition:
"Please make sure that your system under test is using version %sut:productversion%."
The attribute name productversion is found in the class documentation for the
SUTImplementation class in
de.verit.klaros.core.model.KlarosSUTImplementation
. Given that the version defined there has a value of 1.0.1,
the following output will be rendered when displaying the precondition:
"Please make sure that your system under test is using version 1.0.1."
![[Tip]](images/tip.png) |
Property references are case insensitive! |
|---|---|
|
The left-hand side of a reference is case insensitive. %sut:productversion%, %SUT:productversion% and %Sut:productversion% will yield the same result |
Similar to referencing user defined properties in test case and test case steps ( Section 5.2.14, “Referencing Artifact Properties”), values from binary attachments can be referenced as well. Currently CSV and XLS files are supported.
Binary attachments of the following artifacts are currently supported:
Supported Artifacts
|
Iteration |
itr-att |
|
Job |
job-att |
|
System under Test |
sut-att |
|
Test Case |
tc-att |
|
Test Environment |
env-att |
|
Test Run |
tr-att |
|
Test Segment |
seg-att |
|
Test Suite |
ts-att |
In addition to the above, the wildcard att can be used, which Klaros-Testmanagement tries to resolve to a binary attachment parsing all contemplable artifacts.
A placeholder can be defined in the form %[object type]:[file name]:[column]:[row]% using the following parameters:
Placeholder Parameters
|
[object type] |
The type of the object that is holding the binary attachment. |
|
[file name] |
The name of the binary attachment. |
|
[column] |
The column number of the value of the binary attachment. |
|
[row] |
The row number of the value of the binary attachment. |
|
Note |
|---|---|
|
When referencing xls-files, cells can be addressed using Excel-Coordinates (e.g. C1 or AB24). This shortens the placeholder to %[object type]:[file name]:[coordinate]% . |
The file name, column and row parameters can also be defined using user defined properties, e.g. %itr-att:customers.csv:%job:Customer%:%job:CustomerNr.%% will reference the customers.csv attachment of the current iteration, using the value in the column defined in the attribute Customer of the current job and the row defined in the attribute CustomerNr.
|
Attachment references are case insensitive! |
|---|---|
|
The left-hand side of an attachment reference is case insensitive. %itr-att:customers.csv:A1%, %ITR-att:customers.csv:A1% and %ITR-Att:customers.csv:A1% will yield the same result |
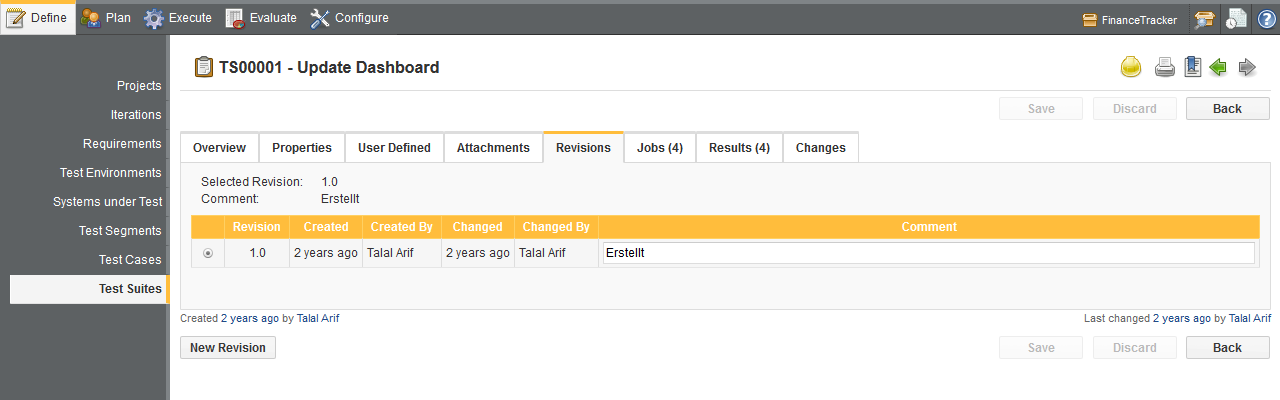
Requirements, Test Cases, Test Segments and Test Suites are revisionable artifacts.
A new revision of an object should be created when a major edit is taking place. An old revision of a test case can, for example, be executed when using a system under test where newly added test steps are not applicable.
Revisioning of objects can be managed from the tab. This tab shows the revision history for the object, allows the user to change the revision comment associated with each revision and also allows creation of new revisions. The revision history table may also be used to select a revision to display and edit.
In many cases Artifacts will be related to other artifacts. Some artifacts like e.g. Test Cases or Requirements may exist in different revisions, so one revision of an artifact can be referenced by any revision of other artifacts. Every revision of an artifact may contain its own references to other artifacts, regardless of the relationships of the other revisions. In addition every revision of an artifact can be related to one or more specific revisions of another artifact.
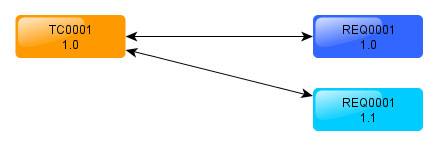
Example: Given is one Test Case: TC0001 and the Requirement REQ0001. Requirement REQ0001 is covered by the Test Case TC0001. Both are still in the initial revision 1.0.

Now a new Revision 1.1 of Requirement REQ0001 is created which is also covered by Test Case TC0001. So TC0001 is now covering the Requirement REQ0001 in both revisions.
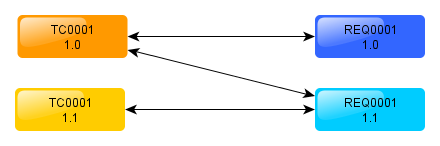
Next, a new Revision of Test Case TC0001 is created, since Revision 1.0 of Requirement REQ0001 has become obsolete. Therefore Revision 1.1 of the Test Case will only reference the newest Revision of the Requirement.
After creating the new Revision of Test Case TC0001, we discover that Requirement REQ0002 is also covered by this Test Case Revision. Therefore, we add further coverage between REQ0002 and the Test Case TC0001 in Revision 1.1.
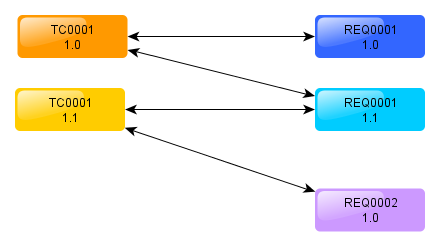
This example shows, that although the Test Case and the Requirement are the same Artifacts, their relationship can change over their revision history. References are defined per revision, and so can be different with each revision. This does not only apply to Test Cases and Requirements, but also for other revisionable Artifacts like Test Suites or Test Segments.
![]() Feature only available in Klaros-Testmanagement Enterprise Edition
Feature only available in Klaros-Testmanagement Enterprise Edition
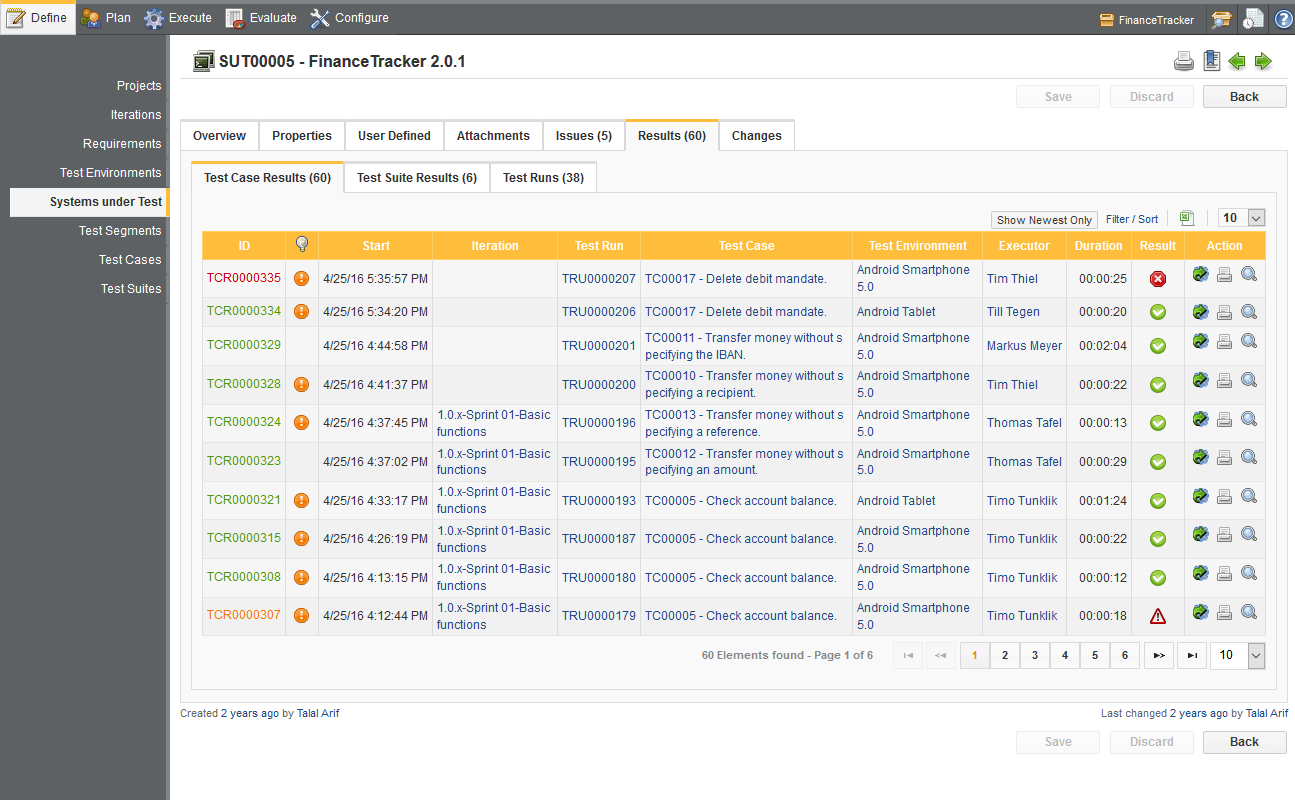
Some Details sections show test runs and test results which are related to the artifact being displayed, e.g. executed in the displayed test environment or executed by the displayed user. An example of a Test Results tab is shown in Figure 5.27.
In both of these tabs, the names of artifacts are links to the Details Pages
of the artifacts.
The
![]() icon displays the Details Page of the corresponding test run
or test result.
icon displays the Details Page of the corresponding test run
or test result.
In the Test Runs tab ( Figure 5.27), reports may also be generated, as described in Section 9.4, “Test Runs”.
![]() Feature only available in Klaros-Testmanagement Enterprise Edition
Feature only available in Klaros-Testmanagement Enterprise Edition
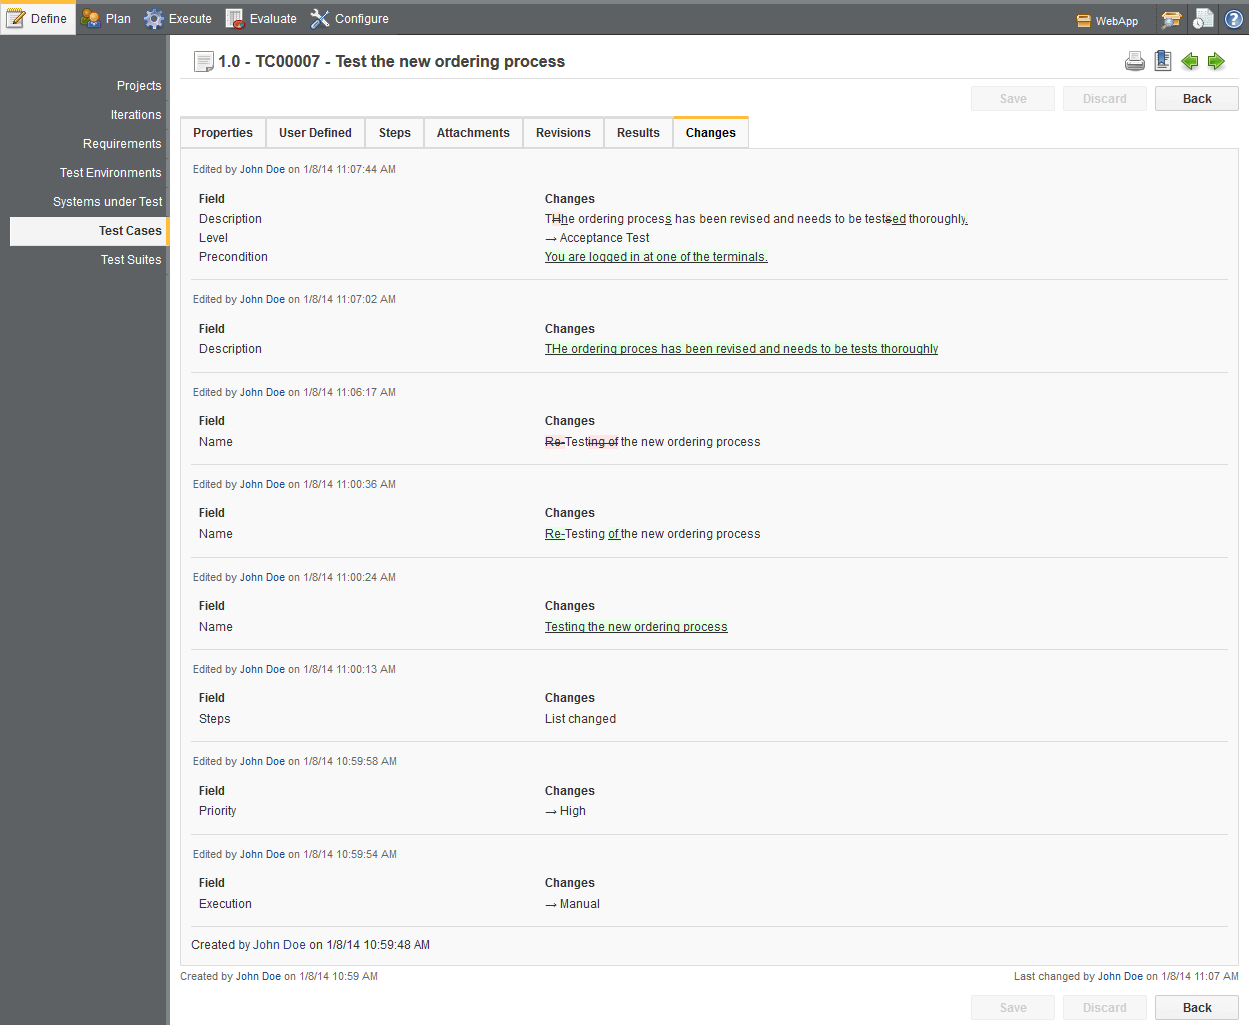
The Details section of each editable object in Klaros-Testmanagement contains a Changes tab. This shows the change history for the object.
Figure 5.28 shows the Changes tab for a test case.
Changes to an object are grouped by edit, i.e. if a user changes two fields and then presses save, the changes to these to fields will be grouped in the Changes tab.
![]() Feature only available in Klaros-Testmanagement Enterprise Edition
Feature only available in Klaros-Testmanagement Enterprise Edition
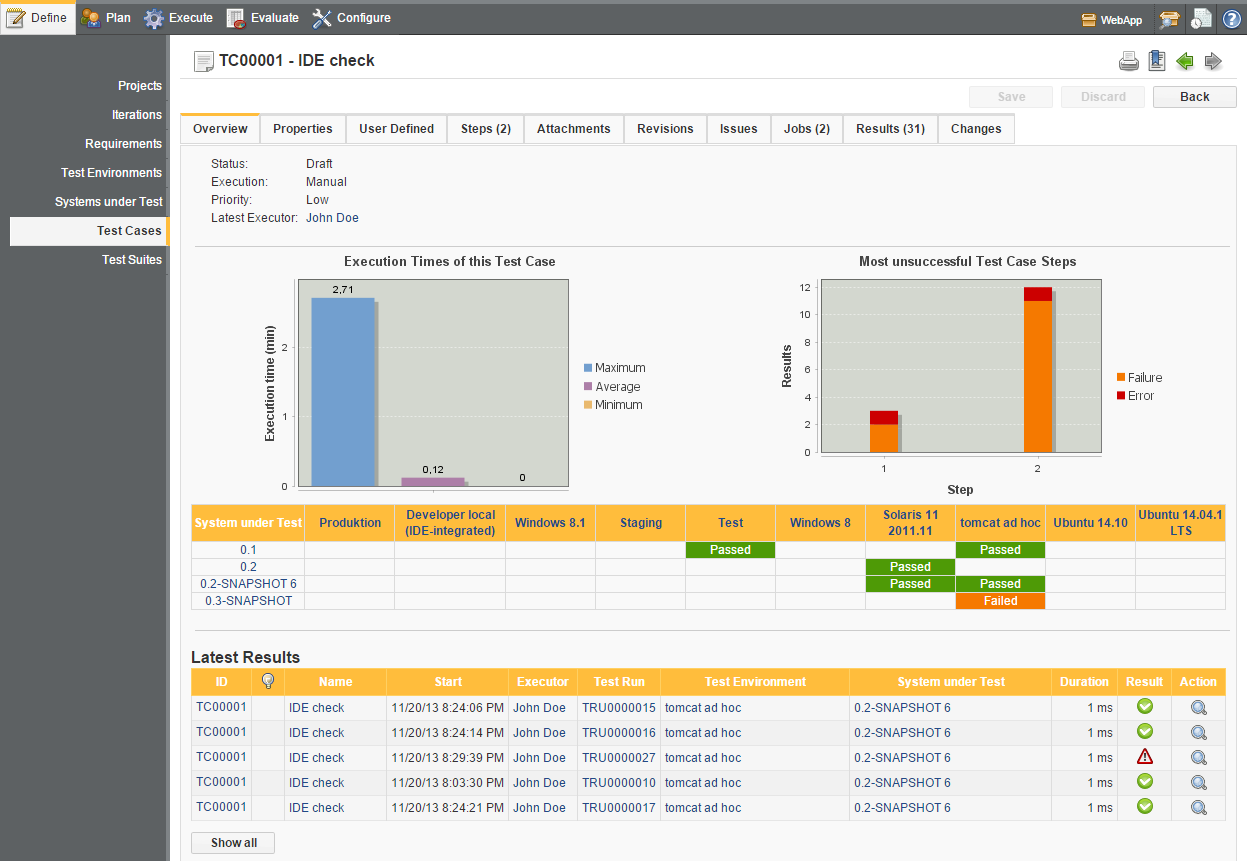
For every type of artifact in Klaros-Testmanagement there is a dedicated overview tab which shows the most important data for this artifact (like the last editor or the the status) at a glance. In addition to raw data, many overview pages are enriched with various useful statistics, like for example the success history for test suites, which helps visualizing the test progress.
|
|
|
|
| Chapter 4. Customization |  |
Chapter 6. Define |