| 10.5. Integration | ||
|---|---|---|

|
Chapter 10. Configure |  |
| 10.5. Integration | ||
|---|---|---|
|
|
Chapter 10. Configure | |
This page contains the settings for integration of Klaros-Testmanagement with external tools and infrastructure. It contains six tabs, Issue Management, Requirements Management, E-Mail, Network, LDAP and CAS.
Clicking the button persists the changes to the Klaros-Testmanagement properties file, and clicking discards all changes.
An Issue Management System (aka Issue Tracker, Bug Tracker) is a software package that manages and maintains issues occuring during the testing process. Issues may contain reports about defects in a software system or other observed information.
Klaros-Testmanagement is capable of creating and retrieving entries in remote issue management systems and assigning them to failed test results. It is possible to configure and simultaneously use multiple issue management systems.
Currently Klaros-Testmanagement supports the following issue management systems:
Bugzilla (a free open source issue management system, see
http://www.bugzilla.org/)
GitHub (a web-based Git repository hosting service offering both plans for
private repositories and free accounts,
which are usually used to host open-source software projects., see
http://github.com/)
GitLab is a web-based DevOps lifecycle tool that provides a Git-repository manager providing wiki,
issue-tracking and CI/CD pipeline features, using an open-source license, see
http://gitlab.com/)
Jira (a commercial issue management system produced by Atlassian Pty Ltd., see
http://www.atlassian.com/)
Mantis (a free open source issue management system, see
http://www.mantisbt.org/)
Redmine (a free open source issue management system, see
http://www.redmine.org/)
Trac (a free open source issue management system, see
http://trac.edgewall.org/)
![[Caution]](images/caution.png) |
Remote System Configuration may be Required |
|---|---|
|
Please refer to Section 3.12, “Configuring External Issue Management Systems” for detailed information on prerequisites for the different issue management systems. Some systems need to be configured before they can be connected to. |
![[Important]](images/important.png) |
Token based authentication (Jira Cloud instances, GitLab) |
|---|---|
|
Some Vendors like Jira and GitLab limit access to their instances to token based authentication, so authenticating via username and password is no longer supported. Klaros-Testmanagement is supporting token based authentication scheme as well. Just use an empty username and the token as password. |
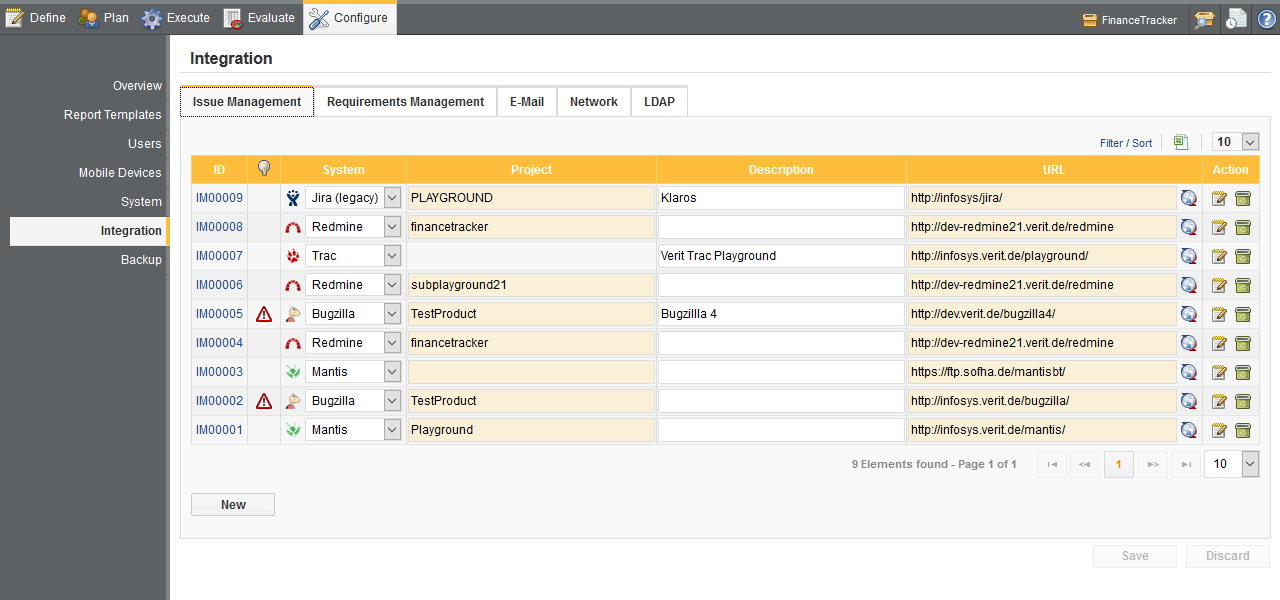
These issue management systems are configured in the Issue Management section in the Configure menu. The page is shown in Figure 10.18, “The Issue Management Tab”.
The issue management systems sections shows all of the configured systems in a single table. The properties of each entry can be changed directly in the table.
The properties of the issue management system are:
|
ID |
The internal id of the issue management system. This property is assigned automatically and cannot be altered by the user. |
|||
|
Info |
If the deletion of an issue management system is prohibited since there are
test case results assigned to issues in the issue management system, the info
column shows a
To enable background synchronisation of issues it is required that credentials are
configured for the issue management system via the (
|
|||
|
System |
The system column indicates which issue management system is used. Currently Klaros-Testmanagement supports Jira (4.3 or newer), Jira Legacy (4.2 or lower), Trac, Mantis, Redmine and Bugzilla. |
|||
|
Project |
If the issue management system organizes Issues in projects, it is possible to specify the project id where the new Issues should be created in the system. Jira, Redmine, Mantis and Bugzilla manages their issues in different projects. For Trac, the URL is used to specify different projects. |
|||
|
Description |
In the Description field a description of the issue management system can be entered. |
|||
|
URL |
In the URL field the link to the issue management system is specified. To check if the URL is valid, the Validate the URL button on the right of the URL field can be pressed. If the URL to the issue management system is configured correctly, a confirmation message will be displayed in the message area.
|
|||
|
Action |
The action column contains a button that can be used to delete an system from the configuration. If the issue management system is unused, i.e. it is not used in any project, the configuration of the system can be deleted. |
![[Tip]](images/tip.png) |
Project selection |
|---|---|
|
The valid project ID values can be found in the issue management systems at the following locations. |
|
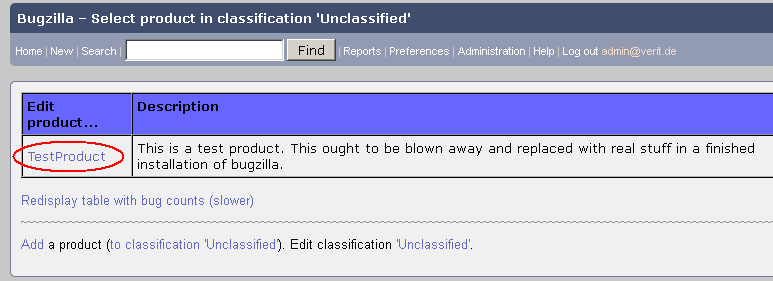
Bugzilla Project ID |
The Bugzilla Project ID consists of the
|
|
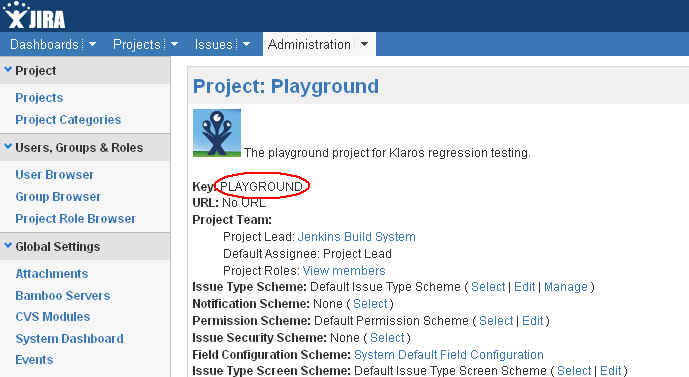
Jira Project ID |
The Jira Project ID consists of the |
|
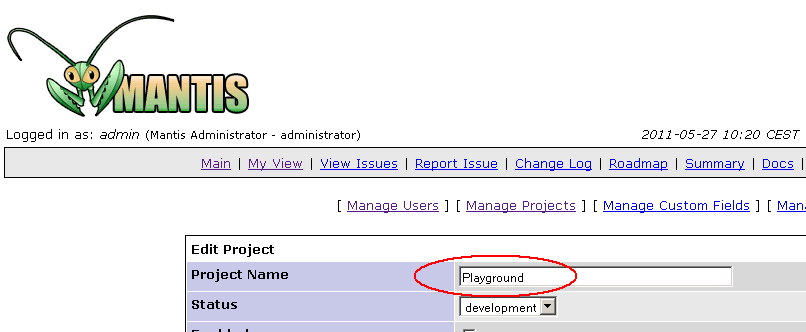
Mantis Project ID |
The Mantis Project ID consists of the
|
|
Redmine Project ID |
The Redmine Project ID consists of the
|
To add a new issue management system, click the button. An empty row will be added to the list of issue management systems.
Clicking the button submits the changes while clicking the button discards them.
The configuration of an issue management system can be changed by editing the fields in the table.
Clicking the button submits the changes while clicking the button discards them.
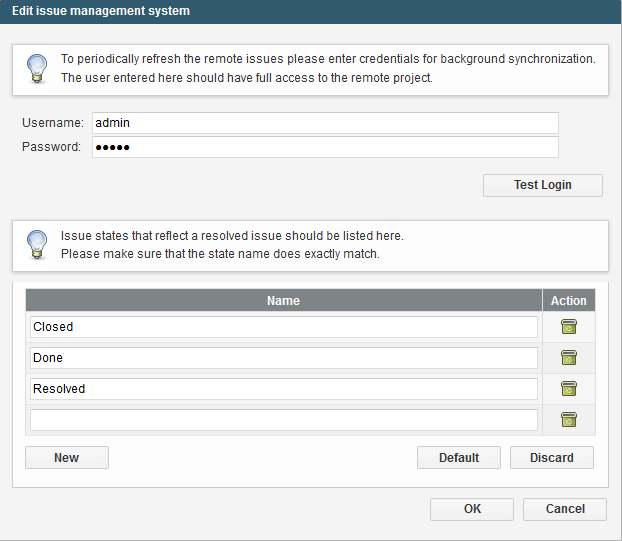
Every issue has a status field, documenting the current state of the issue. Some of these states may reflect that an issue is still open, others indicate that it is resolved. An issue is usually resolved when it has been worked on and/or fixed otherwise it is still open.
Every issue management system or project may define different entries for the issue status field, which may also depend on the localization settings. Klaros-Testmanagement only distinguishes between open and resolved issues. To identify the resolved issues properly, it may be necessary to define the names of the resolved issue states.
Through out the application, the resolved issues will be colored in green to identify them as resolved. Section 9.8.2.2, “Issues by Test Case Details”
It is possible to define the resolved state names individually for each issue
management system
in Klaros-Testmanagement. This can be done by pressing the
![]() button
of the issue
management system in the action column.
button
of the issue
management system in the action column.
The resolved issues states have to be named exactly like the states in the used issue management system or else they can't be identified properly and will be counted as open issues.
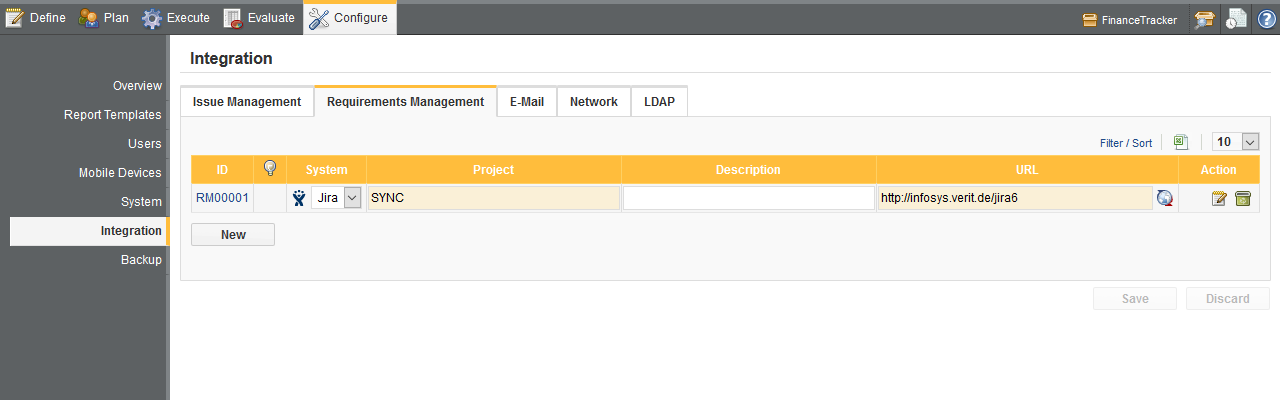
The requirements of a project in Klaros-Testmanagement can be managed either locally or remote.
Local Requirements Management
As per default, managers can create, edit and delete requirements for a project from within Klaros-Testmanagement.
Remote Requirements Management
A project can also be configured to receive its requirements from an external requirements management system (RMS). If a project is configured that way, the creation, editing and deletion of requirements can only be done via the connected RMS.
Currently Klaros-Testmanagement supports the following requirements management systems:
Jira 4.3 or newer (a commercial issue management system produced by Atlassian Pty Ltd., see
http://www.atlassian.com/)
Pressing creates a new connection to a remote requirements management system.
The properties of the requirements management system are:
|
ID |
The internal id of the requirements management system. This property is assigned automatically and cannot be altered by the user. |
|||
|
Info |
To enable background synchronisation of issues it is required that credentials are
configured for the requirements management system via the (
|
|||
|
System |
The system column indicates which issue management system is used. Currently Klaros-Testmanagement only supports Jira 4.3 or newer. |
|||
|
Project |
This is the id of the Jira project from which to receive the requirements from. |
|||
|
Description (Optional) |
In the Description field a description of the requirements management system can be entered. |
|||
|
URL |
In the URL field the link to the requirements management system is specified. To check if the URL is valid, the Validate the URL button on the right of the URL field can be pressed. If the URL to the requirements management system is configured correctly, a confirmation message will be displayed in the message area.
|
|||
|
Action |
The action column contains a button that can be used to delete an system from the configuration. If the requirements management system is unused, i.e. it is not used in any project, the configuration of the system can be deleted. |
![[Note]](images/note.png) |
Snychronizing Attachments |
|---|---|
|
When connected to a Jira server, attachments from its requirements are automatically transferred to Klaros-Testmanagement during synchronization. |
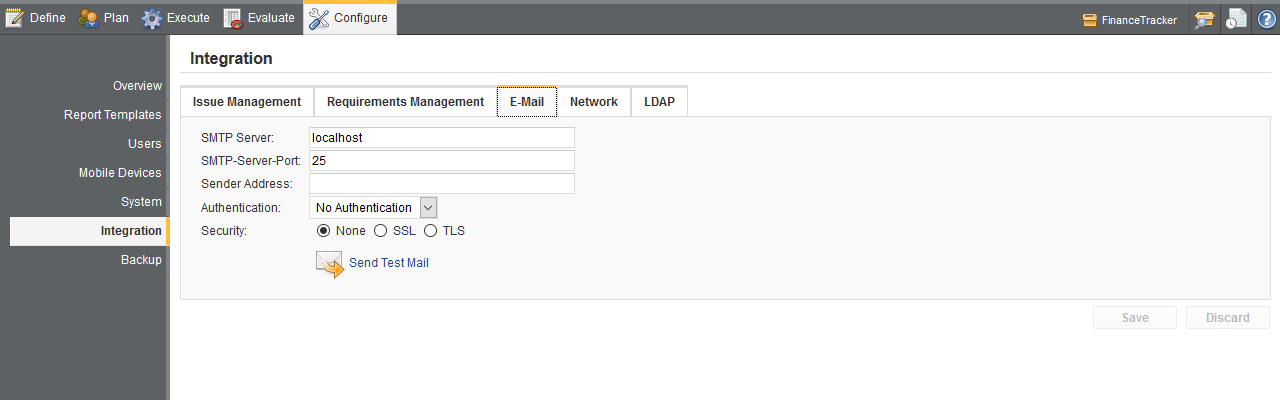
In the E-Mail tab it is possible to change the e-mail server settings of the application. The E-Mail server settings are required for sending notification emails configured in Section 10.4.2, “Notification Settings”. The attributes which can be edited are shown in Figure 10.25.
|
Note |
|---|---|
|
Please consult your system administrator about the values to enter here. |
|
SMTP Server |
The host name of your mail server. |
|
SMTP Server Port |
The port where your mail server is listening. This value usually depends on the security setting chosen below. The default value is 25 for no security. |
|
Sender Address |
The From address field of the mails generated by the application. |
|
User Name |
A user name needed to authenticate against the SMTP server. This field is only present if SMTP or POP authentication is selected in the Authentication field below. |
|
Password |
A password needed to authenticate against the SMTP server. This field is only present if SMTP or POP authentication is selected in the Authentication field below. |
|
Authentication |
Some mail servers require users to authenticate themselves before they allow them to send mails to prevent or identify spammers. This option chooses whether no authentication is required, or a username / password combination via SMTP or POP is used. If one of the latter two is selected the User Name and Password fields are shown in the user interface. |
|
Security |
This setting defines the transport layer security used to access the SMTP mail server. Each transport security setting may require a different port value above. The options are None (Port 25), Secure Socket Layer / SSL (Port 465) or Transport Layer Security / TLS aka STARTTLS (Port 25). Your local port settings may vary from the given defaults. |
|
Send Test Mail |
This link sends a test email to verify that your mail server settings are valid. Therefore it is required that your user account contains a valid email address. |
Click the Send Test Email link to test if the fields are filled in properly.
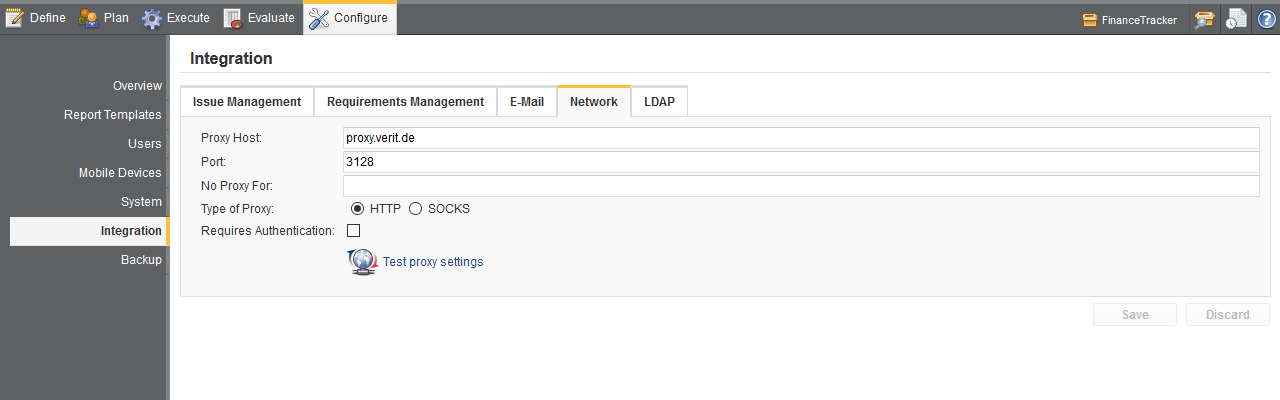
Klaros-Testmanagement supports the use of HTTP and SOCKS proxies for network connections. Proxy settings are configured in the Network section of the configure menu. The network page is shown in Figure 10.26, “The Network Tab”.
|
Application URL must be set |
|---|---|
|
If Klaros-Testmanagement is run behind a proxy, the Application URL must be set in order to view some images within Klaros-Testmanagement properly. The Application URL can be set in the Miscellaneous tab of General Settings (see Section 10.4.1, “Miscellaneous Settings”). |
The properties of a proxy are:
|
Proxy Host |
The network address or hostname of the proxy server. |
|
Port |
The port that the proxy server is active on. |
|
No Proxy for |
A |-separated list of domains which should bypass the proxy settings. |
|
Type of Proxy |
Whether the proxy is a HTTP proxy or a SOCKS proxy. |
|
Requires Authentication |
Whether or not the proxy requires authentication. |
|
Username |
The username to use for username/password authentication. |
|
Password |
The password to use for username/password authentication. |
In addition, proxy settings can be tested by clicking the
![]() icon.
icon.
![]() Feature only available in Klaros-Testmanagement Enterprise Edition
Feature only available in Klaros-Testmanagement Enterprise Edition
|
Note |
|---|---|
|
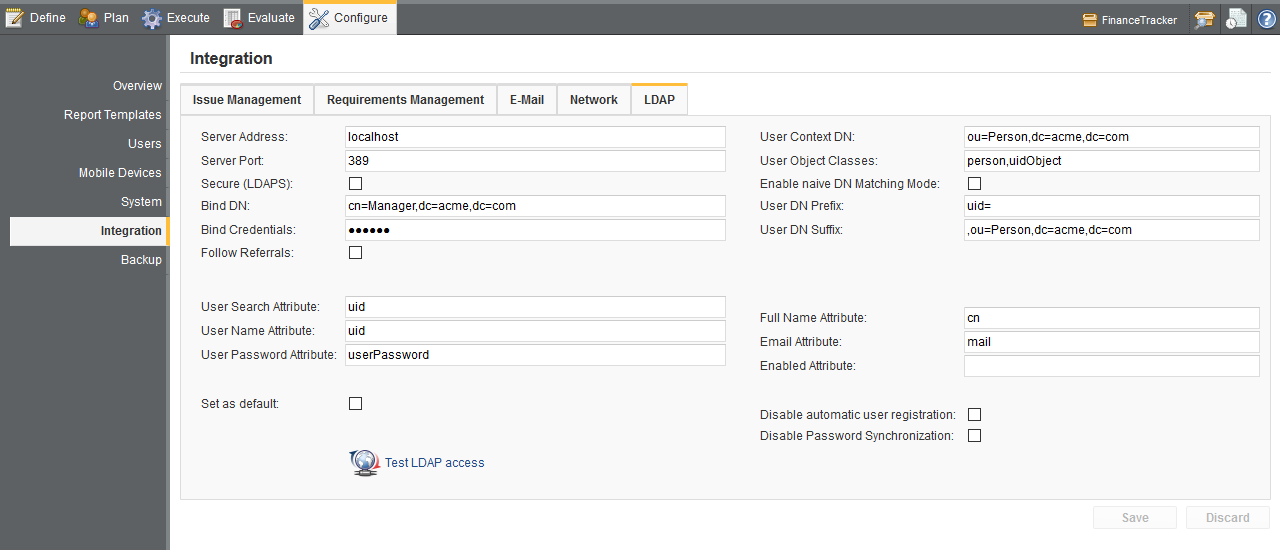
In order to access an LDAP or Active Directory server, a rather large set of configuration parameters is required. Your system administrator should be able to help you by providing the correct values. |
Parameters needed to contact the LDAP server:
Server Address
The URI under which the LDAP server resides (e.g. ldap.acme.com).
Server Port
The port on which the LDAP server is listening (typically 389 for non-secure connections or 686 for LDAPS).
Secure
If this option is enabled, the LDAPS protocol is used.
Bind DN
The distinguished name used for binding to this LDAP server.
Bind Credentials
The credentials (password) required to be able to bind to this LDAP server.
Follow Referrals
If this option is enabled, searching a directory automatically follows any referrals the server might return. When disabled referrals will be ignored and other servers will not be contacted during the search.
Parameters needed to locate user accounts:
User Context DN
The distinguished name under which user accounts will be searched (e.g.
ou=Users,dc=verit,dc=de).
User Object Classes
A comma separated list of the LDAP object classes a user account must
match to be included in the search (e.g. person,posixAccount).
Enable naive DN Matching Mode
If this option is enabled, a returned DN of a user search is used to identify the user to be authenticated. If it is disabled, the following two parameters will be used in conjunction with the User Name Attribute to build a DN to authenticate with.
User DN Prefix
The distinguished name prefix used to locate user accounts (e.g. uid=).
User DN Suffix
The distinguished name suffix used to locate user accounts (e.g.
,ou=Users,dc=acme,dc=com).
When locating user accounts, the prefix, the account id and the suffix are
concatenated to form the distinguished name of the user account.
Parameters describing the attributes of a user account:
User Search Attribute
The LDAP user name attribute which corresponds to the Klaros-Testmanagement
account name (e.g. uid).
User Name Attribute
The LDAP attribute which will be used in the DN bind action which authenticates the
user (if no naive DN Matching mode is active).
In simple scenarios this will match the User Search Attribute.
If your LDAP Server setup does not allow you to bind a user with the specified
user search attribute you should specify the corresponding attribute here (e.g.
cn) and use this
in conjunction with the corresponding user DN prefix/suffix.
User Password Attribute
The LDAP password attribute which corresponds to the Klaros-Testmanagement
account password (e.g. userPassword).
Full Name Attribute
The LDAP attribute containing the full name of the user account
(e.g cn).
If specified, this will be automatically be transferred into the Klaros-Testmanagement
database upon first successful login.
Email Attribute
The LDAP attribute containing the email address of the user account
(e.g. mail).
If specified, this will automatically be transferred into the Klaros-Testmanagement
database upon the first successful login.
Enabled Attribute
If specified this boolean LDAP attribute decides whether a user will be able to be authenticated. Not all directory servers provide such an attribute.
If the Set as default checkmark is activated, the login screen will default to LDAP authentication for all users. It is still possible for existing users to authenticate against the Klaros-Testmanagement user database if selected in the login screen.
Use the Disable automatic user registration option to prevent the automatic creation of a user in Klaros-Testmanagement if a user tries to log into Klaros-Testmanagement using his or her LDAP credentials for the first time.
Upon the first successful login a matching password hash is created in the local user database so that users can also authenticate themselves against the local user database with their LDAP password. If the Disable Password Synchronization checkmark is activated, this synchronization will not be performed and users will only be able to login locally when an administrator assigns them a local password interactively.
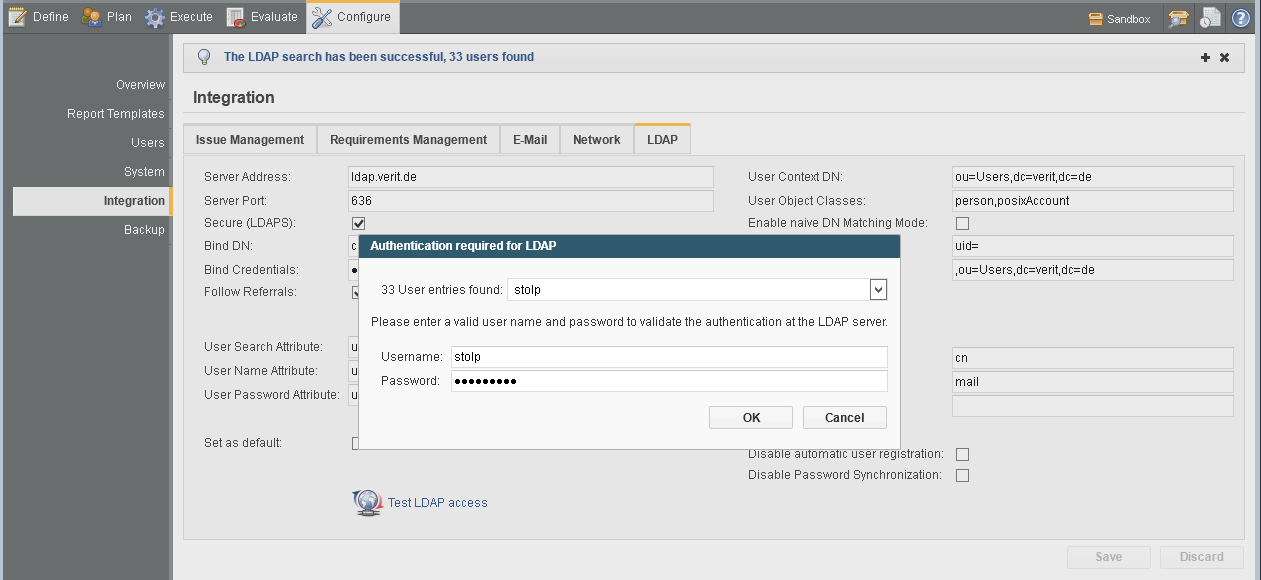
Pressing the Test LDAP access link tests whether the parameters entered on this page are correct. The test process in divided in two phases.
In the first phase a bind to the server is attempted and a search for all matching users is conducted. If it is successful, a dialog is shown listing the matching users found in the LDAP directory.
In the second phase a username and a password may be entered to test the actual LDAP authentication. The result of the authentication attempt is logged in the logpanel.
![]() Feature only available in Klaros-Testmanagement Enterprise Edition
Feature only available in Klaros-Testmanagement Enterprise Edition
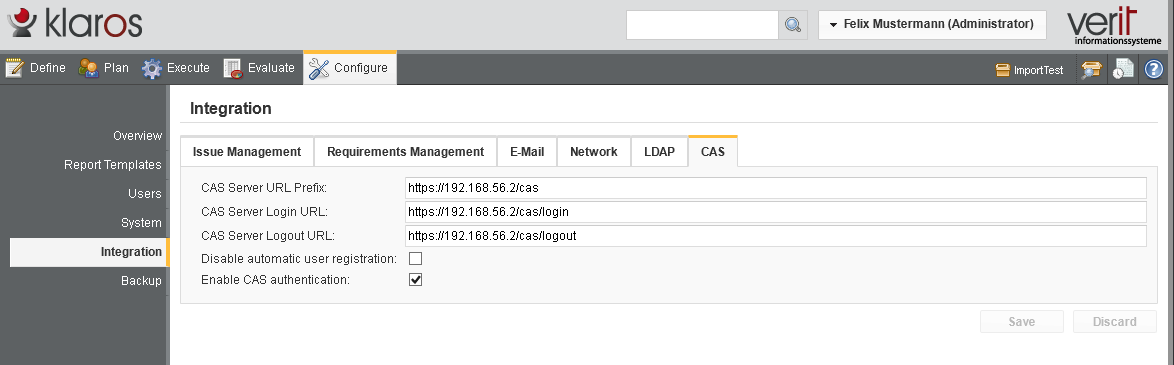
Klaros-Testmanagement supports single-signon authentication (SSO) using a Central Authentication Service (CAS).
Parameters needed to contact the CAS server:
CAS Server URL Prefix
The URL under which the CAS server resides (e.g. cas.acme.com).
CAS Server Login URL
The URL of the CAS server for single signon logins. This URL is the redirection target when a user has yet not been authenticated by CAS.
CAS Server Logout URL
The URL of the CAS server for single signon logouts. This URL is the redirection target when a user logs out from Klaros-Testmanagement
Disable automatic user registration
When activated, a successful CAS authentication does not automatically create a guest user account in the system.
Enable CAS authentication
When activated, all authentication is delegated to the CAS Server and the internal login window is no longer active. To complete the activation, a reboot of the application server is required.
![[Warning]](images/warning.png) |
CAS Single-Signon inhibits local password authentication |
|---|---|
|
Once CAS support is activated and Klaros-Testmanagement has been rebooted it is no longer possible to authenticate locally using the Klaros-Testmanagement login screen.
Please double-check that the account verification works before activating.
In case of a broken setup please set the property |
|
|
 |
|
| 10.4. System |  |
10.6. Backup |