| Chapter 3. Installation | ||
|---|---|---|

|
 |
|
| Chapter 3. Installation | ||
|---|---|---|
|
|
|
|
Table of Contents
Klaros-Testmanagement is equipped with an installer for Microsoft Windows- and Linux-based operating systems. Excluding a Java Runtime Environment, which is needed for the application and the installer itself, it will install all of the applications necessary to run Klaros-Testmanagement, including a file based database (Apache Derby) and an Apache Tomcat application server.
![[Warning]](images/warning.png) |
Warning |
|---|---|
|
The installer configures Klaros-Testmanagement to use the Apache Derby database for persistence which is not intended for production use. For production systems, it is strongly recommended to use a database like MySQL, PostgreSQL, SQL-Server or Oracle Database which will provide significantly better performance. After running the initial installation process, the database can be changed (see Section 3.9, “Changing the Default Database”). |
This chapter provides all information necessary to install Klaros-Testmanagement.
Depending on the version of Klaros-Testmanagement in use, a different user license model is applied. Since the Klaros-Testmanagement Community Edition has a smaller number of features in comparison to the other editions it supports an unlimited amount of users that can work in parallel. The Klaros-Testmanagement Enterprise Edition follows another license model. Each Klaros-Testmanagement Enterprise Edition license is bound to a set number of licensed users. This number dictates how many users can be active at any single point in time. If a user is to be created which would excess the number of licensed users, this user immediately gets deactivated thereafter. The user can later be re-activated if another active user gets deactivated first.
Since Klaros-Testmanagement is a web based application, the client and the server side have different installation prerequisites, which are explained in detail in the next sections.
To access Klaros-Testmanagement, a modern web browser supporting JavaScript is required.
| Name | Version |
|---|---|
| Apple Safari | Version 7 or later |
| Google Chrome | Version 64 or later |
| Microsoft Internet Explorer | Version 11 or later |
| Microsoft Edge | Version 40 or later |
| Mozilla Firefox | Version 52 or later |
Table 3.1. Supported Browsers
![[Caution]](images/caution.png) |
Caution |
|---|---|
|
Klaros-Testmanagement requires a minimum screen resolution of 1280x1024 pixels. |
To run the Klaros-Testmanagement server, a Microsoft Windows or Linux operating system running
OpenJDK 8 or Oracle Java 8 is required.
|
Warning |
|---|---|
|
Later Java Runtime versions, especially non LTS (Long Test Support) releases (Java 9, 10, 12, 13) are currently not supported. Java 11 (LTS) will be supported in the next major version 5.0. |
For optimal performance, using a separate database installation is highly recommended. This database is not required to run on the same physical machine as the Klaros-Testmanagement server.
| Name | Version |
|---|---|
| Apache Derby | 10.12.1.1 (embedded and preconfigured as default) |
| Microsoft SQLServer | SQLServer 2008, 2008 R2, 2012, 2014, 2016, 2017 |
| MySQL | Version 5.5, 5.6 and 5.7, each with InnoDB as the storage engine. MyISAM is not supported as a storage engine, since it doesn't provide referential integrity. MySQL 8 is not supported yet! |
| PostgreSQL | Version 8.4 or later |
| Oracle | Version 10g, 11g, 12c |
Table 3.2. Supported Databases
If your system is not yet equipped with a Java 8 runtime environment, you need to download and install a JRE or JDK distribution. Both JRE and JDK installations are supported. For maximum performance choose a distribution matching your system architecture (x86/x64).
|
Make sure that the JAVA_HOME/JRE_HOME environment variable is set! |
|---|---|
|
A common caveat is that although Java is installed on your machine, the installer or launch script will complain that neither the JAVA_HOME nor the JRE_HOME environment variable is defined. Windows users will find an option to set this in their computer control panel. The instructions to reach this vary with different versions of windows, an example is shown below. Linux users should set these variables in their startup scripts. If you have installed a Java SDK you would set the JAVA_HOME variable. If your system only contains a Java Runtime (JRE) please use JRE_HOME accordingly. |
Free OpenJDK distributions may be downloaded from the following URL: https://adoptopenjdk.net/.
OpenJDK distributions are open sourced licenced and available for free.
A current Oracle Java SE Runtime installer can be downloaded from this URL: http://www.oracle.com/technetwork/java/javase/downloads/.
Please note that starting April 16, 2019 Oracle has changed the license terms for their Java SE distributions. For using them in a non personal / non development environment a commercial license must be acquired. Details can be found at https://www.oracle.com/downloads/licenses/javase-license1.html.
Depending on your Java runtime selection use
JAVA_HOME or JRE_HOME
in the following settings.
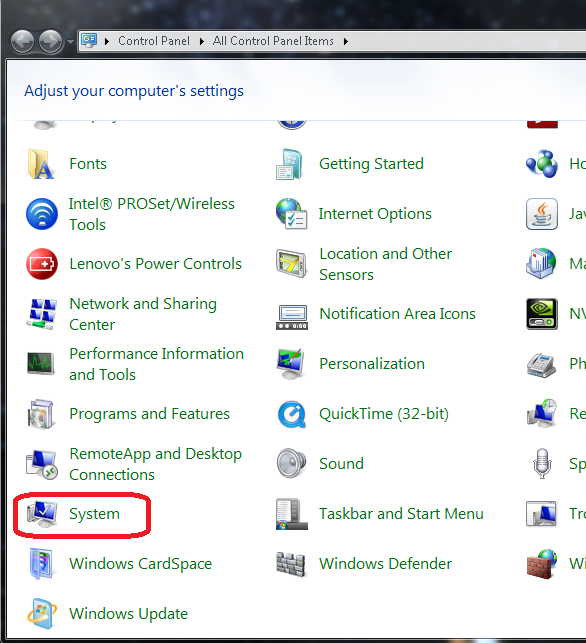
Go to Control Panel.
Find System.
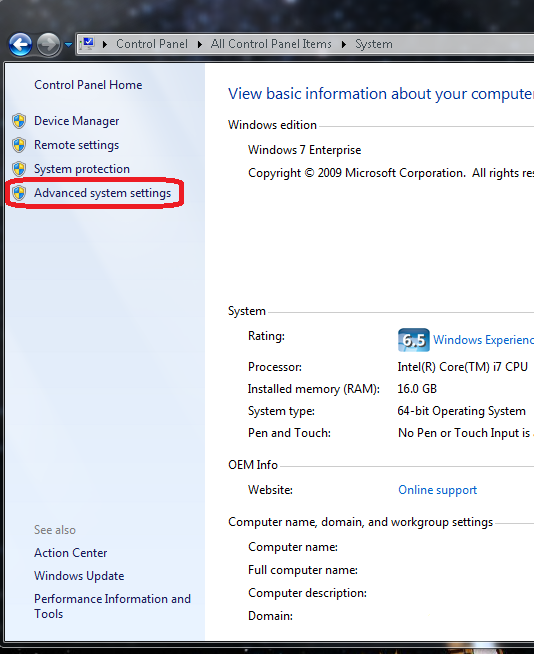
Then go to Advanced system settings
Click on the panel Advanced then the button Environment Variables

Then this Window should pop up.
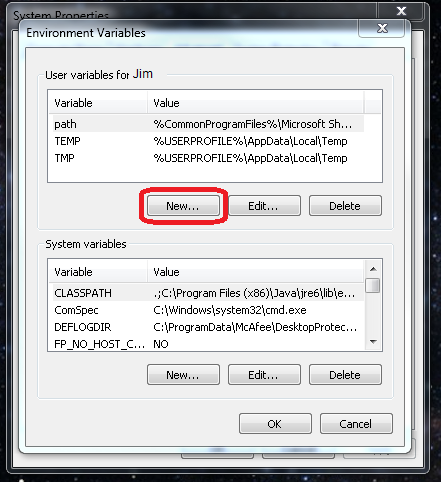
If the variable JAVA_HOME (or JRE_HOME) is not listed, press
.
Otherwise make sure the variable value of JAVA_HOME
(or JRE_HOME) is still correct.
If the name of the variable is JAVA_HOME, the
value must be the absolute path of the Java JDK.
You can usually find the JDK in C:\Program Files\Java\jdk1.8.0_nn,
where nn is the patch level of the JDK.
Java JREs, which are addressed via JRE_HOME can be found in
C:\Program Files\Java\jre1.8.0_nn, where nn is the patch
level of the JRE. Add (x86) to
C:\Program Files if you use a 32bit Java on a 64bit operating system, which is
not recommended for production use).
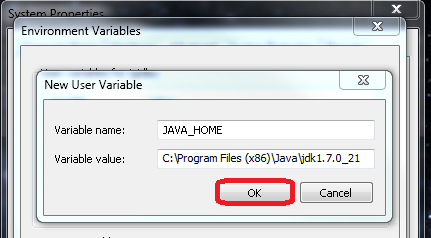
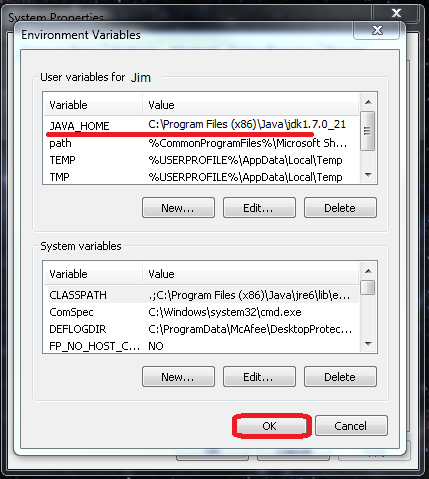
After pressing OK the Java variable is set.
In the end, it should look something like this:
![[Important]](images/important.png) |
Never point JAVA_HOME to a JRE directory! |
|---|---|
|
|
To run Klaros-Testmanagement on Microsoft Windows operating systems the following requirements should be met:
Minimum requirements
2GB RAM, 2GHz Single Core CPU
Recommended requirements (Remote Database)
4GB RAM, 3GHz Dual-Core CPU
Recommended requirements (Local Database)
8GB RAM, 3GHz Quad-Core CPU
Operating system
Microsoft Windows Server 2003, Microsoft Windows Server 2008, Microsoft Windows Server 2012, Microsoft Windows Server 2016, Microsoft Windows 7, Microsoft Windows 8, Microsoft Windows 8.1, or Microsoft Windows 10.
Java Runtime Environment
OpenJDK or Oracle Java Runtime Platform, Standard Edition version 8
To run Klaros-Testmanagement on Linux operating systems the following requirements should be met:
Minimum requirements
2GB RAM, 2GHz Single Core CPU
Recommended requirements (Remote Database)
4GB RAM, 3GHz Dual-Core CPU
Recommended requirements (Local Database)
8GB RAM, 3GHz Quad-Core CPU
Operating system
Linux IA32 (Intel 32 bit architecture) or Intel64/x86-64 (Intel 64 bit architecture) distribution containing Version 2.2.1 or better of the GTK+ widget toolkit and associated libraries.
![[Note]](images/note.png) |
Note |
|---|---|
|
The GTK+ libraries are only needed to run the Klaros-Testmanagement installer in windowed mode. Running the installer in console mode will work without this requirement. |
Java Runtime Environment
Oracle Java Platform, Standard Edition 7 or 8
Open file limitation
|
Caution |
|---|---|
|
Klaros-Testmanagement Enterprise Edition stores database search indices in the file system in the
|
Klaros-Testmanagement stores binary attachments in a file based repository inside the
.klaros folder in home directory of the user account that
is running the Klaros-Testmanagement application server.
Depending on the usage pattern a sufficient amount of disk space should be reserved
for this account.
If the file based Derby database is active, the database files will per default also
be located in the user home directory.
|
Note |
|---|---|
|
Reserving 10GB of disc space should be enough for typical usage patterns. |
Under Windows the installer is invoked by running Klaros-Setup.exe .
Under Linux the installer can be started by entering java -jar Klaros-Setup.jar in a user shell.
The following screens show each step involved in installing Klaros-Testmanagement.
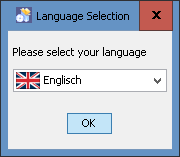
Upon startup the installer is requesting the language used throughout the following installation procedure.
Currently both English and German are available as a language.
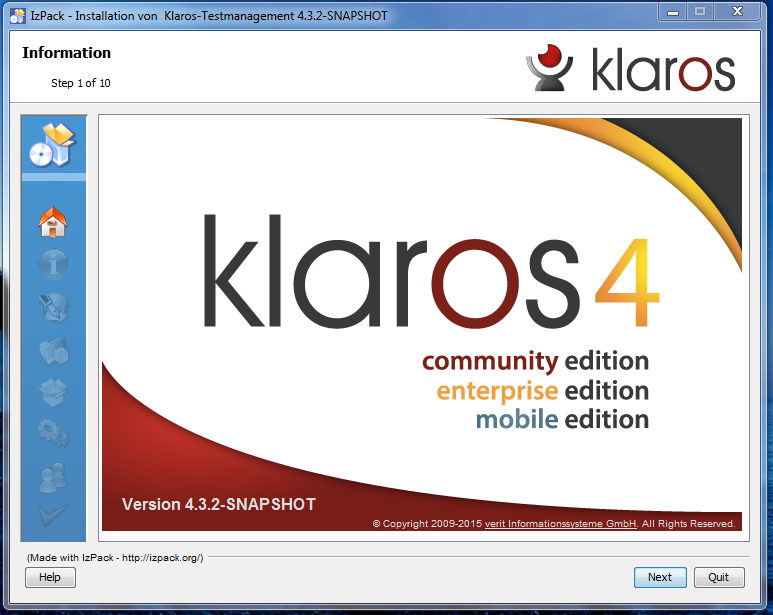
The initial step shows a welcome screen to the user ( Figure 3.2).
The installation may be aborted by clicking the button. Clicking proceeds with the installation.
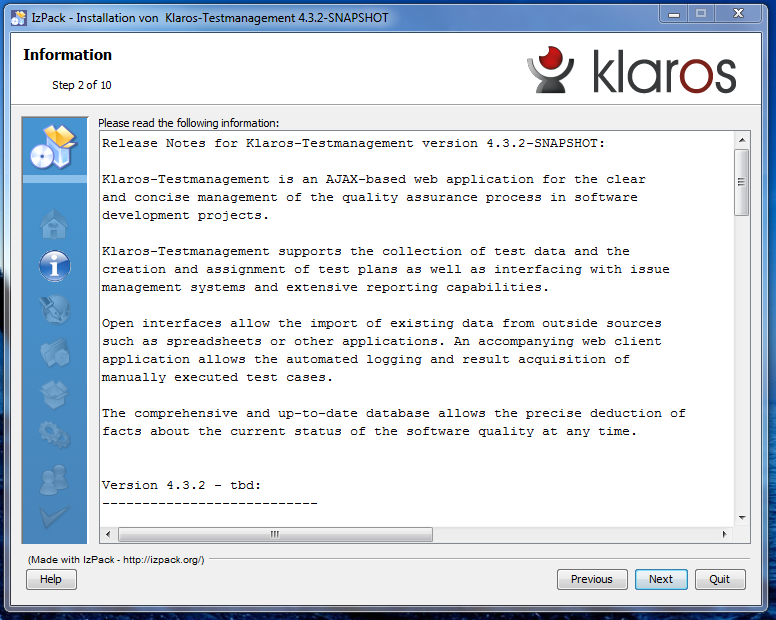
The second step shows information about the product and the revision history, listing the fixed issues and the newly added features ( Figure 3.3).
The installation may be aborted by clicking the button. Clicking goes back to the Welcome step and clicking proceeds with the installation.
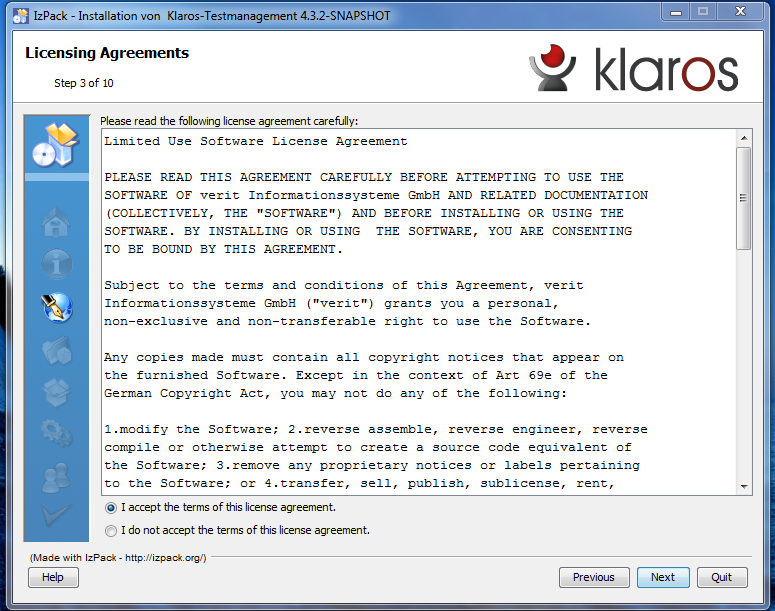
The third step shows information about the license agreement for Klaros-Testmanagement. The license must be accepted to continue the installation. ( Figure 3.4).
The installation may be aborted by clicking the button. Clicking goes back to the Information step and clicking proceeds with the installation.
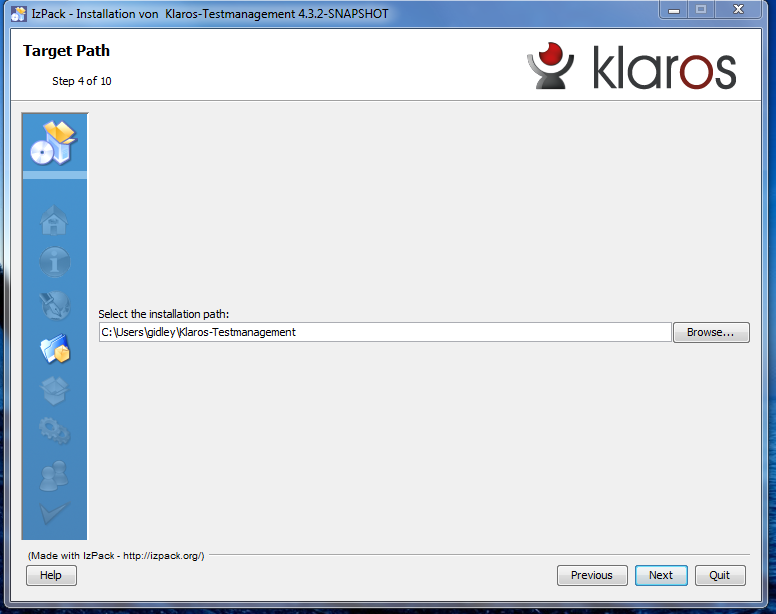
The fourth step requests the target path where Klaros-Testmanagement will be installed. The user can use the button to search for the specific path in the local file system ( Figure 3.5).
|
Important |
|---|---|
|
It is not recommended to install Klaros-Testmanagement in the Programs folder on systems running Microsoft Windows Vista or later. By default, Klaros-Testmanagement will not be able to start if installed here, as tomcat requires write access to the install folder in order to deploy the web application. This is blocked by Microsoft Windows User Account Control (UAC). If you wish to install Klaros-Testmanagement in this location, UAC must be disabled. |
The installation may be aborted by clicking the button. Clicking goes back to the Licensing Agreement dialog and clicking proceeds with the installation.
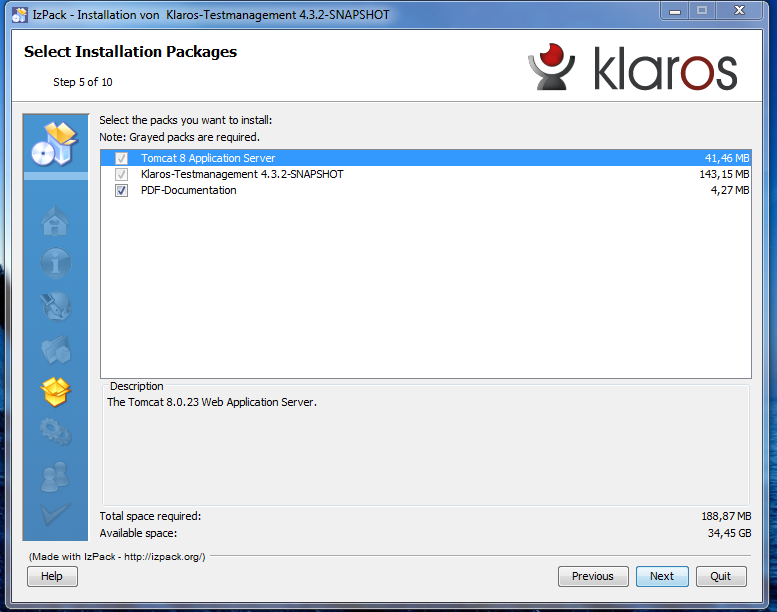
The fifth step allows to select the packages that are installed with Klaros-Testmanagement.
The installation may be aborted by clicking the button. Clicking goes back to the Target Path dialog, clicking proceeds with the installation.
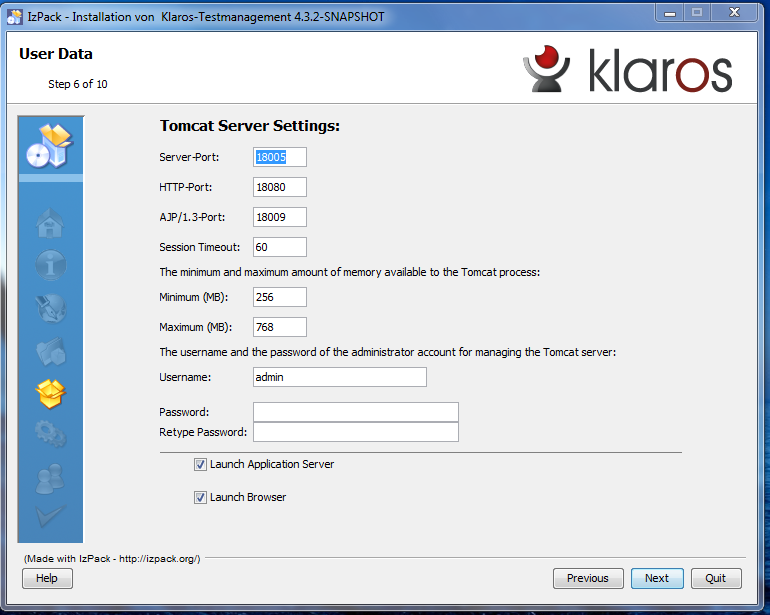
In the sixth step the Tomcat server settings can be changed.
It is possible to set the ports used by Tomcat(Server-Port, HTTP-Port and AJP/1.3-Port), the minimum and maximum amount of memory available to the Tomcat process as well as the user name and password of the Tomcat application server administrator.
In addition it is possible to control the startup of the application during the installation. If the Launch Application Server checkmark is set, the application server will be launched automatically during the installation process. If the Launch Browser checkmark is set, a native web browser instance will be redirected to the application login page. Both of these actions happen during the Section 3.3.9, “Step 8: Perform External Processes” phase.
The installation may be aborted by clicking the button. Clicking button goes back to the Select Installation Packages step and clicking button proceeds with the installation.
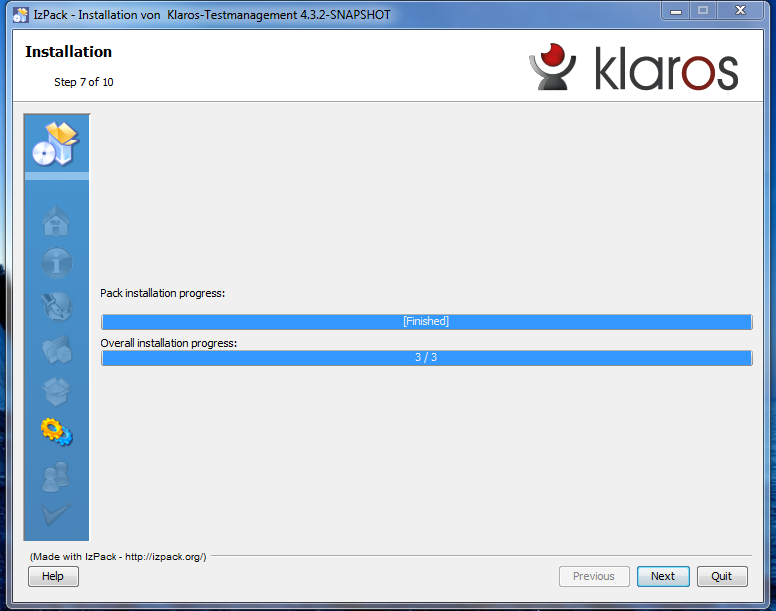
The seventh step starts the installation of Klaros-Testmanagement and shows its progress. The following screenshots show the Installation in Progress Screen and the Installation finished screen ( Figure 3.8).
The installation may be aborted by clicking the button. Clicking proceeds with the installation.
The optional eighth step performs external processes such as setting the environment variables and starting the Tomcat service. In case none of the flags Launch Application Server and Launch Browser are checked, this panel will be skipped.
The installation may be aborted by clicking the button. Clicking proceeds with the installation.
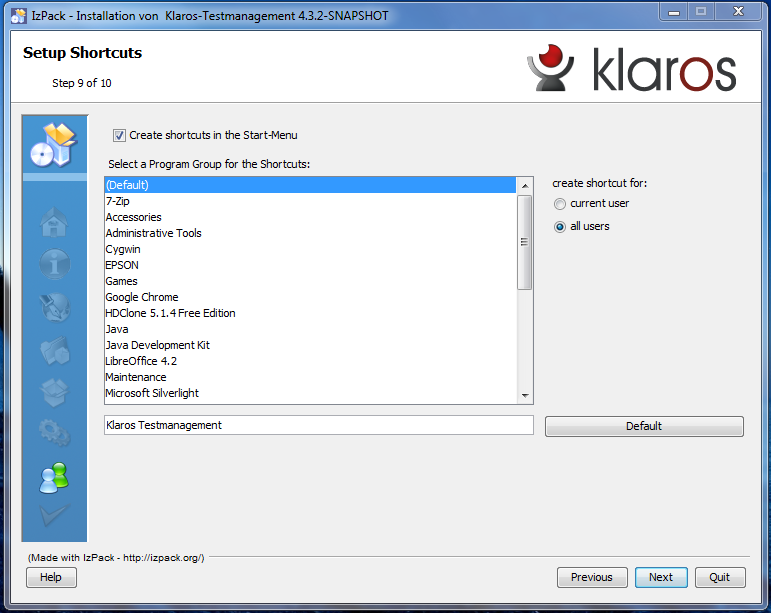
The ninth step requests the options for shortcuts. The installer can create shortcuts in the Start-Menu and on the desktop ( Figure 3.11).
This step looks different on Linux installations but has the same functionality.
The installation may be aborted by clicking the button. Clicking goes back to the Perform External Processes step and clicking proceeds with the installation.
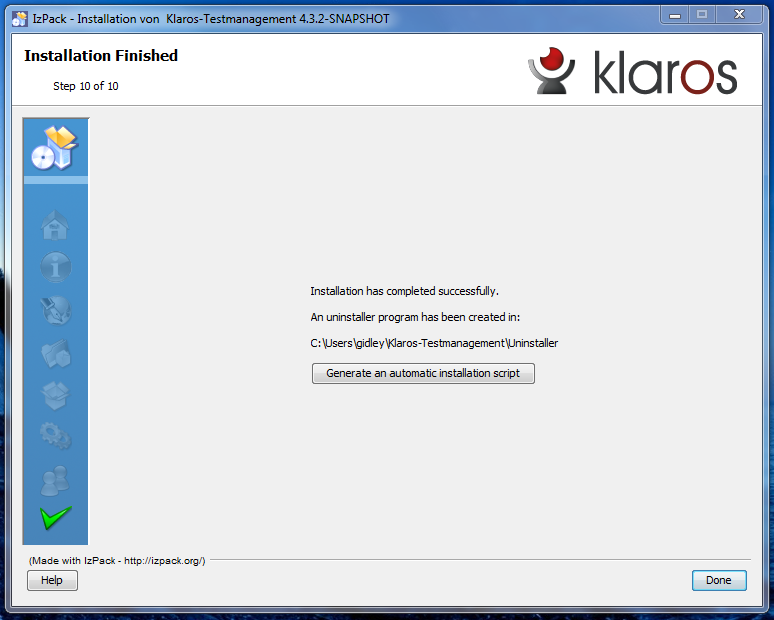
The tenth step notifies the user that Klaros-Testmanagement was installed successfully and shows the path to the uninstaller program ( Figure 3.12).
The button saves a complete script of the installation with the selected user choices, so that the same installation could be repeated unattended or on other machines.
The installation can be completed by clicking the button.
The Klaros-Testmanagement installer also supports a GUI-less variant which only needs a shell/command window and can be invoked as follows:
java -jar Klaros-Setup.jar -console
This displays the content of the installer panels in the shell window and lets the user input her choices via keyboard.
The UI controls are replaced by short key sequences:
|
Enter |
shows the next page of a text panel or accepts a default value |
|
1+Enter |
selects a checkbox |
|
0+Enter |
deselects a checkbox |
|
n+Enter |
chooses the nth item from a list |
The Language Panel ( Section 3.3.1, “Language Selection”) is displayed and wants to be committed by 0+Enter for English or 1+Enter for German.
    Select your language
    0  [x] eng
    1  [ ] deu
    Enter selection:
The Welcome Panel ( Section 3.3.2, “Step 1: Welcome”) is displayed and wants to be committed by 1+Enter.
    -----------------------------------------------------------------------------------------
    Information
    -----------------------------------------------------------------------------------------


    Version 4.7.0
    (c) Copyright 2009-2017 verit Informationssysteme GmbH. All Rights Reserved.


    Press 1 to continue, 2 to quit, 3 to redisplay
    1
The Information Panel ( Section 3.3.3, “Step 2: Information”) displays the Release Notes of the recent versions starting with version 4.4.0.
    ...

    Version 4.5.2 - 2016-07-06:
    ---------------------------


    Fixed Bugs:

      [KLAROS-2987] - Wrong number of requirements on the iteration detail page after switching the
        connected RMS
      [KLAROS-2981] - Implement a migrator to merge test case step shadows with the same search hash
      [KLAROS-2975] - If a user defined enum field has n entries and a default value set at position n,
        the entries between n and m can't be selected
      [KLAROS-2974] - Adding project roles on a user details page while editing other properties of the
        user causes a MethodNotFoundException

    Improvements:

      [KLAROS-2989] - Extend the user printpage for the access rights
      [KLAROS-2979] - Optionally show test case details (steps, precondition, etc) on the test suite print
        page
      [KLAROS-2510] - The detail page result pages should support a bulk print page

    ...

    Version 4.4.0 - 2016-02-12:
    ---------------------------

    New Features:

      [KLAROS-2790] - Implement a RESTful API to retrieve data from Klaros
      [KLAROS-2762] - Synchronisation of attachments from remote requirements management systems
      [KLAROS-2705] - Support the category based filtering on more pages
      [KLAROS-2700] - Enable the input of references to custom properties of text fields of selected test
        artifacts (e.g. %testrun.customPropertyName%) which will be resolved to the respective value when
        viewing them during a test run
      [KLAROS-2696] - Support the Jira REST interface
      [KLAROS-2694] - Synchronize requirements from external systems, e.g. Jira
      [KLAROS-2688] - Add support for the GitHub issue tracker
      [KLAROS-2410] - Add the possibility to create review jobs for test cases from within the test case
        details page
      [KLAROS-1326] - Provide support for specifying test result types in the Jenkins plugin

    Fixed Bugs:

      [KLAROS-2831] - Unable to deselect assignees and categories when creating or editing Redmine issues
      [KLAROS-2825] - Unable to delete test cases containing only deleted test results
      [KLAROS-2817] - Test case steps without associated test cases are present in the database
      [KLAROS-2813] - Start background issue synchronization only after a successful migration
      [KLAROS-2803] - When adding an issue during manual test execution, provide a back button
      [KLAROS-2802] - Some dated test case step results and testsuite results don't have any verdict set
      [KLAROS-2801] - Broken error handling for users attempting to edit their own account in special
        cases
      [KLAROS-2788] - Error during saving of categories

    Improvements:

      [KLAROS-2836] - Add related job information to the test result page
      [KLAROS-2799] - Document how to use the Klaros Remote API
      [KLAROS-2794] - Random errors in database search indices no longer lead to application lockup since
        indices are now automatically rebuild
      [KLAROS-2792] - Lift the artificial file size limit when interactively uploading automated test
        result files
      [KLAROS-2791] - Provide more predefined Reports
      [KLAROS-2771] - Support changing the status of redmine issues
      [KLAROS-2769] - Add support for the GoogleTest result file format
      [KLAROS-2768] - Add support for the gtester result file format
      [KLAROS-2767] - Add support for the JsUnit result file format
      [KLAROS-2766] - Add support for the TESSY result file format
      [KLAROS-2765] - Add support for the JBehave result file format
      [KLAROS-2764] - Add support for the embUnit result file format
      [KLAROS-2754] - After successfully validating a connection to an IMS or RMS, allow to save the used
        credentials for background authentication
      [KLAROS-2720] - Support detecting issue resolve states in the report model API
      [KLAROS-2719] - Check for matching content in the target url when checking external system urls
      [KLAROS-2715] - Provide a remote issue url through the model API
      [KLAROS-2713] - Extend the model API to deliver browse URLs to remote issue management systems
      [KLAROS-2466] - Calculate the estimated time left automatically when logging work
      [KLAROS-2425] - Support build environment and build parameter variables as parameters in the Jenkins
        Plugin
      [KLAROS-2163] - Rename the "Area" field in test case definitions to "Test Type" to comply with ISTQB


    Press 1 to continue, 2 to quit, 3 to redisplay
    1
The License Panel ( Section 3.3.4, “Step 3: Licensing Agreements”) displays the Licensing Agreements. Commit with 1+Enter.
    -----------------------------------------------------------------------------------------
    Licensing Agreements
    -----------------------------------------------------------------------------------------

    Limited Use Software License Agreement

    PLEASE READ THIS AGREEMENT CAREFULLY BEFORE ATTEMPTING TO USE THE
    SOFTWARE OF verit Informationssysteme GmbH AND RELATED DOCUMENTATION
    (COLLECTIVELY, THE "SOFTWARE") AND BEFORE INSTALLING OR USING THE
    SOFTWARE. BY INSTALLING OR USING THE SOFTWARE, YOU ARE CONSENTING
    TO BE BOUND BY THIS AGREEMENT.

    ...

    limitations may not apply to you. You may also have other rights
    that vary from state to state.

    Press 1 to accept, 2 to reject, 3 to redisplay
    1
The Target Path Panel ( Section 3.3.5, “Step 4: Target Path”) looks like this with the console installer:
    -----------------------------------------------------------------------------------------
    Target Path
    -----------------------------------------------------------------------------------------


    Select the installation path: [C:\Users\...\Klaros-Testmanagement]
You can press Enter to accept the proposed path or type another. The path will be created, if it did not already exist. If the directory already exists, a warning is displayed and you can cancel the installation or continue.
Select Installation Packages ( Section 3.3.6, “Step 5: Select Installation Packages”) is more complex in console mode. The required packages (Tomcat 8 and Klaros-Testmanagement) are displayed for information only and the request targets the optional PDF-Documentation. Typing Y chooses to install the PDF-Documentation, where N omits it. After this choice you are requested to commit the selection by typing 1 and then Enter.
    -----------------------------------------------------------------------------------------
    Select Installation Packages
    -----------------------------------------------------------------------------------------

    Select the packs you want to install:

      [x] Pack 'Tomcat 8 Application Server' required
      [x] Pack 'Klaros-Testmanagement 4.6.4' required
    -----------------------------------------------
      [x] Include optional pack 'PDF-Documentation'
    -----------------------------------------------
    Enter Y for Yes, N for No: N
    Y
    Done!

    Press 1 to continue, 2 to quit, 3 to redisplay
    1
After that, the installer requests user data ( Section 3.3.7, “Step 6: User Data”). The installer presents default values which can be comitted by pressing Enter. You can enter a different value in case the default is not suitable.Checkboxes show [x] if the checkbox is set, [ ] otherwise. Pressing Enteraccepts the current value, which can be set and unset explicitly with 1and 0respectively.
In this example we adopt most of the default values. Only the memory settings and the tomcat admin password (withno default) are entered and the two flags are unset:
    -----------------------------------------------------------------------------------------
    User Data
    -----------------------------------------------------------------------------------------
    Tomcat Server Settings:

    Server-Port: [18005]

    HTTP-Port: [18080]

    AJP/1.3-Port: [18009]

    Session Timeout: [60]

    The minimum and maximum amount of memory available to the Tomcat process:
    Minimum (MB): [256]
    400
    Maximum (MB): [512]
    1024

    The username and the password of the administrator account for managing the Tomcat server:
    Username: [admin]

    Password:
    **********
    Retype Password:
    **********

    ------------------------------------------
      [x] Launch Application Server
    Enter 1 to select, 0 to deselect:
    0

      [x] Launch Browser
    Enter 1 to select, 0 to deselect:
    0


    Press 1 to continue, 2 to quit, 3 to redisplay
    1
Packages are displayed as soon as they are installed ( Section 3.3.8, “Step 7: Installation”).
    [ Starting to unpack ]
    [ Processing package: Tomcat 7 Application Server (1/3) ]
    [ Processing package: Klaros-Testmanagement (2/3) ]
    [ Processing package: PDF-Documentation (3/3) ]
    [ Unpacking finished ]
    Installation finished
This panel is skipped since we chose not to launch the server or a browser, otherwise startup messages of the server could be seen here. See Section 3.3.9, “Step 8: Perform External Processes” on how this is handled in GUI mode.
In a GUI-less environment we do not want any menu entries or icons on desktops, thus we choose N. See Section 3.3.10, “Step 9: Setup Shortcuts” for details on shortcut setup in windowed environments.
    -----------------------------------------------------------------------------------------
    Setup Shortcuts
    -----------------------------------------------------------------------------------------

    ----------------------------------
    Create shortcuts in the Start-Menu
    ----------------------------------
    Enter Y for Yes, N for No:
    N
    ------------------------------------------
    Create additional shortcuts on the desktop
    ------------------------------------------
    Enter Y for Yes, N for No:
    N
An automatic installation script with the selected user choices can be genrated here, so that the same installation could be repeated unattended or on other machines. Automatic installation scripts will work for unattended installations in console mode as well.
    Generate an automatic installation script
    Enter Y for Yes, N for No:
    Y
    Select the installation script (path must be absolute)[C:\Users\...\Klaros-Testmanagement
      \auto-install.xml]

    Installation was successful
    Application installed on C:\Users\...\Klaros-Testmanagement
    [ Writing the uninstaller data ... ]
    [ Console installation done ]
After the installation has finished, you can find the installation of Klaros-Testmanagement
in the folder /opt/klaros-testmanagement.
See Section 3.10, “Installing Klaros-Testmanagement as a Service”
for details on how to configure Klaros-Testmanagement to run as a service.
If you've previously installed Klaros-Testmanagement and chose to save an automated installation
script, you can install Klaros-Testmanagement again with the same parameters using one of the
following commands. This example assumes the automated installation
script was saved as auto-install.xml.
Linux: java -jar Klaros-Setup.jar -console auto-install.xml
Windows: Klaros-Setup.exe auto-install.xml
In case you cannot run the Klaros-Testmanagement installer on a system with graphical user
interface, you can build an automated installation script and run an unattended
installation.
Use the following sample script and adapt installpath and the userInputs.
The installation may issue some warnings of the form
AutomationHelper class not found for panel ...,
which can be safely ignored.
<?xml version="1.0" encoding="UTF-8" standalone="no"?>
<AutomatedInstallation langpack="eng">
  <com.izforge.izpack.panels.htmlhello.HTMLHelloPanel
    id="hello" />
  <com.izforge.izpack.panels.htmlinfo.HTMLInfoPanel
    id="info" />
  <com.izforge.izpack.panels.licence.LicencePanel
    id="license" />
  <com.izforge.izpack.panels.target.TargetPanel
    id="target">
    <installpath>/opt/Klaros-Testmanagement</installpath>
  </com.izforge.izpack.panels.target.TargetPanel>
  <com.izforge.izpack.panels.packs.PacksPanel id="packs">
    <pack index="0" name="Tomcat 8 Application Server" selected="true" />
    <pack index="1" name="Klaros-Testmanagement" selected="true" />
    <pack index="2" name="PDF-Documentation" selected="false" />
  </com.izforge.izpack.panels.packs.PacksPanel>
  <com.izforge.izpack.panels.userinput.UserInputPanel
    id="portselection">
    <userInput>
      <entry key="tomcat_server_port" value="18005" />
      <entry key="tomcat_http_port" value="18080" />
      <entry key="tomcat_https_port" value="18443" />
      <entry key="tomcat_ajp_port" value="18009" />
      <entry key="tomcat_session_timeout" value="60" />
      <entry key="tomcat_memory_min" value="256" />
      <entry key="tomcat_memory_max" value="512" />
      <entry key="tomcat_admin_name" value="tcadmin" />
      <entry key="tomcat_admin_password" value="IfYouDontChangeThisDontBlameMe" />
      <entry key="start_server_flag" value="false" />
      <entry key="launch_browser_flag" value="false" />
    </userInput>
  </com.izforge.izpack.panels.userinput.UserInputPanel>
  <com.izforge.izpack.panels.install.InstallPanel
    id="install" />
  <com.izforge.izpack.panels.process.ProcessPanel
    id="process" />
  <com.izforge.izpack.panels.shortcut.ShortcutPanel
    id="shortcuts">
    <createShortcuts>false</createShortcuts>
  </com.izforge.izpack.panels.shortcut.ShortcutPanel>
  <com.izforge.izpack.panels.finish.FinishPanel
    id="finish" />
</AutomatedInstallation>
Example 3.1. sample auto-install.xml
If Klaros-Testmanagement is already installed it is possible to update it to a newer version. The installer will update all files automatically. Further information of the installation process can be found in Section 3.3, “Installation Process”. The Klaros-Testmanagement home folder remains untouched, so all settings, database connections and the content repository will be unaffected by the update process.
|
Important |
|---|---|
|
Klaros-Testmanagement must be stopped before starting the update. Otherwise the installation process cannot finish successfully. |
|
Note |
|---|---|
|
It is highly recommended to create a backup of your database before starting the Klaros-Testmanagement update process. Most database products offer utilities for backing up database schemes, please refer to the relevant sections in the database vendor documentation. If you are using the pre-configured derby database you may skip this step but you should make sure to execute the following instructions.
In addition to the database Klaros-Testmanagement stores various data like configuration files,
attachments and logs in the |
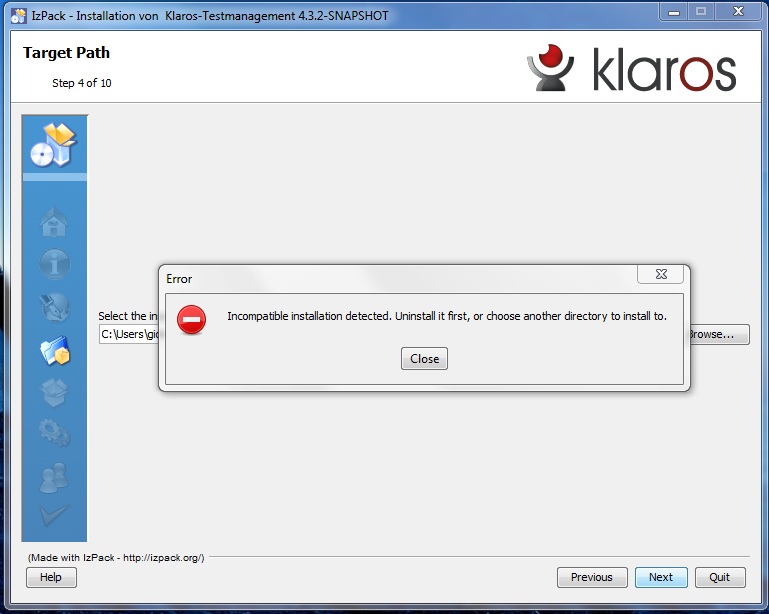
If you're trying to install a new version of Klaros-Testmanagement in some cases you will receive
the message Incompatible installation detected. (see
Figure 3.13, “Incompatible Installation detected”).
In this case, Klaros-Testmanagement needs to be uninstalled first before a new version can be
installed. As with the update process, all of your settings, database settings
and the content repository will remain untouched by the uninstallation process.
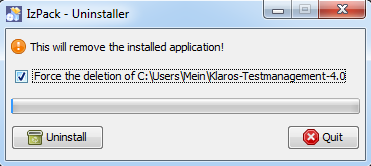
When uninstalling Klaros-Testmanagement, the Force the deletion of [Klaros-Testmanagement installation path] checkbox needs to be set.
Some settings may need manual adjustments when updating Klaros-Testmanagement from major revision 3 to 4, e.g. from 3.8.4 to 4.0.0.
If your installation of Klaros-Testmanagement uses the embedded Derby database, you should change
the value of hibernate.dialect
in <userhome>/.klaros/hibernate.properties
to org.hibernate.dialect.DerbyTenSevenDialect
for improved database handling.
If you created custom reports (available with Klaros-Testmanagement Enterprise Edition), the pdf and excel namespace declaration in the XML root element needs to be adapted for each of them. Just replace the old URL
http://jboss.com/products/seam/pdf
given in an xmlns-attribute by
http://jboss.org/schema/seam/pdf
and
http://jboss.com/products/seam/excel
given in an xmlns-attribute by
http://jboss.org/schema/seam/excel
and press . For new reports the updated URL is already preset, so no further action is required.
If you miss to change the namespace, your document will not be rendered and you will receive the following error message:
Unexpected runtime exception: The rendered document has not been found in the document store
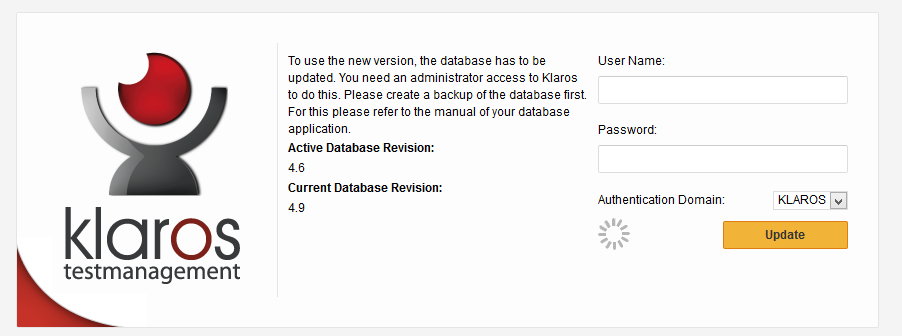
After updating Klaros-Testmanagement to a newer version it is possible that a database migration will be necessary. If so, Klaros-Testmanagement will show the following screen on startup. To start the migration an administrator account is needed. Before the migration process starts, the appropriate authentication domain should be selected ( LDAP or KLAROS). Figure 3.15
There are two important locations in a Klaros-Testmanagement installation. One of these is the
installation folder where
application server and the klaros web application will be installed in.
The other is the home folder containing runtime data
like configuration files, search indices and attachments. Per default this is the
.klaros folder in the home folder of the user running Klaros-Testmanagement.
To allow a simple upgrade the installation/upgrade process will only change files in the installation folder and leaves the content of the home folder untouched.
On Microsoft Windows systems, by default the home folder is located at
C:\Documents and Settings\<username>\.klaros
for Microsoft Windows XP and earlier or C:\Users\<username>\.klaros
for Microsoft Windows Vista, 7 and 8. This can also be opened by entering
%UserProfile%\.klaros in an explorer window address bar
or by entering cd %UserProfile%\.klaros
on the command line.
On Linux systems this folder can be found using the path ~/.klaros
and is generally located at /home/<username>/.klaros.
On Mac OS X systems this folder is located at /Users/<username>/.klaros
and can be found using ~/.klaros.
![[Tip]](images/tip.png) |
Relocating the Klaros-Testmanagement home folder |
|---|---|
|
By setting the environment variable export KLAROS_HOME=/var/application-data/klaros |
|
Heads up when moving the home folder! |
|---|---|
|
If the application does not find a previous installation in the home folder it will bootstrap an empty default installation including a new local database. If this happens by accident, e.g. by providing a wrong home folder location it appears to the user that all previous data is gone. Of course this is not the case. To resolve this situation point the KLAROS-HOME variable to the correct location and restart. |
The log files for Klaros-Testmanagement can be found in the logs
folder in the installation directory and also in condensed form the
logs folder within the .klaros directory.
Attaching the log files from these locations to a bug report helps the support team to quickly identify and fix any problems you encounter.
The Hibernate properties file is located at .klaros/hibernate.properties.
This file is used to specify the database to use for Klaros-Testmanagement.
It contains the database type, URI and the authentication information.
More information about changing the database can be found in
Section 3.9, “Changing the Default Database”.
Klaros-Testmanagement may be customized to add new languages. This process is described in
Section 4.1.1, “Defining Language Files”.
The file used to store the Quote of the Day entries is located
at .klaros/resources/quotes.txt.
The file used to store the Quote of the Day entries is located
at .klaros/resources/quotes.txt.
If you are using the default Derby database, this is located in the
.klaros/KlarosDerby folder.
To access Klaros-Testmanagement, open the following URL in a web browser:
http://${host}:${port}/klaros-web/ where ${host}
is the IP address or domain name of the application server and ${port}
is the HTTP port defined in Section 3.3.7, “Step 6: User Data”.
The first time Klaros-Testmanagement is executed, it will create a .klaros folder containing Klaros-Testmanagement and database property files. The .klaros folder is created in the home directory of the current user. For Microsoft Windows XP users it is located in C:\Documents and Settings\username, for Microsoft Windows Vista and Microsoft Windows 7/8 users it is in C:\Users\username, and for Linux users in /home/username by default.
By default Klaros-Testmanagement uses the Apache Derby Database which requires no further installation or maintenance but is lacking performance in comparison to other implementations. For production systems, it is strongly recommended to use a full-blown database system, such as the open source PostgreSQL or MariaDB/MySQL database servers or the commercial Microsoft SQLServer or Oracle database products.
To switch to another database system, Klaros-Testmanagement must be stopped, and the file
hibernate.properties located in
<user.home>/.klaros/hibernate.properties
must be edited as shown below.
The hibernate.connection.url property must match the location
of the database in your network. Please consult your database administrator for the
hibernate.connection.username/ hibernate.connection.password
credentials to use.
|
Warning |
|---|---|
|
Blank spaces at the end of lines in the hibernate.properties file might get misinterpreted by hibernate! For example, 'hibernate.dialect=org.hibernate.dialect.DerbyTenSevenDialect ' is not the same as 'hibernate.dialect=org.hibernate.dialect.DerbyTenSevenDialect' (ignoring quotes). |
To use a Microsoft SQL-Server change the content of the file to:
hibernate.dialect=org.hibernate.dialect.SQLServer2008Dialect
hibernate.connection.driver_class=com.microsoft.sqlserver.jdbc.SQLServerDriver
hibernate.connection.url=jdbc:sqlserver://localhost:1433;databaseName=KLAROS
hibernate.connection.username=root
hibernate.connection.password=root
For MariaDB/MySQL change the content of the file to:
hibernate.dialect=org.hibernate.dialect.MySQL5InnoDBDialect
hibernate.connection.driver_class=com.mysql.jdbc.Driver
hibernate.connection.url=jdbc:mysql://localhost:3306/klaros
hibernate.connection.username=root
hibernate.connection.password=root
|
Important |
|---|---|
|
When using a MySQL database, it is important to set the following option in the my.ini file.
# The maximum size of a query packet the server can handle as well as
# maximum query size server can process (Important when working with
# large BLOBs).  enlarged dynamically, for each connection.
max_allowed_packet = 64M
|
For Oracle please use the following entry:
hibernate.dialect=org.hibernate.dialect.Oracle10gDialect
hibernate.connection.driver_class=oracle.jdbc.driver.OracleDriver
hibernate.connection.url=jdbc:oracle:thin:@localhost:1521:klaros
hibernate.connection.username=root
hibernate.connection.password=root
To use PostgreSQL change the content of the file to:
hibernate.connection.driver_class = org.postgresql.Driver
hibernate.connection.url = jdbc:postgresql://localhost/klaros
hibernate.dialect = org.hibernate.dialect.PostgreSQLDialect
hibernate.connection.username=root
hibernate.connection.password=root
An exhaustive list of all parameters can be found in the Hibernate Core Manual.
|
Database Instance Creation |
|---|---|
|
Klaros-Testmanagement will not automatically create either the database instance
( |
To switch back to the integrated Derby database:
hibernate.connection.driver_class=org.apache.derby.jdbc.EmbeddedDriver
hibernate.connection.password=root
hibernate.connection.url=jdbc\:derby\:${user.home}/.klaros/klarosDerby;create\=true
hibernate.connection.username=root
hibernate.dialect=org.hibernate.dialect.DerbyTenSevenDialect
For day-to-day usage of Klaros-Testmanagement, it is necessary that the application is available after a reboot of the machine it is installed on. Depending on the operating system, different measures have to be taken to achieve this.
Depending on your Linux distribution system services are launched using different init daemons.
We are providing sample scripts for the most common ones here, SysVInit and systemd.
To start Klaros-Testmanagement automatically the startup script shown below should be saved to the
/etc/init.d
directory as
klaros
and selected for the appropriate run level. Please refer to the documentation of your
linux distribution for details.
The values of the KLAROS_USER and KLAROS_PATH fields
must first be replaced with the intended user id and installation path.
It is important that the script is executable.
This can be ensured with the command chmod a+x klaros.
The service can now be started via service klaros start and stopped via service klaros stop. chkconfig --add klaros enables the start of the service at system boot.
  #!/bin/bash
  #
  #
  # This will be ignored by systems that don't use chkconfig.
  # chkconfig: 345 98 2
  # description: klaros (inside Tomcat, a servlet container)
  #
  ### BEGIN INIT INFO
  # Provides:          klaros
  # Required-Start:
  # Required-Stop:
  # Default-Start:     3 4 5
  # Default-Stop:      0 1 2 6
  # Short-Description: klaros
  # Description:       klaros-testmanagement
  ### END INIT INFO
  #
  KLAROS_USER=klarosdemo
  KLAROS_PATH="/opt/klaros-testmanagement"
  /bin/su - "${KLAROS_USER}" -c "${KLAROS_PATH}/bin/catalina.sh $@ >/var/tmp/klaros.log 2>&1"
To start Klaros-Testmanagement automatically the startup script shown below should be saved to the
/etc/systemd/system
directory as
klaros.service
.
The values of the User, ExecStart and ExecStop
entries must first be replaced with the intended user id and installation path.
The service can now be started via systemctl start klaros and stopped via systemctl stop klaros. systemctl enable klaros enables the start of the service at system boot.
  [Unit]
Description=Klaros Testmanagement Service
After=syslog.target network.target

[Service]
Type=forking
User=klaros

ExecStart=/opt/klaros-testmanagement/bin/startup.sh
ExecStop=/opt/klaros-testmanagement/bin/shutdown.sh

[Install]
WantedBy=multi-user.target
Under the Windows operating system family the supplied service.bat script can be used to install the Tomcat application server as a Windows service.
Please refer to the official Apache Tomcat 8 Windows service HOW-TO for further details.
|
Change the Service User Account! |
|---|---|
|
Per default the created Windows service will use the
Skipping this vital step will lead to a newly created
If you encounter this situation, then shut down the service, delete the |
|
Make sure to use a Java architecture that matches your Tomcat installation |
|---|---|
|
Upon first installation of Klaros-Testmanagement the installer chooses a matching Tomcat Windows installation (32-Bit vs. 64-Bit) for the Java runtime architecture it was started with. If you want to change the desired Java Runtime Architecture later (e.g. switching from 32-Bit Java to 64-Bit Java) please make sure that you re-install your distribution with the desired Java runtime in your system path. If in doubt check by running javaw -version from the cmd windows command line processor. The service will refuse to start if you choose the wrong Java architecture. A typical error output for running a 32-Bit Tomcat installation in conjunction with a 64-Bit Java looks like the following:
Commons Daemon procrun (1.0.15.0 32-bit) started
Debugging 'tomcat7' service...
Starting service...
%1 is not a valid Win32 application.
Failed creating java C:\Program Files\Java\jre1.8.0_45\bin\server\jvm.dll
%1 is not a valid Win32 application.
ServiceStart returned 1
%1 is not a valid Win32 application.
Debug service finished with exit code 1
Commons Daemon procrun failed with exit value: 3 (Failed to run service as console application)
%1 is not a valid Win32 application.
You may update the Java virtual machine which the service uses in the
|
|
Adjusting memory settings |
|---|---|
|
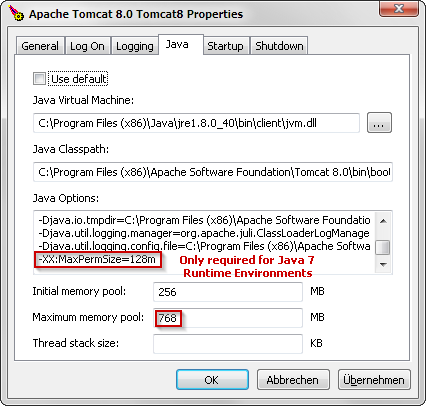
Depending on the number of parallel users, Klaros-Testmanagement may require a larger amount of memory than the installer suggests with the default values provided. If you want to change the specified memory settings for an already installed installation you may supply these settings in the tomcat8w administration interface as shown below. To ensure that indeed the settings of the installed service are changed, add the service name as a command line argument as follows: [path]\Klaros-Testmanagement\bin\Tomcat8w.exe //ES//Tomcat8. |
Using the built-in JMX Support in Tomcat it is possible to monitor the Klaros-Testmanagement installation using any JMX capable Monitoring tool (like e.g. VisualVM).
Add the following lines to bin/catalina.sh:
# Set JMX connector
RMI_SERVER='[FQDN]'

JMXREMOTE="-Dcom.sun.management.jmxremote"
JMXREMOTE="$JMXREMOTE -Dcom.sun.management.jmxremote.port=[PORT]"
JMXREMOTE="$JMXREMOTE -Dcom.sun.management.jmxremote.ssl=false"
JMXREMOTE="$JMXREMOTE -Dcom.sun.management.jmxremote.authenticate=false"
JMXREMOTE="$JMXREMOTE -Dcom.sun.management.jmxremote.ssl=false"

JAVA_OPTS="$JAVA_OPTS $JMXREMOTE -Djava.rmi.server.hostname=$RMI_SERVER"
Where [FQDN] and [PORT]
denote the fully qualified domain name and port of the remote JMX server you want to
deliver messages to.
Depending on the type of Issue Management System, some configuration is needed to connect it to Klaros-Testmanagement. This section describes the needed installation steps for each system.
| Name | Version |
|---|---|
| Bugzilla | 3.0.9 or later |
| GitHub | Any |
| GitLab | API V3/V4 |
| Jira | 3.7 or later |
| Mantis | 1.1.8 or later. |
| Redmine | 3.0 or later. |
| Trac | 0.10 or later |
Table 3.3. Supported External Issue Management Systems
To allow the connection of Klaros-Testmanagement to the Jira server instance the Jira RPC Plugin has to be activated in your Jira installation. You find this option as Accept remote API calls in under . Then you need to enable the JIRA RPC Plugin in under in the left-hand menu.
|
Jira Cloud instances |
|---|---|
|
Starting April 25th 2019 Atlassian limited access to their cloud instances to token based authentication, so authenticating via username and password is no longer supported. Klaros-Testmanagement is supporting token based authentication scheme as well. Just use your email address as username and the token as password. |
|
Note |
|---|---|
|
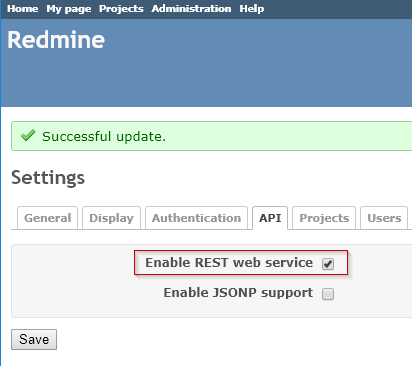
In order to use Klaros-Testmanagement Redmine integration, the Authentication Required and the Enable REST Web Service checkbox in the Authentication section of the Redmine settings must be checked ( Figure 3.17, “Redmine Authentication Section”). |
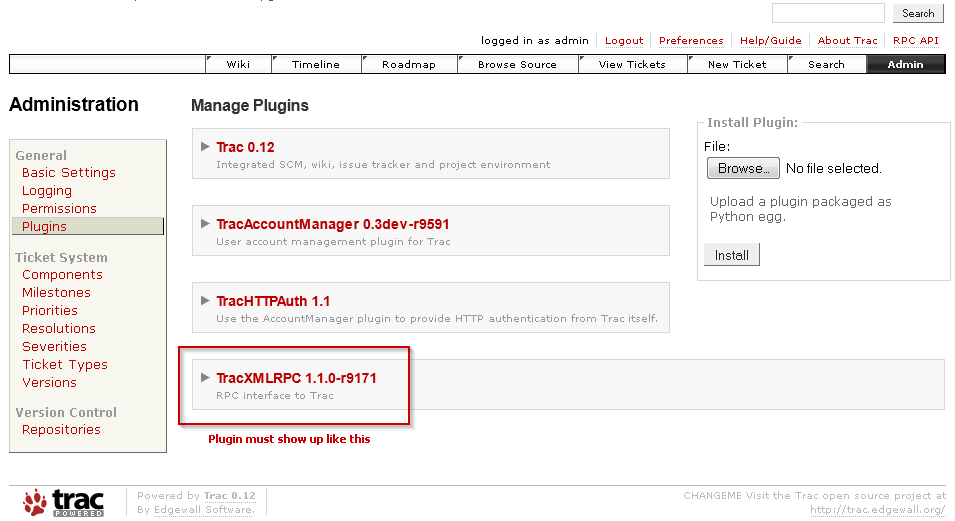
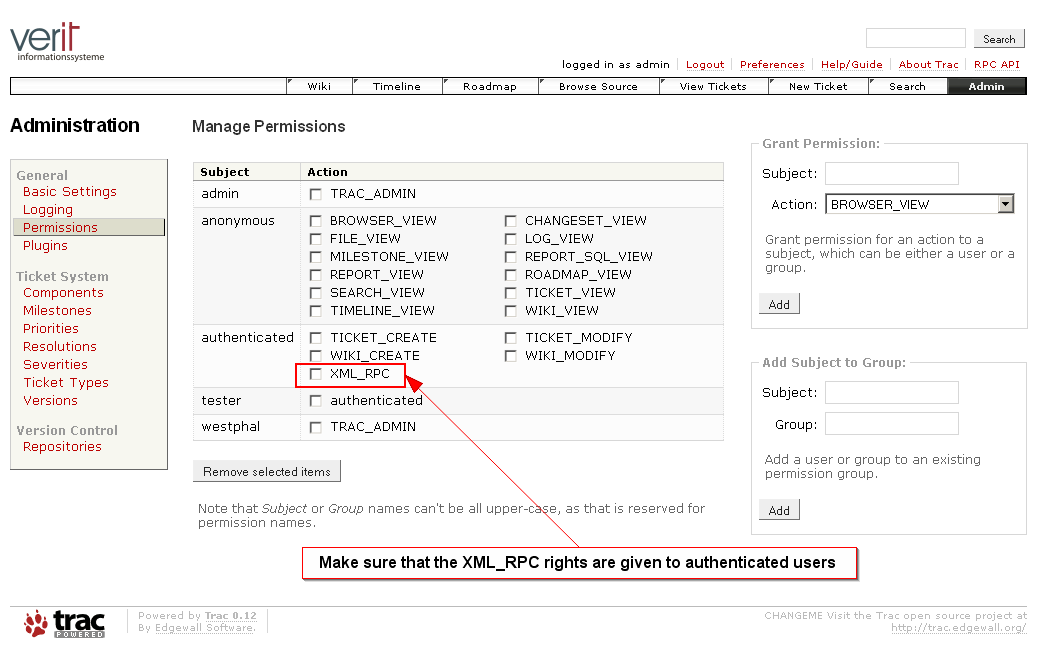
The Klaros-Testmanagement Trac integration requires the installation of the TracXMLRPC Plugin. The download archives and installation notes are available at http://trac-hacks.org/wiki/XmlRpcPlugin/. After successful installation of the plugin, it has to be activated using the Trac web administration interface. Figure 3.18, “Trac Plugin Section” shows the Trac Plugin section after the successful installation of the plugin.
To make the plugin accessible, authenticated users must be able to access the XML_RPC plugin as shown below.
The following combinations have been successfully tested:
Trac 0.12 / TracXMLRPC 1.1.0
Later versions are expected to work but currently not tested.
Note on self-signed certificates: If you are accessing HTTPS servers with self-signed certificates, you will need to import those certificates into your Java trusted keystore. One instruction on how to achieve this can be found at http://stackoverflow.com/questions/2893819/telling-java-to-accept-self-signed-ssl-certificate.
To uninstall Klaros-Testmanagement select Uninstall Klaros-Testmanagement Server from the start menu (if running under Windows) or just delete the installation folder manually.
If you have added an installation as a service as described in Section 3.10, “Installing Klaros-Testmanagement as a Service” please remember to deactive the Windows service or Linux init script.
|
Home Folder |
|---|---|
|
Just like during the upgrade process uninstalling Klaros-Testmanagement will not touch your home folder
( So if you uninstalled by accident re-installing will let you restore your system safely, else remove feel free to remove that folder manually. |
|
|
|
|
| Chapter 2. Introduction |  |
Chapter 4. Customization |