| 8.3. Run Test Suite | ||
|---|---|---|

|
Chapter 8. Execute |  |
| 8.3. Run Test Suite | ||
|---|---|---|
|
|
Chapter 8. Execute | |
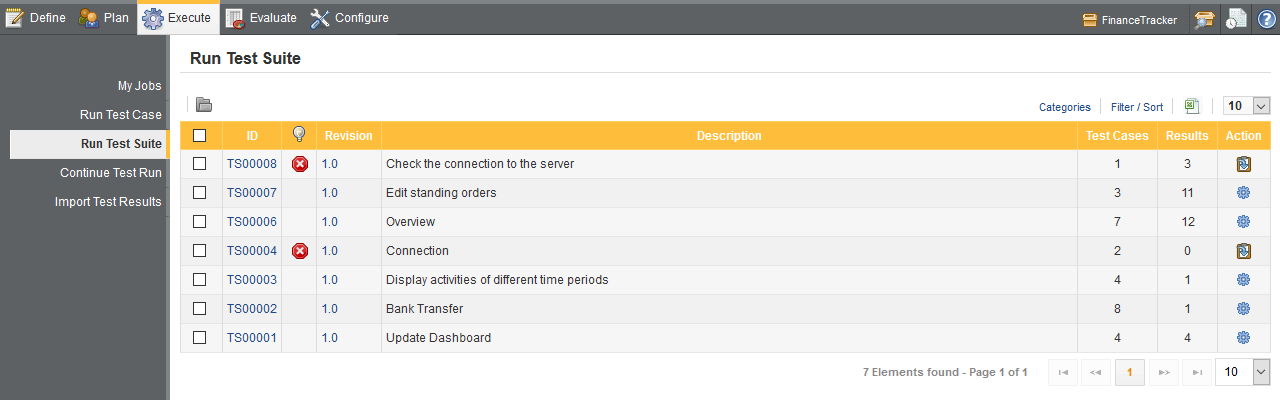
Executing a Test suite consists of running a defined set of test cases on a specific version of the system under test in a selected test environment.
The Run Test Suite page shows all test suites of a project in a list. To get a better overview of the available test suites, the sorting and filtering functionality of the Filter / Sort panel can be used as described in Section 5.2.6, “Filtering and Sorting”.
Clicking on the
![]() action icon of a test suite executes that test suite
( Figure 8.8).
action icon of a test suite executes that test suite
( Figure 8.8).
![[Warning]](images/warning.png) |
Warning |
|---|---|
|
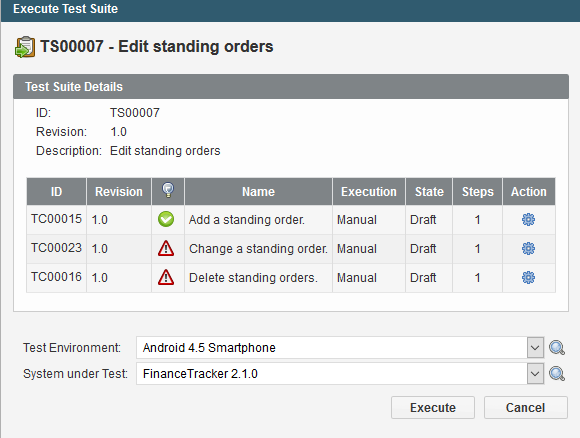
Test cases with the state Locked or without any steps will be skipped when executing the test suite. |
A dialog showing information about the test suite will be displayed
( Figure 8.9).
Clicking the
![]() icon on the right side of the dialog displays more detailed
information about the test suite.
icon on the right side of the dialog displays more detailed
information about the test suite.
Before a test run is started, a test environment and a system under test must be chosen. user-defined properties may also be set for the test run here.
Press the button to run the test suite. Klaros-Testmanagement will show the following pop-up window:
![[Note]](images/note.png) |
Note |
|---|---|
|
Pop-ups must be enabled in your browser, or an exception must be added for Klaros-Testmanagement, in order to execute tests manually. |
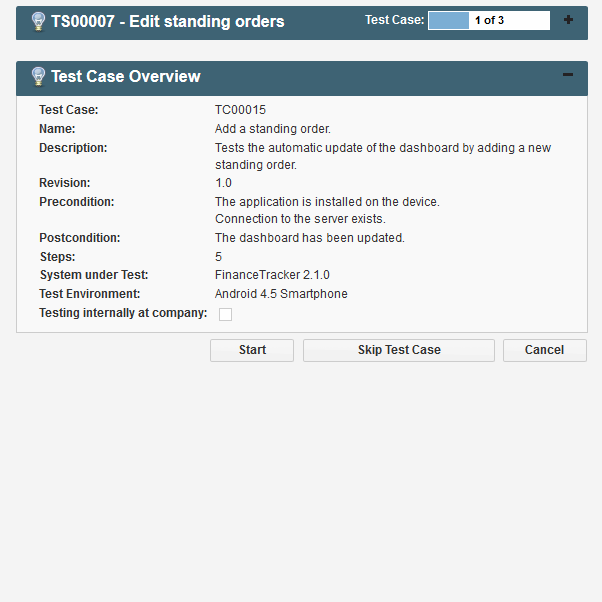
This screen shows the test suite overview and the attachments of the test suite if it has any.
Clicking the
![]() icon starts the download of the corresponding attachment.
icon starts the download of the corresponding attachment.
Click the button to begin the manual test run. By default, the step-by-step instructions screen will open, but this can be changed to the tabular step instructions view by marking the tabular view checkbox.
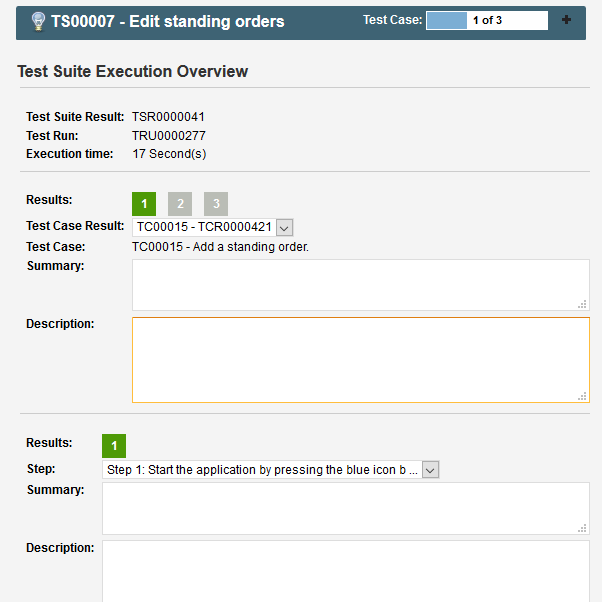
The test suite results screen allows the user to write a description and summary for the test suite run as well as for each individual test case and test step in the test run. ( Figure 8.11).
|
Note |
|---|---|
|
If there are any issue management systems configured for this project, the button will be enabled. For instructions on creating an issue with Klaros-Testmanagement see Section 8.7, “Creating Issues”. |
|
|
 |
|
| 8.2. Run Test Case |  |
8.4. Permanently Skipping Test Cases |