About this tutorial
Klaros-Testmanagement is a software to manage, execute and evaluate test cases.
In addition, it is a powerful tool with numerous interfaces and functions to cover
the entire test process.
In this tutorial we will limit ourselves to the basic functions and show you how to use
shortest way to achieve success with Klaros-Testmanagement.
The example in this tutorial can also be found as a video on our website:
We would like to make your start as smooth as possible.
If you are missing something or get stuck, please do not hesitate to contact us.
We are happy to hear from you under
support@verit.de
Creating and Running a Test Case
In order to execute a manual test case, the following must be done
four objects can be created:
- The project in which all other objects will be saved.
- One or more test environments in which the test case is to be executed, for example
Operating systems or browser variants.
- The system under test, (also test object, system to be tested, test object).
- The test case itself containing the process description, which is divided into individual test steps.
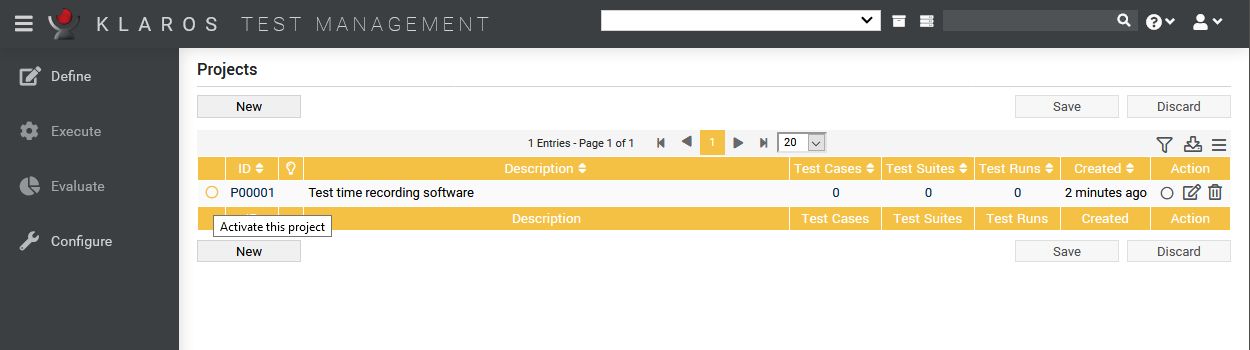
1. Create a project
We start by creating the project. Projects are the units that combine all test-related
objects into a particular test project. In our example, a
time recording software shall be tested.
Define → Projects → New → Description: "Test time recording" → Save
Now select the function Activate this project to the left of the project ID or
left in the Action column.
The selected project now appears permanently in the top right corner of the screen.
2. Create a test environment
The next step is to create the test environment.
In Klaros Test Management, a test environment summarizes the definition of external circumstances
that can influence the test result. This could be an
operating system, a physical environment, the version of a customer system or as described in our
example the web browser in use.
Test Environments → New → Enter description: "Chrome" → Save
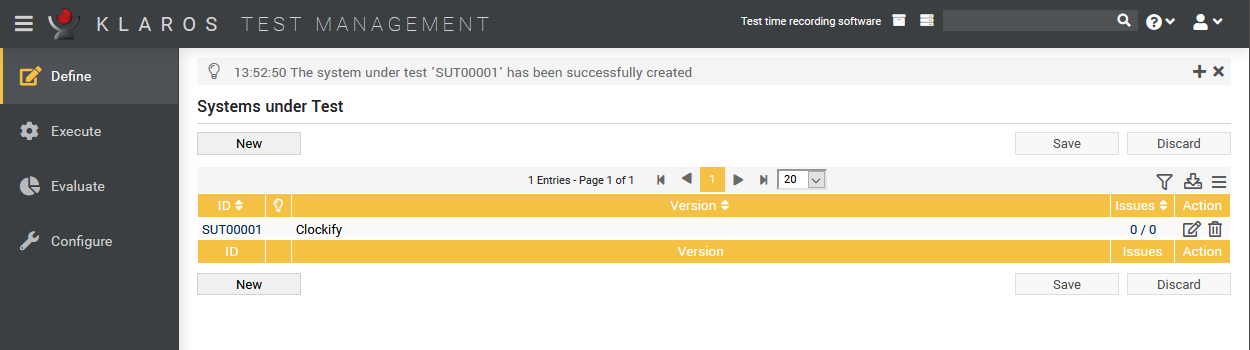
3. Create a system under test
Next we need the system under test.
Other terms are also used for this term like test system or test object.
This denotes the identification of the system/object to be tested.
Here we use the version number of the time recording software.
Systems under Test → New → Enter version "2.45" → Save
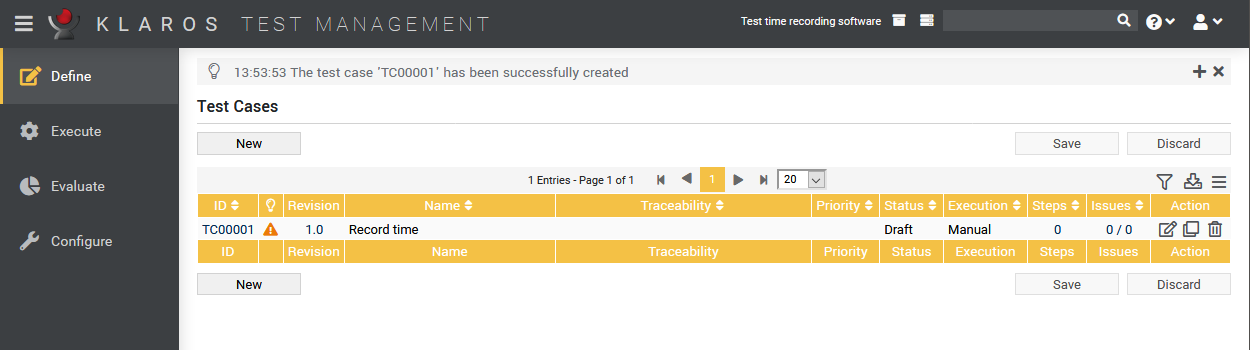
4. Define the test case
Now only the actual test case with the detailed test instructions is still missing.
Test Cases → New → Enter description: "Record time" →
Determine type of execution: Manual → Save
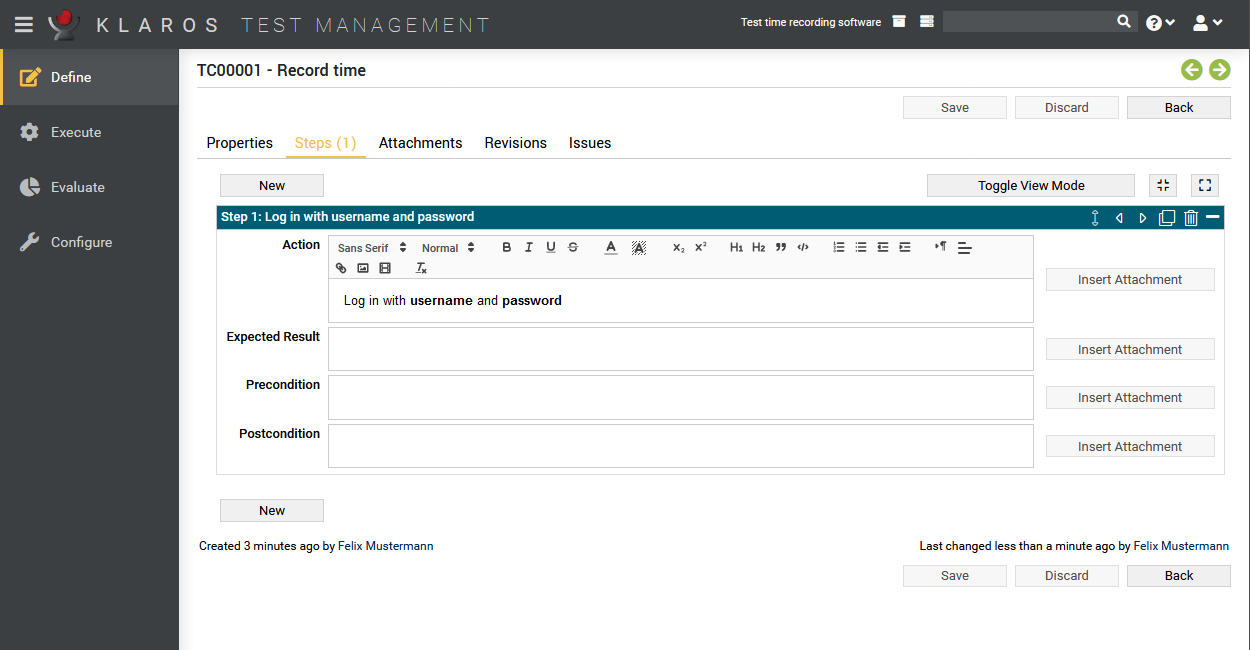
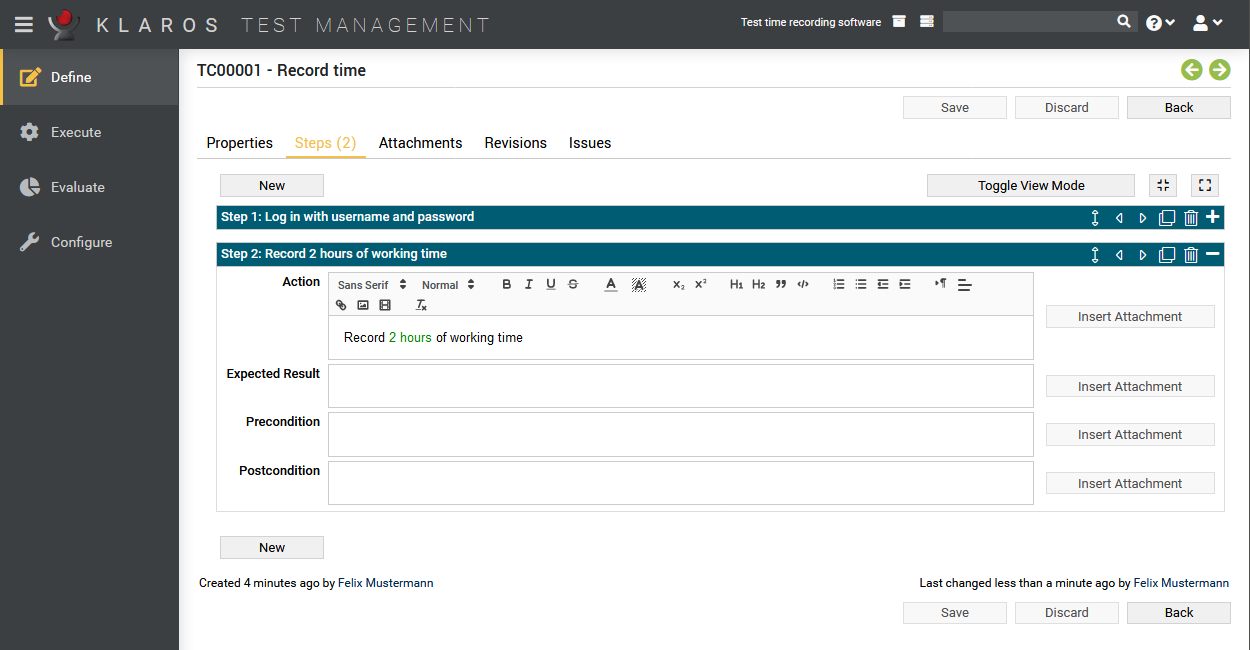
5. Create the test steps (test instructions)
To ensure that the tester knows which steps to perform, at least one test step must be performed.
can be created. We insert two steps here.
Now click on the edit symbol ("Edit this test case") in the "Action" column
to reach the "Overview" page of the test case. Here we select the tab "Steps".
Steps → New → Action "Log in with user name and password" → Save
New → Action "Record 2 hours of working time" → Save
Note: Use Toggle view mode to display a
compressed tab view. This is especially helpful when having many test steps.
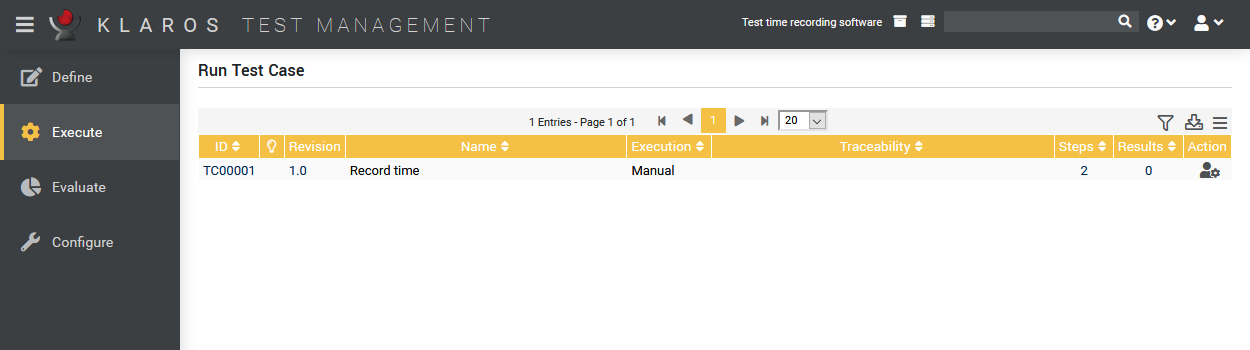
The test case "Time recording" in the project "Test time recording system" contains its
minimum definitions and can now be executed.
To do this, we switch to the Execute area.
5. Run the test case
In the Community Edition the menu item Execute Test Cases will open per default. In the
Enterprise Edition the menu item My Jobs will be shown
and you need to select Execute Test Cases from the side menu.
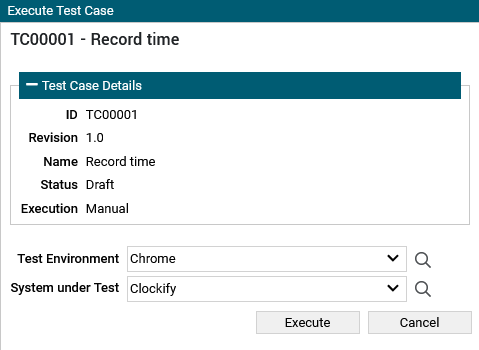
Execute → Execute Test Cases Execute → A dialog opens → Inputs can be made
are checked → Run → A new browser window opens
Note: A separate window will now open to execute the test case.
Please make sure that your browser allows to open popup-windows.
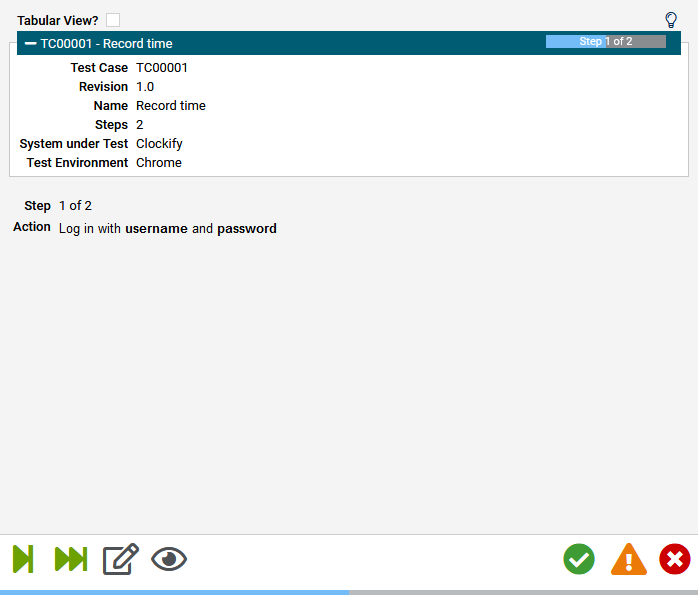
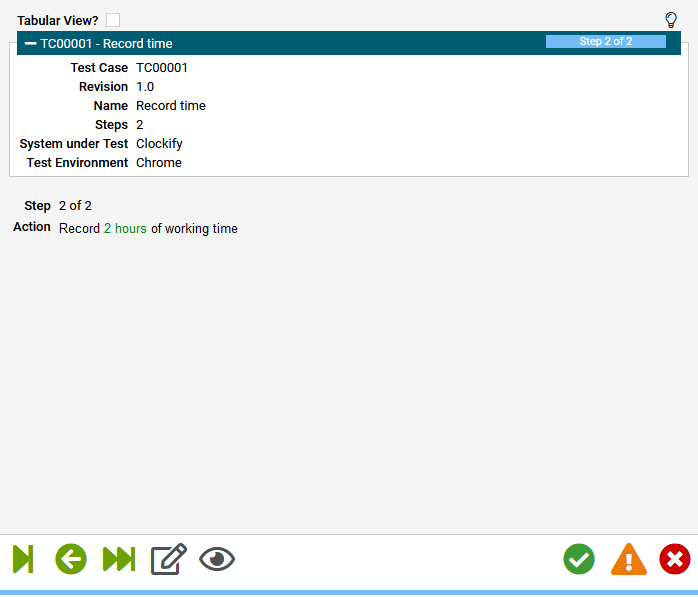
The tester is now guided step by step through the test case while the results are automatically recorded.
For a better overview, two possible representations can be chosen here: "Detailed" and "Tabular".
If necessary, the application window can now be minimized to leave the screen free to perform the test steps.
Step 1 click Passed
Step 2 click Passed
Confirm with OK.
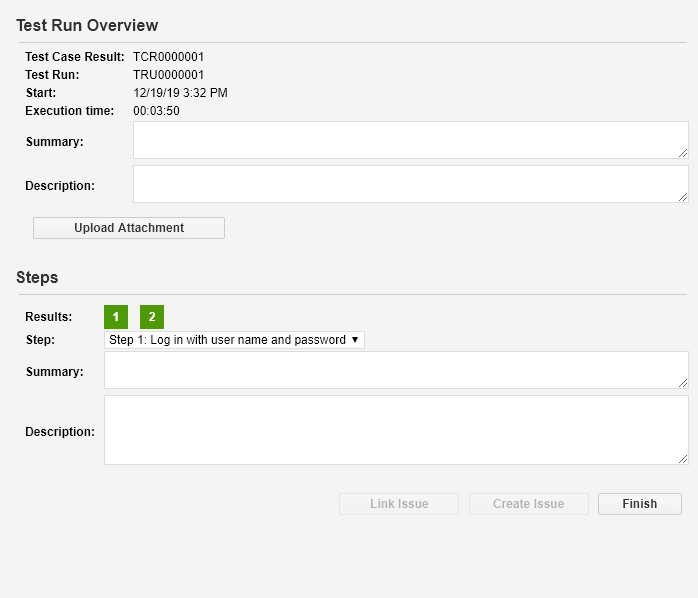
Before the test case execution is complete, additional information about the test execution can be added
or files can be appended to the test case result.
Now we open the application window again. After clicking on Close, the execution of the
test case is finished and you will see the current results.
Close → Close → Switch to application window
6. View the Test Case Result
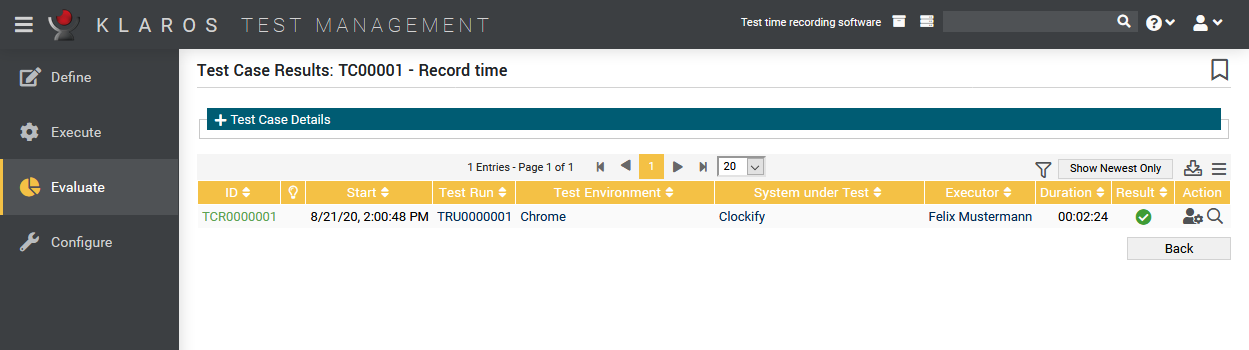
For this we select the area Evaluate → Test Case Results
to reach the overview page of all test case results. In our example only one test case exists.
Select the magnifying glass symbol in the "Action" column to go to the "Test Case Results" detail page.
All test case results of the selected test case are displayed here.
Since the test case was executed only once, only one result is listed here.
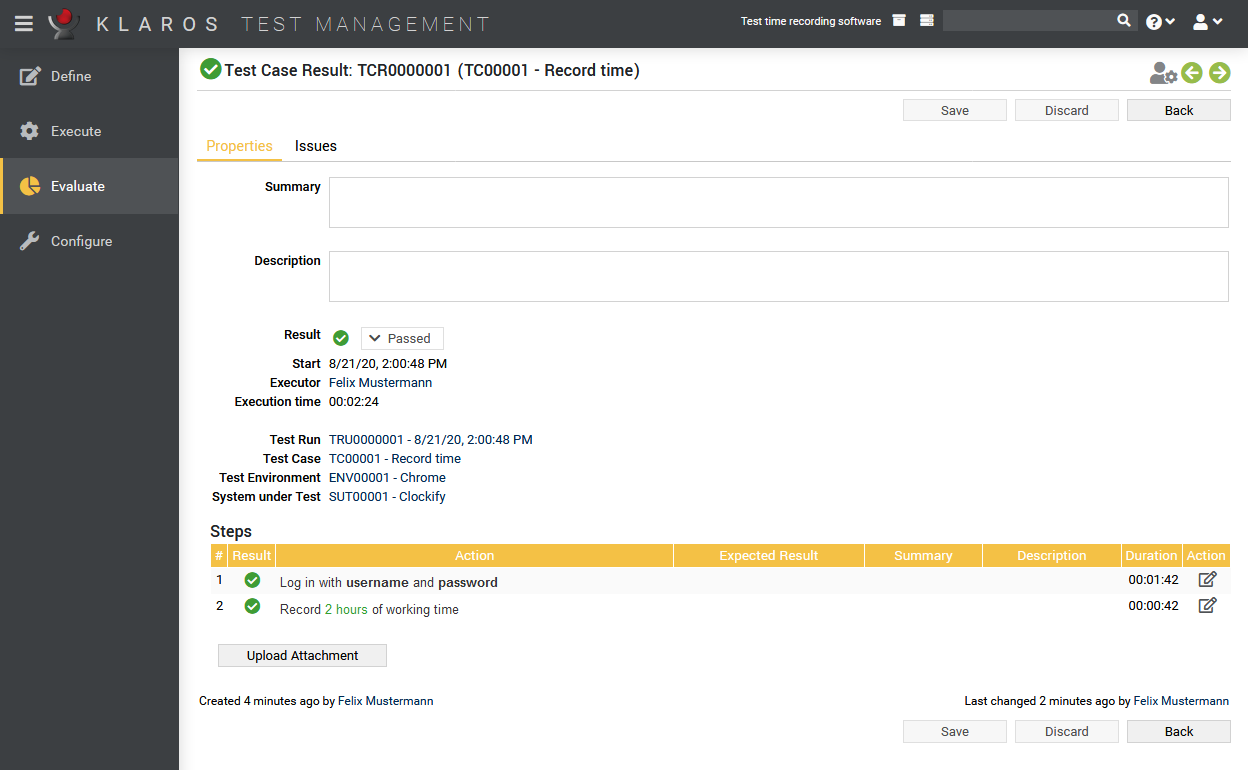
A further click on the magnifying glass symbol takes you to the detail page of the test case result.
Alternatively, the result can also be displayed by clicking on
the number in the overview view under the column "Results".
You will be taken back to the area
Define → Test Cases → Test Case Results.
Here you can select the magnifying glass symbol and return to the "Evaluate" area.
By clicking on the bookmark icon in the upper action bar you create a permanent URL for this test result,
which can be shared with team members.
A click on the print symbol generates an optimized view of the test result and may be directly printed
from the browser.
The first test case was successfully created, executed and evaluated. Its result can
can be sent as a link or printed out as a document.


 Up to version 4.11.1 Klaros-Testmanagement still only supports Oracle Java 8. We recommend using Oracle Java Runtime 8u201. This version is still subject to the original license conditions and can therefore be used free of charge.