| 9.5. Test Case Results | ||
|---|---|---|

|
Chapter 9. Evaluate |  |
| 9.5. Test Case Results | ||
|---|---|---|
|
|
Chapter 9. Evaluate | |
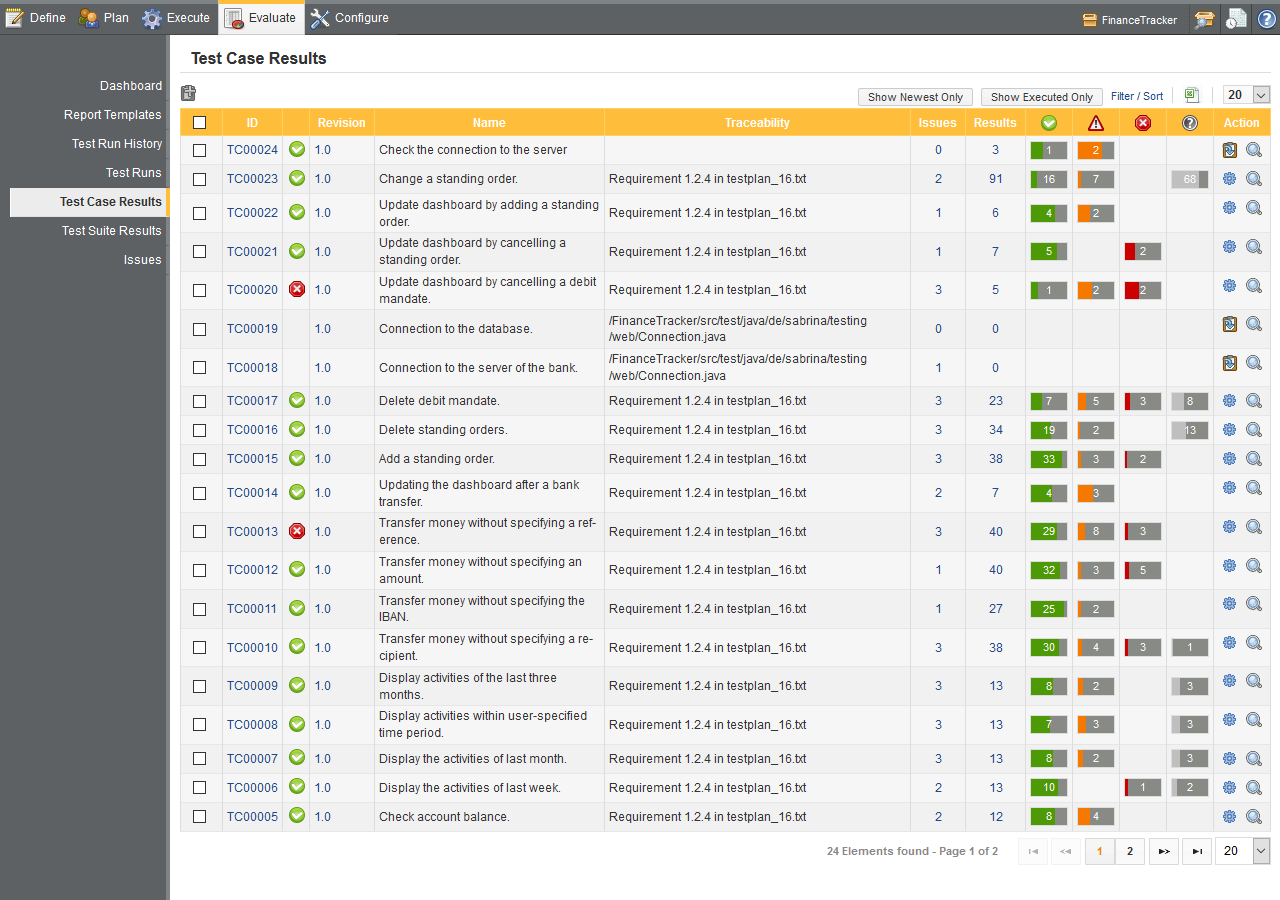
The Test Case Result screen shows results for individual test cases. The total number of passed, failed, error and skipped results for each test case is shown ( Figure 9.19). To get a better overview of the test cases, the sorting and filtering functionality of the Filter / Sort panel can be used, as described in Section 5.2.6, “Filtering and Sorting”.
This screen displays an overview of the test cases for the project. To narrow the search,
the filtering and sorting functionality of the page can be used. The latest result of a
test case is displayed in the
![]() column.
column.
Clicking the
![]() icon starts a retest of the corresponding test case and
clicking the
icon starts a retest of the corresponding test case and
clicking the
![]() icon opens the test case result page for the corresponding test case.
icon opens the test case result page for the corresponding test case.
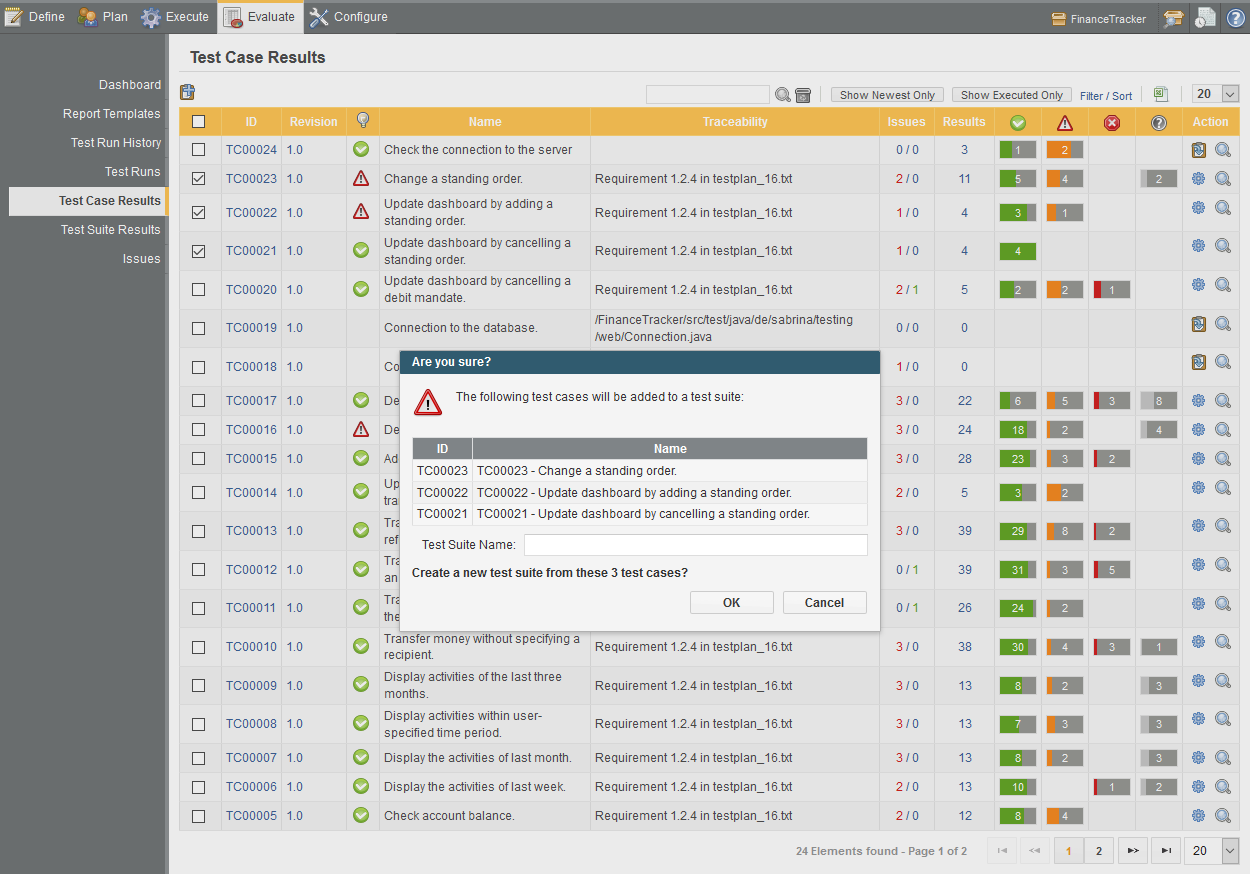
The
![]() icon opens a dialog which enables the user to create a test suite from
the selected test cases. The dialog to create the new test suite is shown in
Figure 9.20.
icon opens a dialog which enables the user to create a test suite from
the selected test cases. The dialog to create the new test suite is shown in
Figure 9.20.
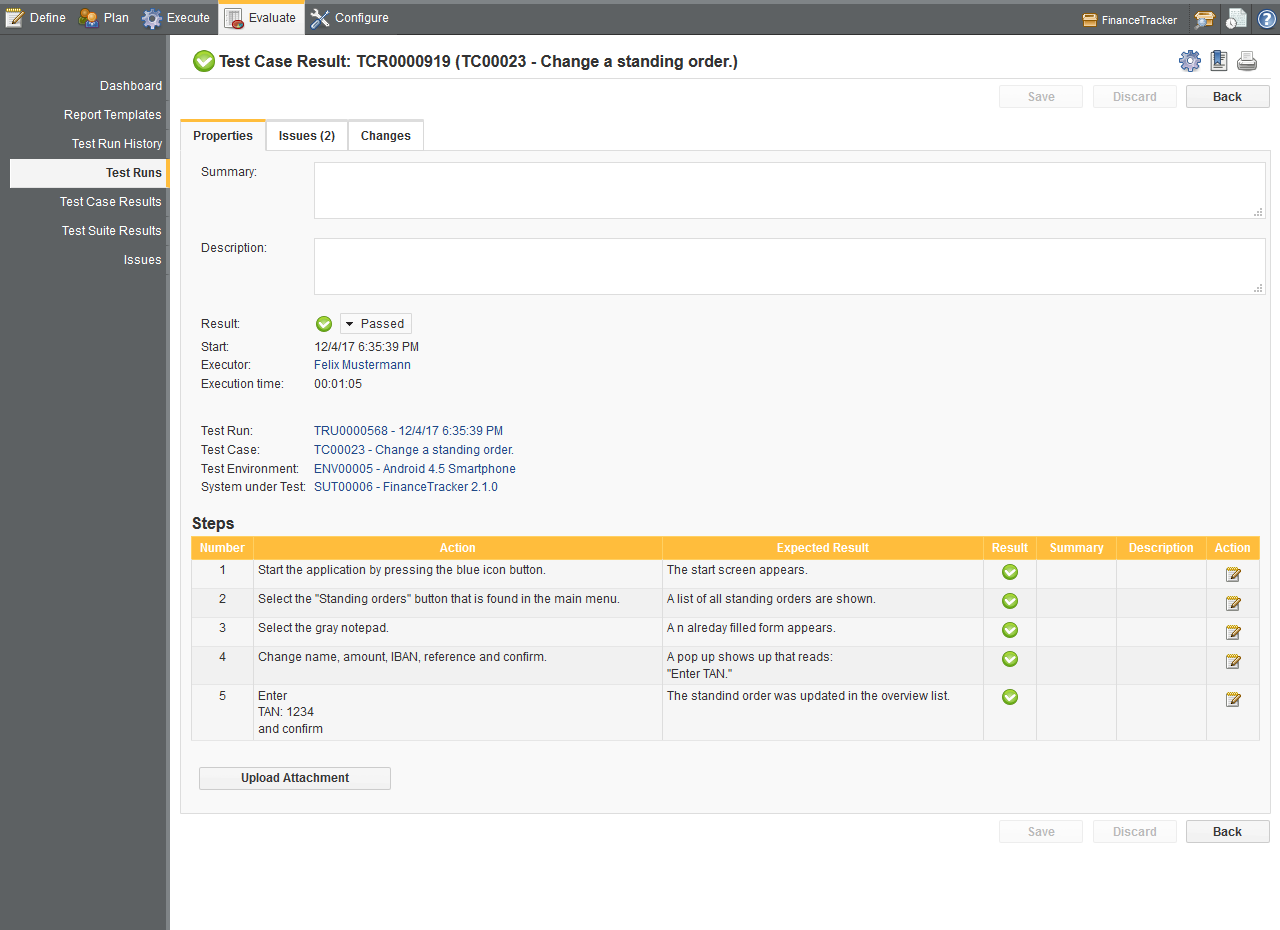
This page shows individual executions of the selected test case. The result of each execution is shown, as well as the system under test and test environment used ( Figure 9.21).
The test case details panel in the page shows all details of the selected test case. The result of the test case runs is shown using the following icons:
![]() the test finished successfully
the test finished successfully
![]() a failure of the system under test has been detected
a failure of the system under test has been detected
![]() an error occured during the test execution
an error occured during the test execution
![]() the test result could not be determined
the test result could not be determined
In addition, the ID of each test case result is colored green for passed, orange for failed, red for error or gray for skipped.
If the
![]() icon appears in the ID column, this means that the corresponding
test case result has been manually changed by a user.
icon appears in the ID column, this means that the corresponding
test case result has been manually changed by a user.
Clicking the
![]() icon starts a retest of the test case.
icon starts a retest of the test case.
To get a better overview of the test case results, the sorting and filtering functionality of the Filter / Sort panel can be used, as described in Section 5.2.6, “Filtering and Sorting”.
Clicking the button brings the user back to the test case results screen ( Figure 9.19), where they may choose another test case.
Clicking on the
![]() icon opens up the test case result details screen for
the corresponding test case result
( Figure 9.22).
icon opens up the test case result details screen for
the corresponding test case result
( Figure 9.22).
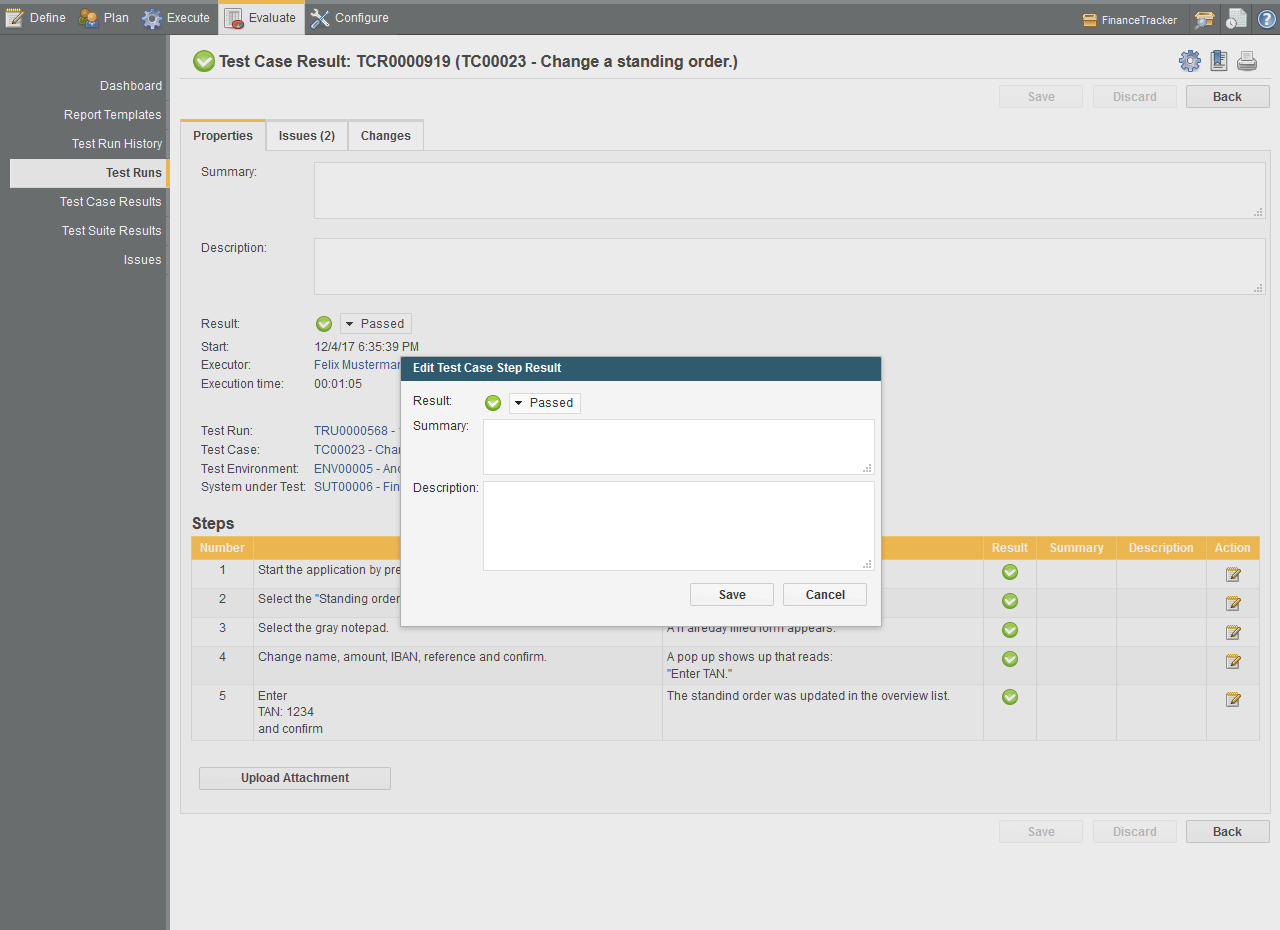
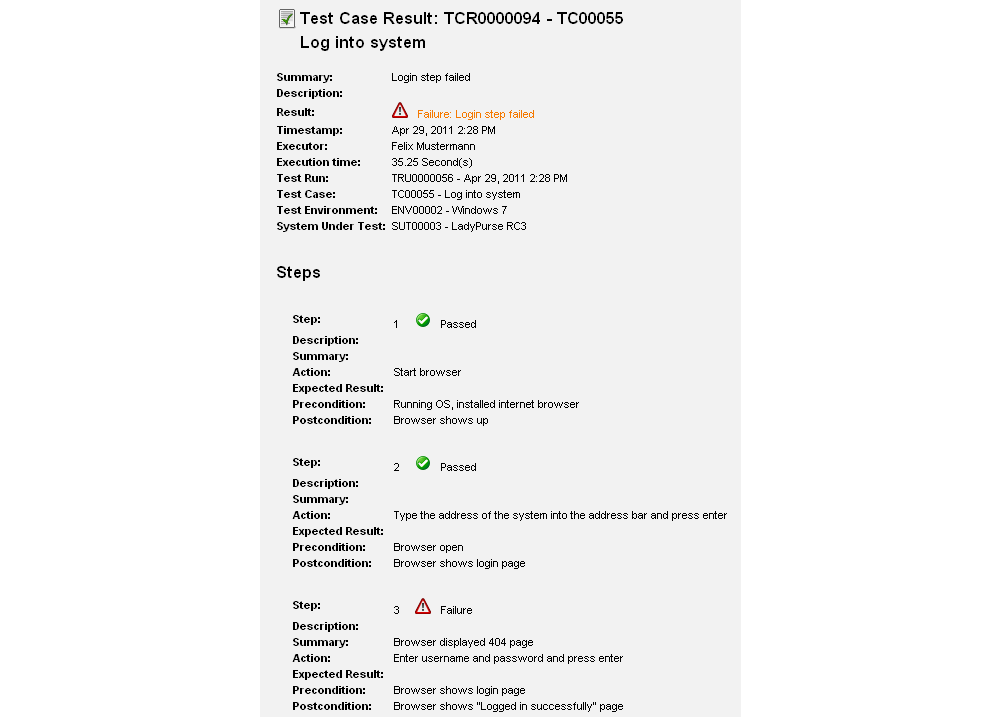
This page shows the individual step results of the test case result. Users may also
edit the Summary, Description
and Result of the test case result and of each individual step
result. All changes are logged, and any change to results is cascaded to the
test case result, test suite result and test run. If a test case result has been
changed, the
![]() icon is displayed on this page and in all tables where the
result is displayed. The Result
field of a test case result may only be changed in Klaros-Testmanagement Enterprise Edition.
Figure 9.23
shows the individual step edit dialog.
icon is displayed on this page and in all tables where the
result is displayed. The Result
field of a test case result may only be changed in Klaros-Testmanagement Enterprise Edition.
Figure 9.23
shows the individual step edit dialog.
Clicking the
![]() icon starts a retest of the test case.
icon starts a retest of the test case.
![]() Feature only available in Klaros-Testmanagement Enterprise Edition
Feature only available in Klaros-Testmanagement Enterprise Edition
This screen can also be viewed as a printer-friendly page ( Figure 9.24).
|
|
 |
|
| 9.4. Test Runs |  |
9.6. Test Suite Results |