| 10.3. Users | ||
|---|---|---|

|
Chapter 10. Configure |  |
| 10.3. Users | ||
|---|---|---|
|
|
Chapter 10. Configure | |
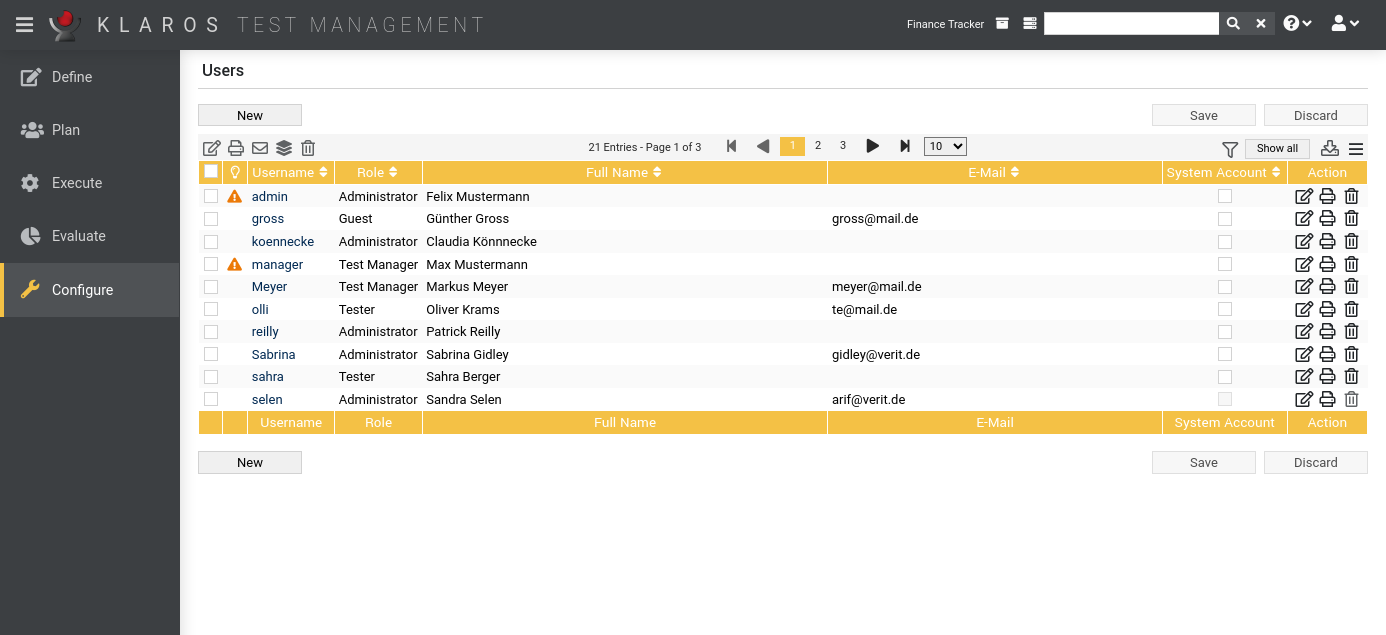
The user accounts are created and edited in the Users section.
The overview page gives an overview of the user accounts in Klaros-Testmanagement. The user accounts are created, edited, merged, activated and deactivated here.
The table shows the following values:
|
Additional Information |
A tooltip appears when the cursor is placed over the icon shown here. |
|
Username |
The unique username. |
|
Role |
The user roles (Administrator, Test Manager, Tester, Guest). |
|
Full Name |
The full name of the user. |
|
|
The email address of the user. |
|
Actions |
The executable actions. |
The action column is located on the far right of the table. The following actions can be performed here:
If a user has been deleted, it is initially marked with a deletion marker and is only visible to administrators. For deleted users, the following action is available instead of Delete:
Some actions can be applied to multiple user accounts at the same time. To do this, select the user accounts to which the action is to be applied in the leftmost column.
The following bulk actions are supported for user accounts:
It is not possible to permanently delete users directly, but users can be merged. The user to be kept will be selected in the dialog ( Figure 10.6). The selected user takes over the job assignments, test results and test runs of the other users. The other users will then be permanently deleted and are therefore no longer listed in the user list.
Bulk actions are described in detail in Section 5.2.3.1.5, “Bulk Actions”
The following operations can be performed in the line above the table on the right:
All operations are described in detail in Section 5.2.3.1, “Overview Page”.
![[Important]](images/important.png) |
Changing User Roles |
|---|---|
|
Users - including administrators - cannot change their own System Account flag or role. This can only be done from another user account that has the Administrator role. |
Clicking the button creates a new user account ( Figure 10.5). The Username, Role, Full Name, and E-Mail attributes can be set here.
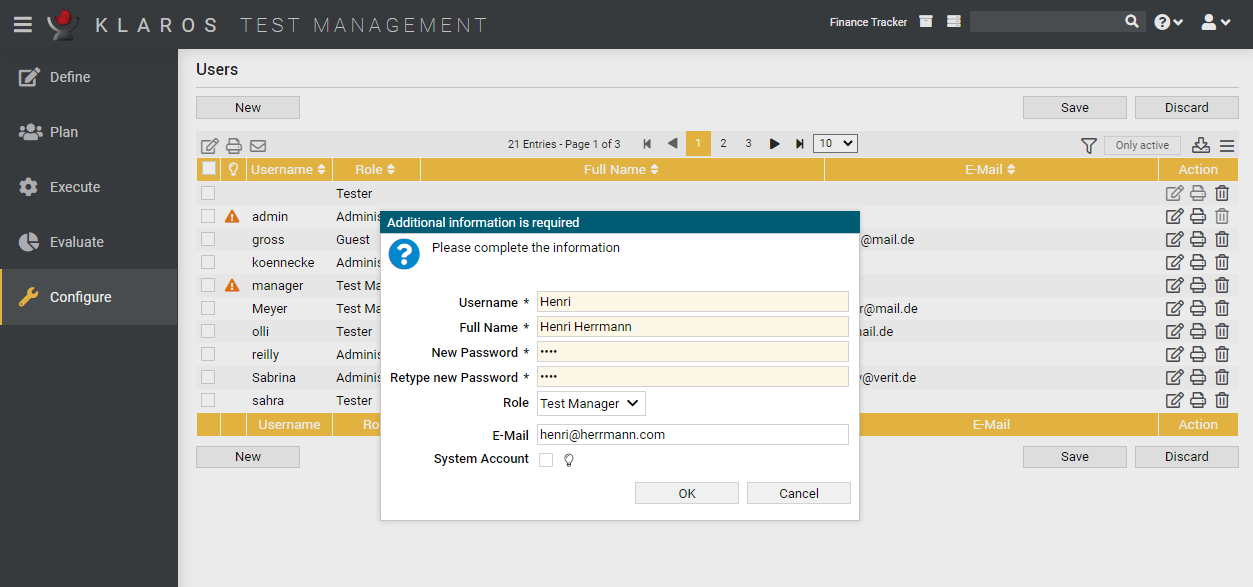
When the button is clicked, a dialog will appear for each new user account to set the Password and System Account flag ( Figure 10.7).
Per default users of the role Administrator or Manager are able to create new user accounts. Users of the role Manager can only create accounts of the role Tester or Guest.
![[Tip]](images/tip.png) |
Restricting Account Creation to Administrators |
|---|---|
|
If a more restrictive policy is desired, the Only Administrators can create Users setting can be used. See Section 10.4.1, “Miscellaneous” for more information. |
Clicking the icon page deactivates the user account. Only users of the role Administrator can see and reactivate deactivated user accounts.
![[Note]](images/note.png) |
User accounts can only be deactivated, not deleted! |
|---|---|
|
By toggling the and button above the table, administrators can hide or show deactivated user accounts. Instead of deleting user accounts, they can be merged with other existing user accounts. This operation will delete all user accounts to be merged except the remaining account. |
Each user account has its own detail page with several additional tabs. Clicking on the ID of the respective user account or on the icon on the right in the action column takes you to the tab that was selected last. When called for the first time, this is the Overview tab.
The following tabs are available: Properties, Project Roles, Jobs, Results and Changes.
On the detail pages, there are additional icons in the top right corner of the header. The following actions can be performed here:
|
Open print view |
A print-ready view of the user account can be created here. With a click on the icon this opens in a new browser tab. Print views are described in detail in Section 5.2.3.2.1, “Print Pages”. |
|
Browse |
Use the green arrows at the very top right to switch between the user accounts present on the previous page. |
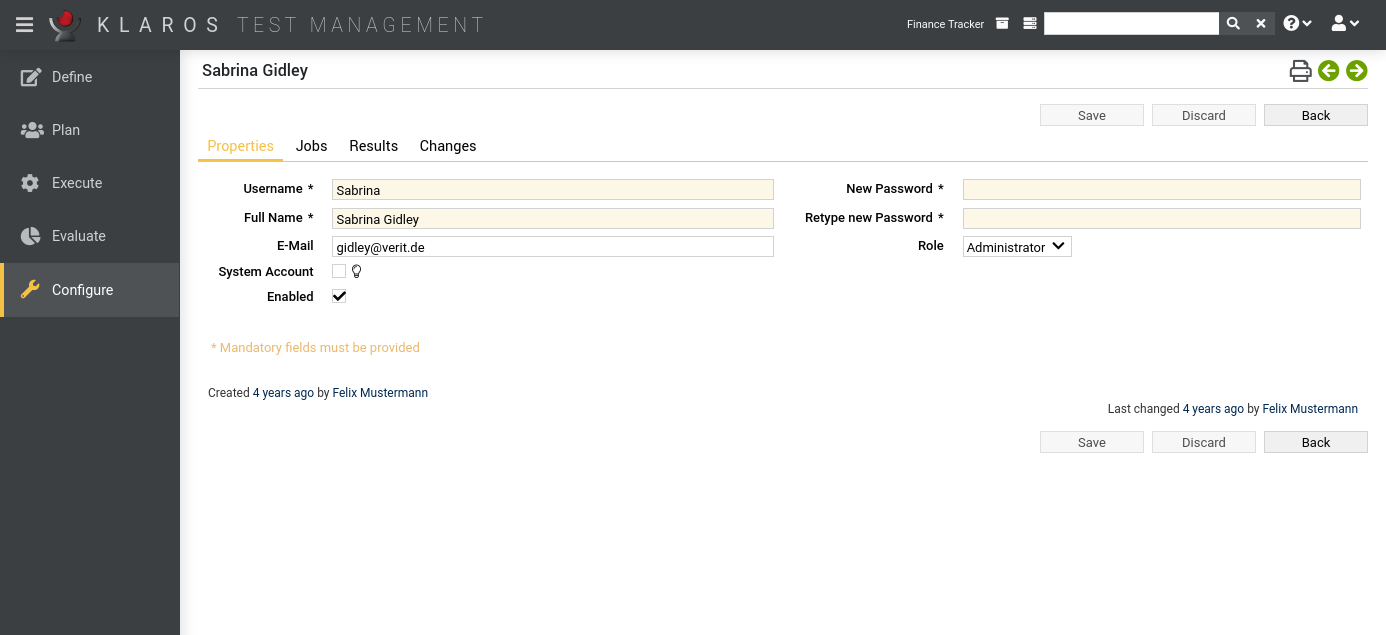
This tab ( Figure 10.8) allows the user to view or change the following attributes of the user account:
|
Username |
The login name of the user |
|
Full Name |
The full name of the user |
|
|
The user's email address which is used for email notifications. If a corresponding event has been configured (see Section 10.4.2, “Notifications”) and an email address is specified when creating a new user (see Section 10.3.1.4, “Creating a new User”), this user will receive a registration email with username and password. |
|
System Account |
If this box is checked, this user will not be able to log in to the login page. System accounts are intended for automated tasks such as importing data. |
|
Active |
If this box is checked, this user will not be able to log in to the login page. |
|
Password |
The password to log in to Klaros-Testmanagement. |
|
Retype Password |
Confirmation of the password. |
|
User Role |
The user role. Available roles are Administrator, Test Manager, Tester or Guest. |
|
Limitations when Changing User Roles |
|---|---|
|
Users can not change their own System Account flag and Role. This must be done by another user with administrator role. |
![]() Only available in Klaros-Testmanagement Enterprise Edition
Only available in Klaros-Testmanagement Enterprise Edition
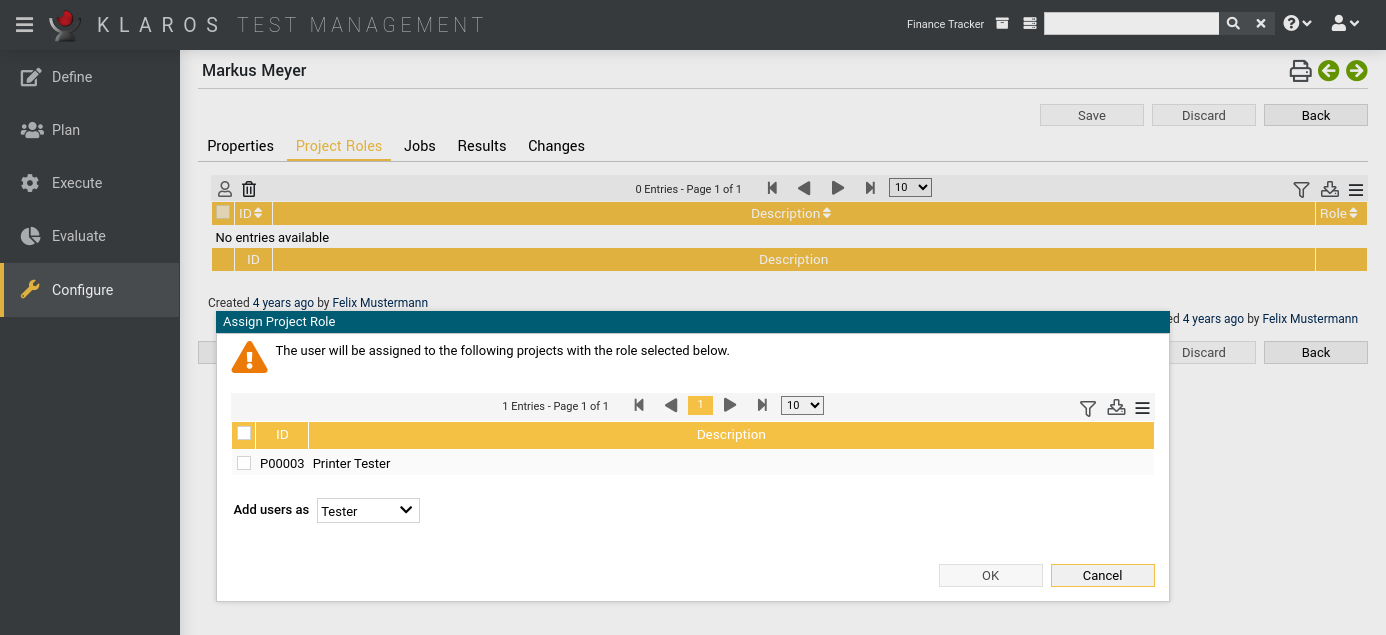
The Project Roles tab shows the project roles the user has in projects with project specific roles (see Section 6.1.2.5, “Access” for more information on how to assign project-specific roles to a project). Administrators can change the project roles for these projects here.
This tab is available once the first project has been assigned project-specific roles.
Pressing the button opens up a dialog with a list of all projects with project specific roles that the user isn't assigned to yet. Pressing the button assigns the user to the selected projects.
The Jobs tab lists all the jobs assigned to the user. See Section 7.1, “Jobs” for more information on how to manage jobs.
The Results tab shows all the test results of the tests that the user has executed, see Section 5.2.3.2.7, “Test Runs and Results”.
In the Changes tab the change history for the user can be found, see Section 5.2.3.2.8, “Change History”.
|
|
 |
|
| 10.2. Report Templates |  |
10.4. System |