| 4.3. Creating the Report Layout | ||
|---|---|---|

|
Chapter 4. Creating custom reports |  |
| 4.3. Creating the Report Layout | ||
|---|---|---|
|
|
Chapter 4. Creating custom reports | |
Klaros-Testmanagement uses the JBoss Seam PDF framework to render the report and fill the retrieved data into the layout template.
We will start with an empty document that contains only a header and footer definition.
<p:document xmlns:ui="http://java.sun.com/jsf/facelets"
  xmlns:f="http://java.sun.com/jsf/core"
  xmlns:p="http://jboss.org/schema/seam/pdf"
  title="Klaros-Testmanagement Test Plan Report" marginMirroring="true"
  author="#{user.name}" creator="#{user.name}" pageSize="A4">
  <f:facet name="header">
    <p:font size="8">
      <p:header borderWidthBottom="0.1" borderColorBottom="black" borderWidthTop="0" alignment="center">
        <p:text value="Test Run Report - Generated on #{date} by #{user.name}" />
      </p:header>
      <p:footer borderWidthTop="0.1" borderColorTop="black" borderWidthBottom="0" alignment="center">
        <p:text value="Page " />
        <p:pageNumber />
        <p:text value=" - Created with Klaros-Testmanagement (www.klaros-testmanagement.com)" />
      </p:footer>
    </p:font>
  </f:facet>
  <p:paragraph>
    <p:text value=" " />
  </p:paragraph>
</p:document>
This snippet creates a header that is displayed on every page.
It contains the date and the name of the Klaros-Testmanagement user who created the report.
The footer contains the page number and an informative text that the report was created with Klaros-Testmanagement.
For the header the borderWidthBottom attribute was set to provide a separation from the following text.
Likewise for the footer the borderWidthTop attribute was used to create a single line for separation.
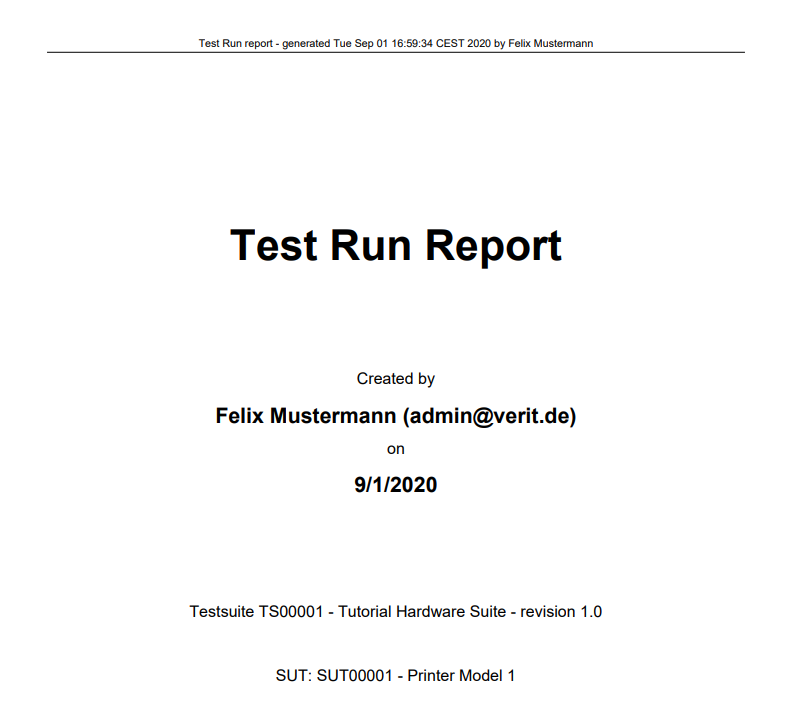
Next we create a front page accumulating the main information about the report.
The layout of the front page is done using <p:paragraph> elements for formatting.
These elements use alignment and spacing to position the text.
To change the font of the paragraphs, you can use the <p:font>
element and use its style and size attributes to highlight text.
  <p:paragraph alignment="center" spacingAfter="100">
        <p:text value="" />
    </p:paragraph>
    <p:font style="bold" size="32">
        <p:paragraph alignment="center" spacingAfter="75">
            <p:text value="Test Run Report" />
        </p:paragraph>
    </p:font>
    <p:font style="normal" size="12">
        <p:paragraph alignment="center" spacingAfter="5">
            <p:text value="Created by" />
        </p:paragraph>
    </p:font>
    <p:font style="bold" size="16">
        <p:paragraph alignment="center" spacingAfter="5">
            <p:text value="#{user.name} (#{user.email})" />
        </p:paragraph>
    </p:font>
    <p:font style="normal" size="12">
        <p:paragraph alignment="center" spacingAfter="5">
            <p:text value="on" />
        </p:paragraph>
    </p:font>
    <p:font style="bold" size="16">
        <p:paragraph alignment="center" spacingAfter="75">
            <p:text value="#{date}" />
        </p:paragraph>
    </p:font>
    <p:font style="normal" size="12">
        <p:paragraph alignment="center" spacingAfter="30">
            <p:text value="Testsuite " />
            <p:text value="#{testSuite.name}" />
            <p:text value=" - " />
            <p:text value="#{testSuite.shortname}" />
            <p:text value=" - revision " />
            <p:text value="#{testSuite.revisionId}" />
        </p:paragraph>
        <p:paragraph alignment="center" spacingAfter="5">
            <p:text value="SUT: " />
            <p:text value="#{testSuite.sut.name}" />
            <p:text value=" - " />
            <p:text value="#{testSuite.sut.productversion}" />
        </p:paragraph>
    </p:font>
    <p:newPage />
The resulting cover sheet can be found below.
As seen with the header and footer definition, values stored in the context can be accessed by preceding the context variable enclosed in curly brackets with a leading # character, e.g. #{user.name}. The context variable for the user is automatically inserted into the context by Klaros-Testmanagement. We used this already when we prepared the data for this report and added the test suite to the context.
context.add("testSuite", testSuite);
For the front page we access this context variable to retrieve the data that came with this test suite, e.g.
#{testSuite.name}, #{testSuite.shortname}, and
#{testSuite.revisionId}.
You can find the accessible attributes in the
Klaros-Testmanagement API Documentation
reference in the online documentation.
All attributes that have a get-method can be accessed. e.g. for #{testSuite.name}
you will find the method getName() in its derived IKlarosLabeledObject interface.
To add a page break to the document, you can use the following:
<p:newPage />
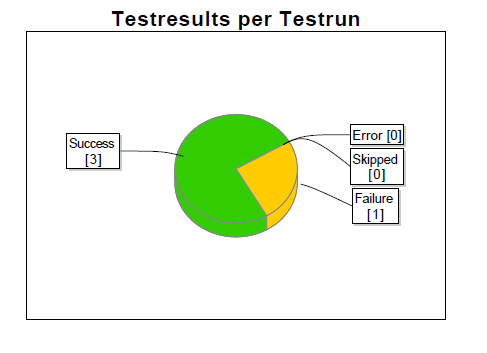
Now that we have created a front page we can start to fill in the data we prepared and stored in the context. To give a quick overview over the test results we will start with a pie chart displaying the test case results in this test suite.
  <p:paragraph horizontalAlignment="center" spacingAfter="25">
        <p:piechart title="Test Results per Test Run" direction="anticlockwise"
            circular="true" startAngle="30" labelGap="0.1" labelLinkPaint="#000000"
            plotBackgroundPaint="#ffffff" labelBackgroundPaint="#ffffff" is3D="true"
            borderVisible="false">
            <p:series key="results">
                <p:data key="Error [#{error.size}]" value="#{error.size}"
                    sectionPaint="#FF0A0A" />
                <p:data key="Success [#{success.size}]" value="#{success.size}"
                    sectionPaint="#33CC00" />
                <p:data key="Failure [#{failure.size}]" value="#{failure.size}"
                    sectionPaint="#FFCC00" explodedPercent=".2" />
                <p:data key="Skipped [#{skipped.size}]" value="#{skipped.size}"
                    sectionPaint="#FFFFFF" />
            </p:series>
        </p:piechart>
    </p:paragraph>
An example of a generated pie chart can be found below.
For a detailed description about how to lay out the pie chart and many other charts, please check the
seam-pdf documentation.
Again you might remember that we added four List<KlarosTestCaseResult> objects to the context:
  context.add("error", error);
  context.add("failure", failure);
  context.add("success", success);
  context.add("skipped", skipped);
These four objects represent the results of our test suite. We can simply use the size of the collections representing the data for the pie chart:
<p:data key="Error [#{error.size}]" value="#{error.size}" sectionPaint="#FF0A0A" />
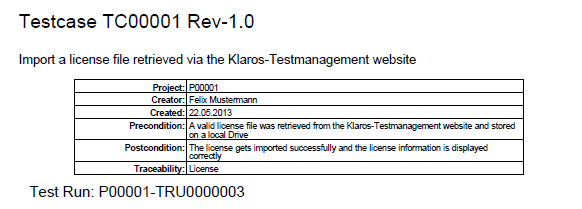
Next, we want to create a separate page for each test case in the test-suite and display the results in a table.
As this might get a bit lengthy, only fragments of the code will be presented here. An example can be found below.
First we need to loop over all test cases of the test suite:
  <ui:repeat value="#{testSuite.testCases}" var="testCase">
    ...
  </ui:repeat>
We create a loop in the template engine using the <ui:repeat> element.
The value attribute gets assigned a collection, in our case the list of test cases.
The var attribute defines a variable which can be used within the loop to address the current value.
of the current value, e.g. testCase.
With each pass of the loop, the variable testCase gets the next value from the collection.
Now for the table. We need a two column table and the width of the second column should be three times the size of the first. The code is as follows:
  <p:table columns="2" widths="1 3">
    ...
  </p:table>
Now the table is filled with data. For this purpose, it is necessary to define how each table cell should look like.
The following code is embedded between the <p:table> elements.
  <p:cell horizontalAlignment="right">
        <p:font style="bold" size="8">
            <p:paragraph>
                <p:text value="Project: " />
            </p:paragraph>
        </p:font>
    </p:cell>
    <p:cell>
        <p:paragraph alignment="left">
            <p:text value="#{testCase.configuration.name}" />
        </p:paragraph>
    </p:cell>
    <p:cell horizontalAlignment="right">
        <p:font style="bold" size="8">
            <p:paragraph>
                <p:text value="Creator: " />
            </p:paragraph>
        </p:font>
    </p:cell>
    <p:cell>
        <p:paragraph alignment="left">
            <p:text value="#{testCase.creator.name}" />
        </p:paragraph>
    </p:cell>
    ...
The table is supposed to have two columns, thus two cells per row must be specified as well.
In the above code, the first cell of a row contains the name of the test project,
while the second cell contains the name of the user who created the test case.
It is possible to format the text inside a cell as shown by the <p:font> element.
Next we need the test case results for the test case being displayed. This is where another element comes in. If there is no result available for a test case, a standard text should be displayed instead of an empty cell.
  <ui:fragment rendered="#{testCase.results.isEmpty()}">
        <p:font style="normal" size="14">
            <p:paragraph alignment="left" spacingAfter="15"
                indentationLeft="10">
                <p:text value="No test runs found for this test case." />
            </p:paragraph>
        </p:font>
    </ui:fragment>
Notice the <ui:fragment rendered="..."> element.
This part of the document is only integrated into the PDF if
the condition defined in the rendered attribute evaluates to true.
This could be compared to an if-clause in programming languages.
In the expression #{testCase.results.isEmpty()}
the isEmpty() method of the test case result list
is called which evaluates to a boolean value.
Next we have to define the block that displays the data in case there are test results present for the test case:
  <ui:fragment rendered="#{!testCase.results.isEmpty()}">
    ...
  </ui:fragment>
Note the ! which is used to negate the boolean expression
we used in the block before.
The code inside this block will be executed if the list of results has at least one entry.
Now we loop over the results of the test cases, which will include each test run for a test case. An example of a test run can be found below.
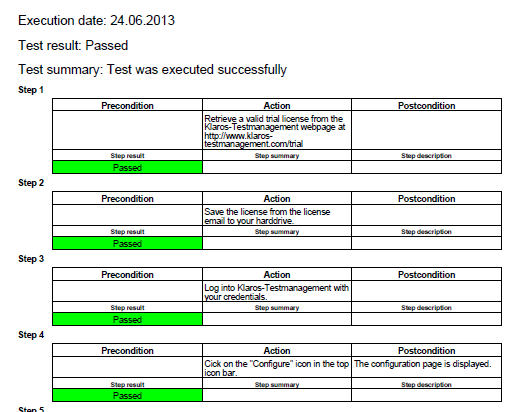
  <ui:repeat value="#{testCase.results.toArray()}" var="testResult">
    <!-- Start Test Result summary (equivalent to Test Run) -->
    ...
  </ui:repeat>
This will provide us with the test results of a test case in the variable testResult.
The next pieces of code include the displaying of a summary of the test result which is quite similar
to the code used displaying the test case summary.
You can examine it in the provided source file.
For this purpose, another loop must be created within the test result loop.
  <!-- Start Test Step Result summary -->
    <ui:fragment rendered="#{!testResult.stepResults.isEmpty()}">
        <ui:repeat value="#{testResult.stepResults}" var="testStepResult">
        ...
        </ui:repeat>
    </ui:fragment>
    <ui:fragment rendered="#{testResult.stepResults.isEmpty()}">
        <p:font style="normal" size="10">
            <p:paragraph alignment="left" spacingAfter="35"
                indentationLeft="25">
                <p:text value="No test step results found." />
            </p:paragraph>
        </p:font>
    </ui:fragment>
Inside the <ui:repeat>...</ui:repeat> block a table is created.
This table should be displayed if there are any results for the test case step.
The table displays the precondition, action, and postcondition of the test case step and also the test case step
result,
the test case step summary, and the test case step description.
The test case step result cell of the table will get coloured according to the result, e.g. green if the step passed.
Each table will have the number of the step as headline.
Displaying the step number.
  <p:font style="bold" size="8">
      <p:paragraph indentationLeft="20">
          <p:text value="Step #{testResult.stepResults.indexOf(testStepResult)+1}" />
      </p:paragraph>
  </p:font>
Here you can see how to retrieve the index of the test case step
result from the list of test results. testStepResult is the variable from
the inner loop, while testResult is the variable from the outer loop.
As counting starts at zero we have to increment the retrieved value, otherwise the first step would be shown as
step 0.
The table should only be displayed if the test case contains at least one test step.
  <p:table columns="3" widths="3 3 3" spacingBefore="5"
        rendered="#{testCase.testCaseSteps!=null and testCase.testCaseSteps.size() > 0}">
    ...
  </p:table>
Retrieving the test case step properties (precondition, action, postcondition).
  <p:cell horizontalAlignment="left">
    <p:font style="normal" size="8">
        <p:paragraph>
            <p:text
            value="#{testCase.testCaseSteps.get(testStepResult.precondition}" />
        </p:paragraph>
    </p:font>
  </p:cell>
To get to the test case step properties we have to access the test
case to retrieve the data. From the list of test case steps we retrieve
the test case step via the index in the list of the test case step results and
then the precondition can be accessed. The same applies to the
action and the postcondition of the test case
step.
Coloring a cell depending on the test step result.
    <ui:fragment rendered="#{testStepResult.isPassed()}">
        <p:cell backgroundColor="rgb(0,255,0)"
            horizontalAlignment="center">
            <p:font style="normal" size="8">
                <p:paragraph>
                    <p:text value="Passed" />
                </p:paragraph>
            </p:font>
        </p:cell>
    </ui:fragment>
    <ui:fragment rendered="#{testStepResult.isError()}">
        <p:cell backgroundColor="rgb(255,0,0)"
            horizontalAlignment="center">
            <p:font style="normal" size="8">
                <p:paragraph>
                    <p:text value="Error" />
                </p:paragraph>
            </p:font>
        </p:cell>
    </ui:fragment>
    <ui:fragment rendered="#{testStepResult.isFailure()}">
        <p:cell backgroundColor="rgb(255,215,0)"
            horizontalAlignment="center">
            <p:font style="normal" size="8">
                <p:paragraph>
                    <p:text value="Failed" />
                </p:paragraph>
            </p:font>
        </p:cell>
    </ui:fragment>
    <ui:fragment rendered="#{testStepResult.isSkipped()}">
        <p:cell horizontalAlignment="center">
            <p:font style="normal" size="8">
                <p:paragraph>
                    <p:text value="Skipped" />
                </p:paragraph>
            </p:font>
        </p:cell>
  </ui:fragment>
The cells are rendered depending on the status of the test case step,
therefore the methods isError(),
isFailure() and so on are called for
the test result object under processing.
The cells are colored by setting the backgroundColor attribute to the desired RGB value.
|
|
 |
|
| 4.2. Preparing the Data for the Report |  |
Glossary |