| 5.3. Executing Test Case Steps | ||
|---|---|---|

|
Chapter 5. Executing Jobs |  |
| 5.3. Executing Test Case Steps | ||
|---|---|---|
|
|
Chapter 5. Executing Jobs | |
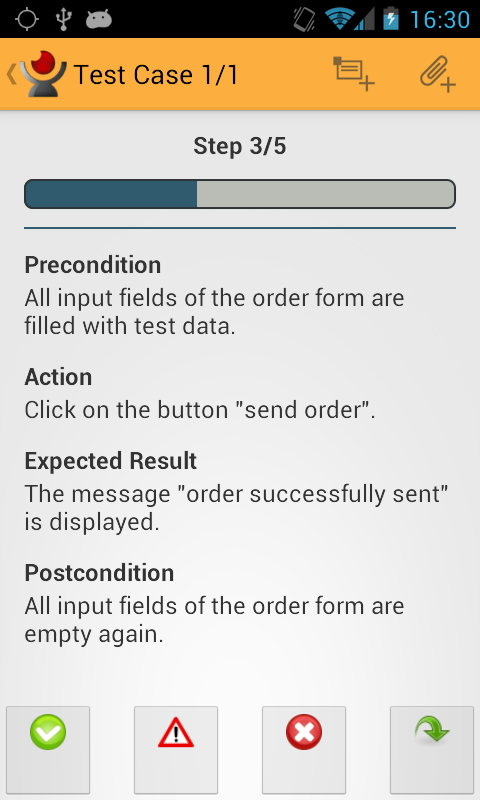
In the Test Case Step Screen the user can capture the results of the test execution. On the left of the Action Bar the current Test Case and the total number of Test Cases for this Job are displayed. Below is the position of the Test Case Step in the current Test Case. Beneath the total progress of the Test Case execution in form of a progress bar is shown.
The center of the Test Case Step Screen has the following information:
Precondition
The Precondition has to be true before the Test Case Step is executed.
Action
The Action that has to be performed by the user.
Expected Result
The Result that is expected for the Test Case Step to be successfully executed.
Postcondition
The Precondition has to be true after the Test Case Step has been executed.
On the bottom of the screen are four buttons with which the user can capture the test result. The buttons are labeled:
Passed
If the Postcondition and Expected Result match with the results after the user has executed the Action, the Test Case Step should be marked as passed.
Failed
If the Postcondition and Expected Result don't match with the results after the user has executed the Action, the Test Case Step should be marked as failed. Note that if a single Test Case Step is marked as failed, the result of the whole Test Case counts as failed.
Error
If the user is unable to execute the action, the Test Case should be marked as an error. Note that if at least one Test Case Step is marked as an error, the whole Test Case Result is marked as an error, too.
Skip
When touching the Skip button the user is provided with the option to either skip this step or to skip all steps without a result . If the latter is chosen, all Test Case Steps which haven't been executed yet are set to skipped.
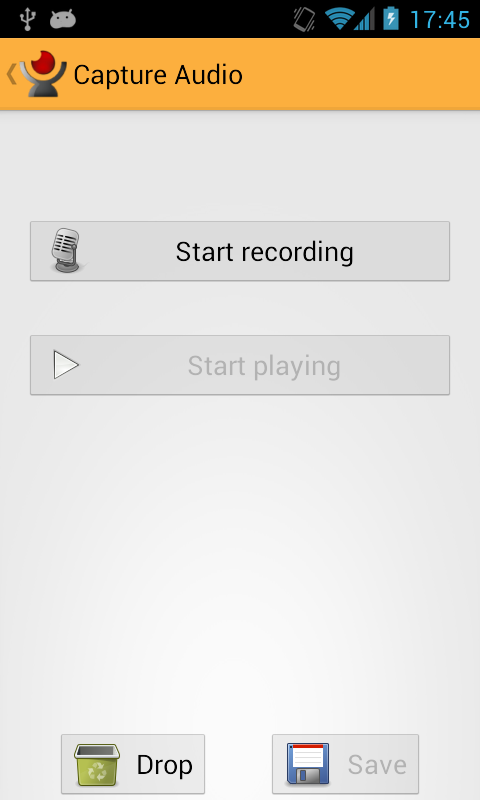
The user has also the option to capture test data by using the internal devices of the Android Device. This option can be accessed by pressing the Add Attachment option in the Action Bar, represented by a paperclip. In the popup that opens, the user can choose between different options, depending on the hardware integrated into the device:
Capture Photo
Pressing this option opens up the Camera application installed on the device. The back camera is preferred. If no back camera is available on the device, the front camera is used instead.
Capture Video
Pressing this option opens up the Camera application installed on the device. The back camera is used preferred. If no back camera is available on the device, the front camera is used instead.
Capture Audio
This option opens up the Capture Audio Screen , in which the user can record audio (See figure Figure 5.4, “The Capture Audio Screen” ).
After each Test Case Step, the Result is saved into the local database on the mobile device. The user is then brought to the next Test Case Step of the current Test Case. If all Test Case Steps have been marked with a result, the user is provided the option to finish the current Test Case. Choosing to finish the execution triggers different things, depending if the Job holds only this Test Case or a Test Suite (which contains multiple Test Cases). First, the overall Result of the Test Case is calculated from the results of the single Test Case Steps. When executing a Test Suite, the user is then brought to the next Test Case in the Test Case Screen.
If all Test Cases have been executed, the status and success rate of the Job is updated, and the updated Job and the results of the execution are sent to the Klaros-Testmanagement Mobile Edition installation. If no connection can be set up, the user can start a new synchronization attempt later by pressing the synchronization button on the Job List Screen. The user is then brought back to the Job List.
|
|
 |
|
| 5.2. Executing Jobs with Test Suites |  |
Chapter 6. Notifications |