| Chapter 2. Quick Start Guide | ||
|---|---|---|

|
 |
|
| Chapter 2. Quick Start Guide | ||
|---|---|---|
|
|
|
|
Table of Contents
This section of the tutorial covers the creation of a project, several test cases and a test suite. In addition, the test cases and the test suite will be executed and as a last step, test reports will be generated from the test results. The example project in this guide involves both hardware and software components. For this example, we will consider a printer as our system under test.
Our printer has both hardware and software components which must be tested, as well as various versions of each to be tested in different environments. A good example here are the printer drivers, which have different versions for Windows and Linux, and must also be tested in different versions of each.
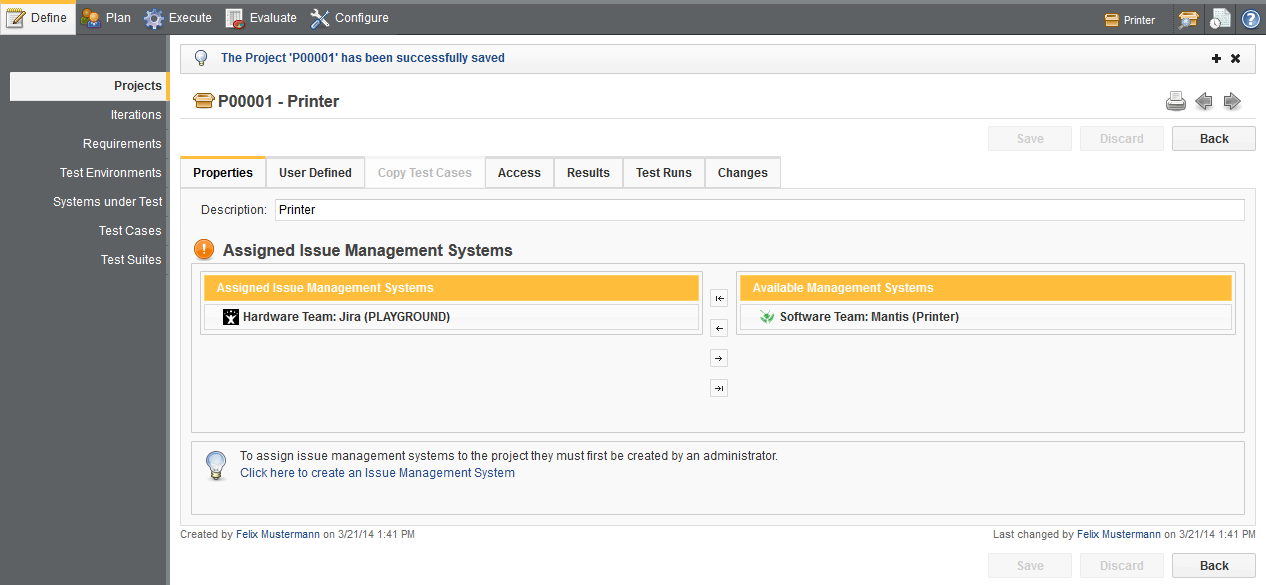
The different sorts of testing that must be done require different teams of testers. For our tutorial we will consider two different teams, the hardware team and the software team. The different teams have different issue management systems to track defects. The hardware team uses JIRA, while the software team uses Mantis.
In order to execute and evaluate test cases, you will have to create the test cases itself and also all related test artifacts (e.g. the test environments in which the test cases will be executed) in Klaros-Testmanagement. In this chapter we will create all artifacts which are necessary for the execution of a single test case.
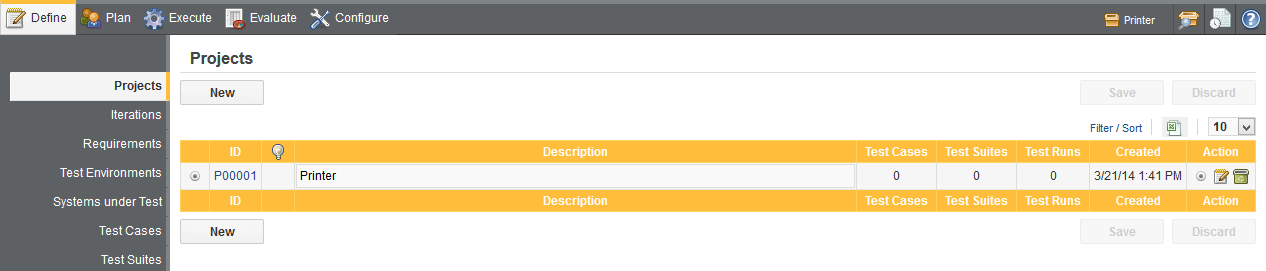
Projects are the base test artifacts in Klaros-Testmanagement. All test-related artifacts, e.g. test cases or test results, are associated with a single project. A project must therefore be selected in order to engage in any test-related activities. When you first log in to Klaros-Testmanagement there will be no projects available so you will have to create one.
Press the button to create a new project.
Enter Printer as the project description.
Press the button.
Select the newly created project by clicking on the radio button next to its id. You will notice that more options have become available here in the section, and that some of the buttons in the topbar are no longer grayed out. For now however, we want to edit the project that we have just created.
![]() Feature only available in Klaros-Testmanagement Enterprise Edition
Feature only available in Klaros-Testmanagement Enterprise Edition
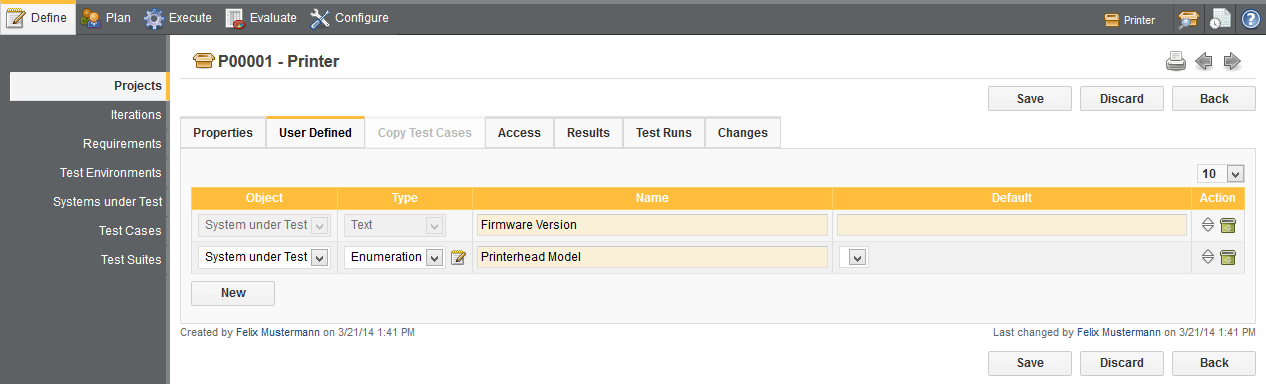
Now is a good time to create some user defined properties for the project to allow for more accurate searching of elements in the project. The process of creating user defined properties is explained in Section 3.3, “ User Defined Properties ”.
Since the SUTs in our example are printers, there are a number of properties that will make searching through them easier. One of these is the firmware version, an alpha-numeric value which is changed relatively often.
Select the User Defined tab.
Click the button.
Select System Under Test in the Object column.
Select Text in the Type column.
Enter
Firmware Versionin the Name text field.
Press the button.
A second property we can use to search through our SUTs is the model of printerhead used in the printer. Since our company has only two different printerhead models, it makes sense to make this an enumeration property.
Click the button.
Select System Under Test in the Object column.
Select Enumeration ind the Typecolumn.
Enter
Printerhead Model
in the
Name
text field.
Press the
![]() icon in the
Type
column to add enumeration values.
icon in the
Type
column to add enumeration values.
Enter
Model 1
in the
Entry
text field and press the
![]()
Enter
Model 2
in the
Entry
field and press the
![]() icon.
icon.
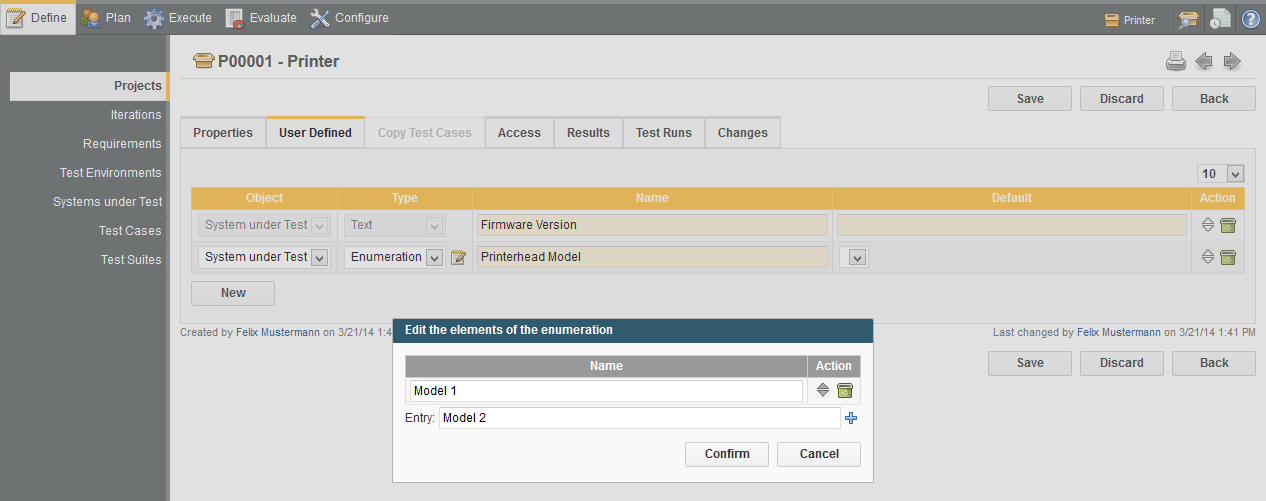
Press the button.
Press the button.
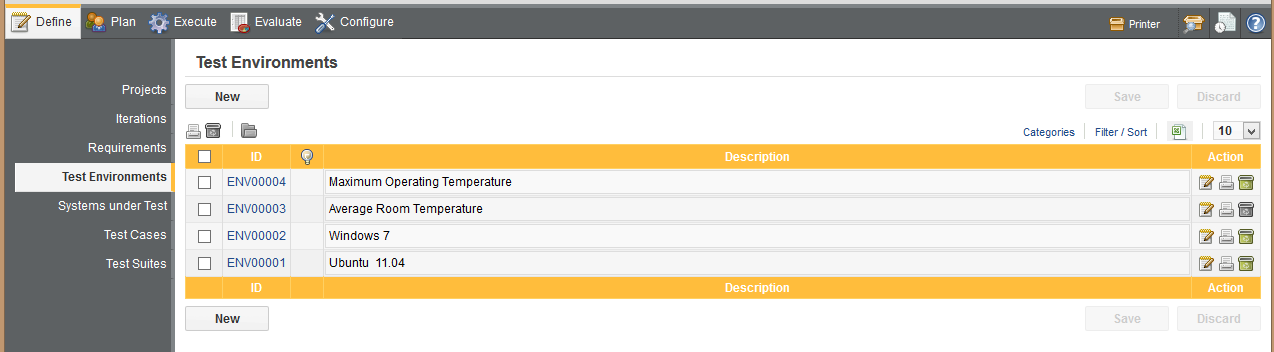
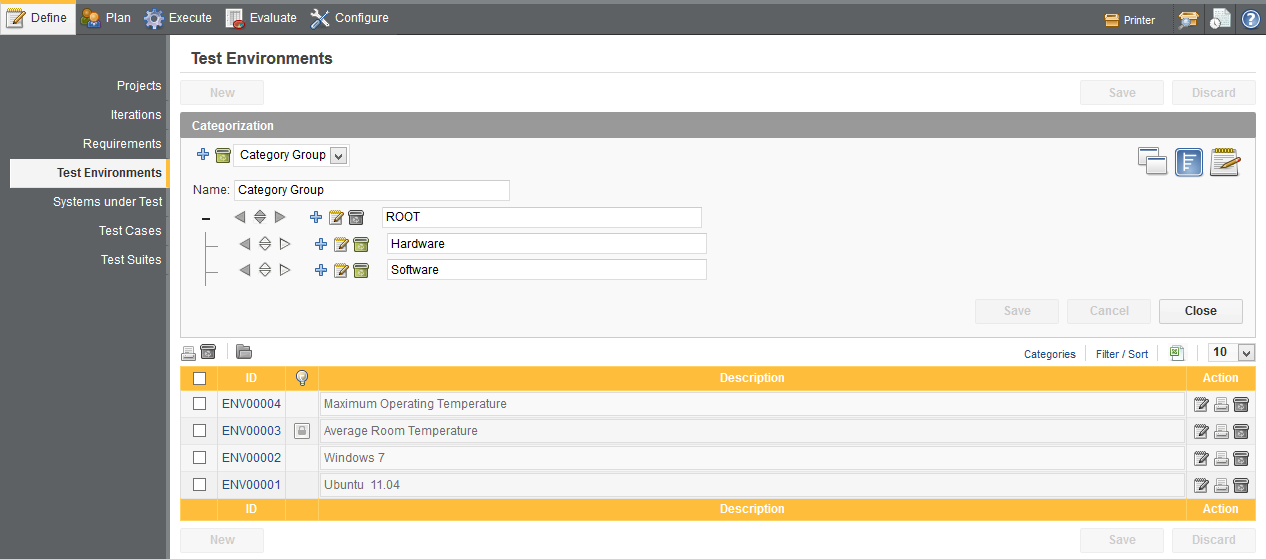
The next step in setting up a Klaros-Testmanagement project is to create some test environments to test in. In Klaros-Testmanagement, a test environment is a description of the extrinsic settings that may influence the test result. This could be the operating system used with the printer or even the physical environment used for the test.
For this tutorial, we will create two software-related and two hardware-related test environments.
Press the Test Environments link in the sidebar.
Press the button.
Enter Ubuntu 11.4 in the Description text field.
Press the button.
Next, create three more Test Environments with the following values in the Description text field:
Windows 7
Average Room temperature
Maximum Operating Temperature
Press the button.
Press the button.
![]() Feature only available in Klaros-Testmanagement Enterprise Edition
Feature only available in Klaros-Testmanagement Enterprise Edition
Now is a good time to use the categorization feature at this stage. See Section 3.2, “ Categorization ”.
Press the Categories label to expand the category creation and ???
Press the
![]() icon.
icon.
Press the
![]() icon to create a new category group.
icon to create a new category group.
Press the
![]() icon on the newly created ROOT
category (this is the root category of this category group).
icon on the newly created ROOT
category (this is the root category of this category group).
Enter Hardware in the text field of the new category.
Press the
![]() icon on the ROOT category again.
icon on the ROOT category again.
Enter Software in the text field of the new category.
Press the button.
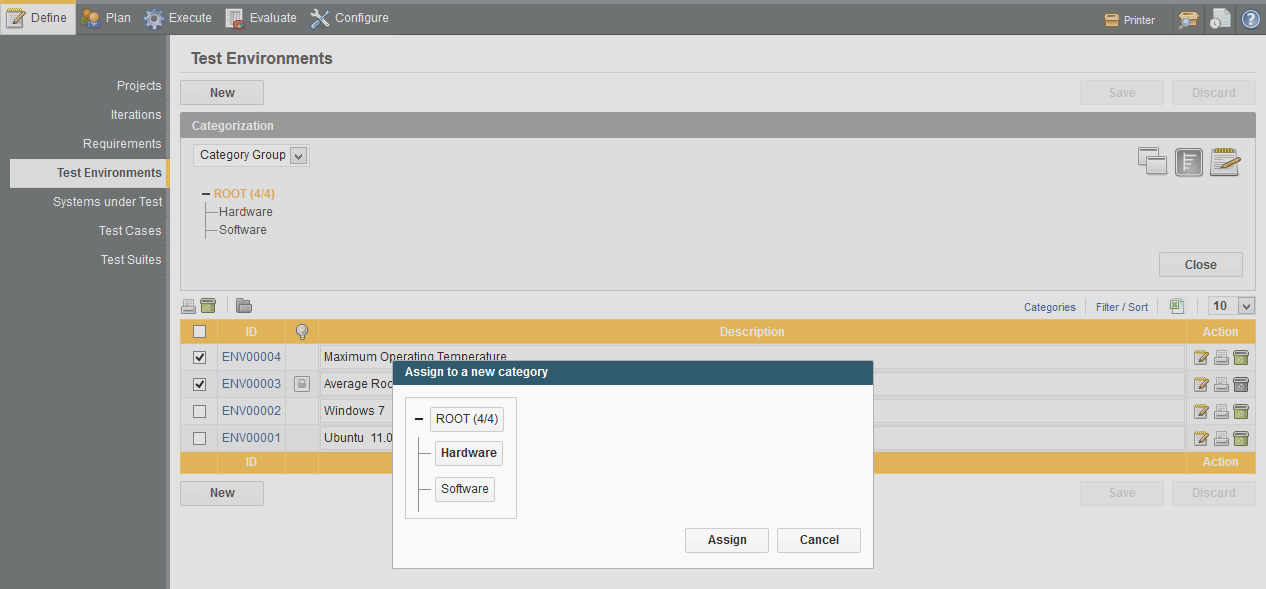
Switch to the tree view by clicking on the
![]() icon.
icon.
Select the checkboxes beside each of the software-related test environments (
Windows 7
and
Ubuntu 10.4).
.
Press the
![]() icon.
icon.
Press the Software entry in the popup.
Press the button.
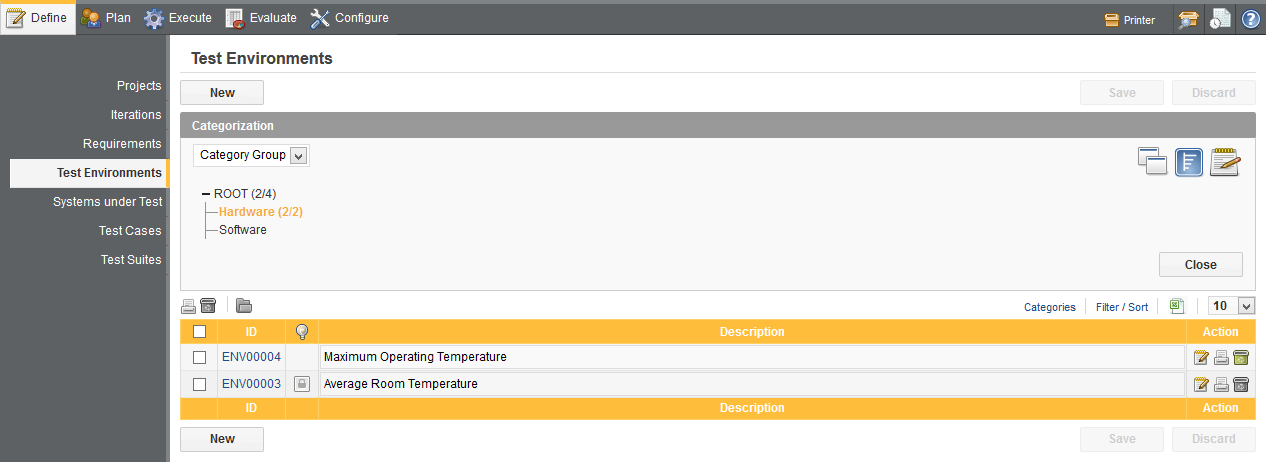
Select the checkbox beside each of the hardware-related test environments.
Press the
![]() icon.
icon.
Press the Hardware entry in the popup.
Press the button.
From now on, all test environments can be viewed as normal if the category panel is closed, and opening the category panel allows for selective viewing of the particular categories of test environments.
Next we should create some systems under test. In Klaros-Testmanagement, systems under test represent the versions of the product or software system to be tested. In our example, these will be various printers.
Press the menu entry in the sidebar.
Press the button.
Enter the text Printer Model 1 in the
Version field.
Press the button.
Repeat the process for three more systems under test:
Versions
Printer Model 2
Printer Model 3
Printer Model 4
![]() Feature only available in Klaros-Testmanagement Enterprise Edition
Feature only available in Klaros-Testmanagement Enterprise Edition
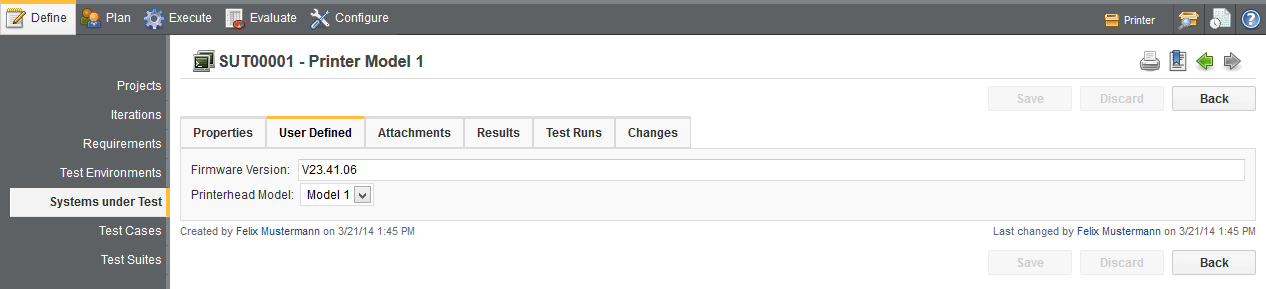
Please refer to Section 3.3, “ User Defined Properties ” how to create user defined properties and create a String property Firmware Version and an enumeration property Printerhead Model with the values Model 1 and Model 2 for systems under test. Then you can set values for them.
Press the
![]() icon for Printer Model 1.
icon for Printer Model 1.
Press the User Defined tab.
Select Model 1 in the Printerhead Model dropdown list.
Enter V23.41.06 in the Firmware Version field.
Press the button.
Press the button.
Repeat the process for the other three systems under test:
| Version | Firmware Version | Printerhead Model |
|---|---|---|
Printer Model 2
|
V23.41.07B
|
Model 2
|
Printer Model 3
|
V23.41.07B
|
Model 1
|
Printer Model 4
|
V23.41.05
|
Model 2
|
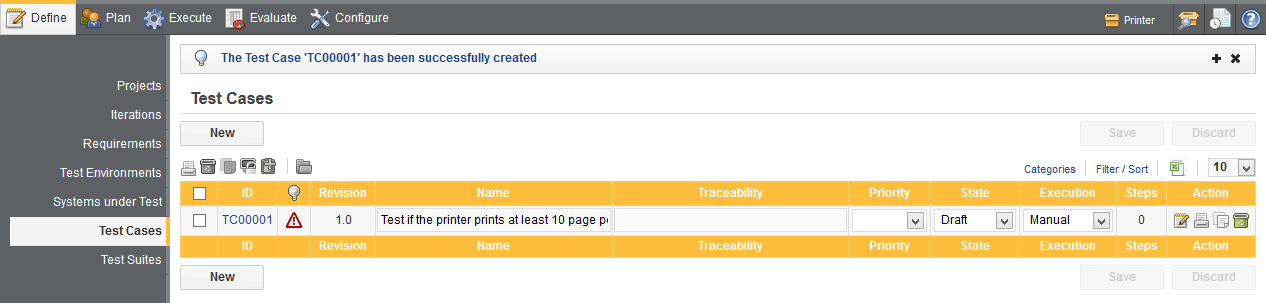
Now it is time to create some test cases. In Klaros-Testmanagement, test cases represent individual tests to be carried out. We will create test cases for each of the hardware and software teams. First we will create a few hardware test cases. The first test is a verification that the printer upholds our claims about its minimum pages per minute rate.
Press the menu entry in the sidebar.
Press the button.
Enter Test if the printer prints at least 10 page per minute
in the Name field.
Select Manual in the Execution field.
Press the button.
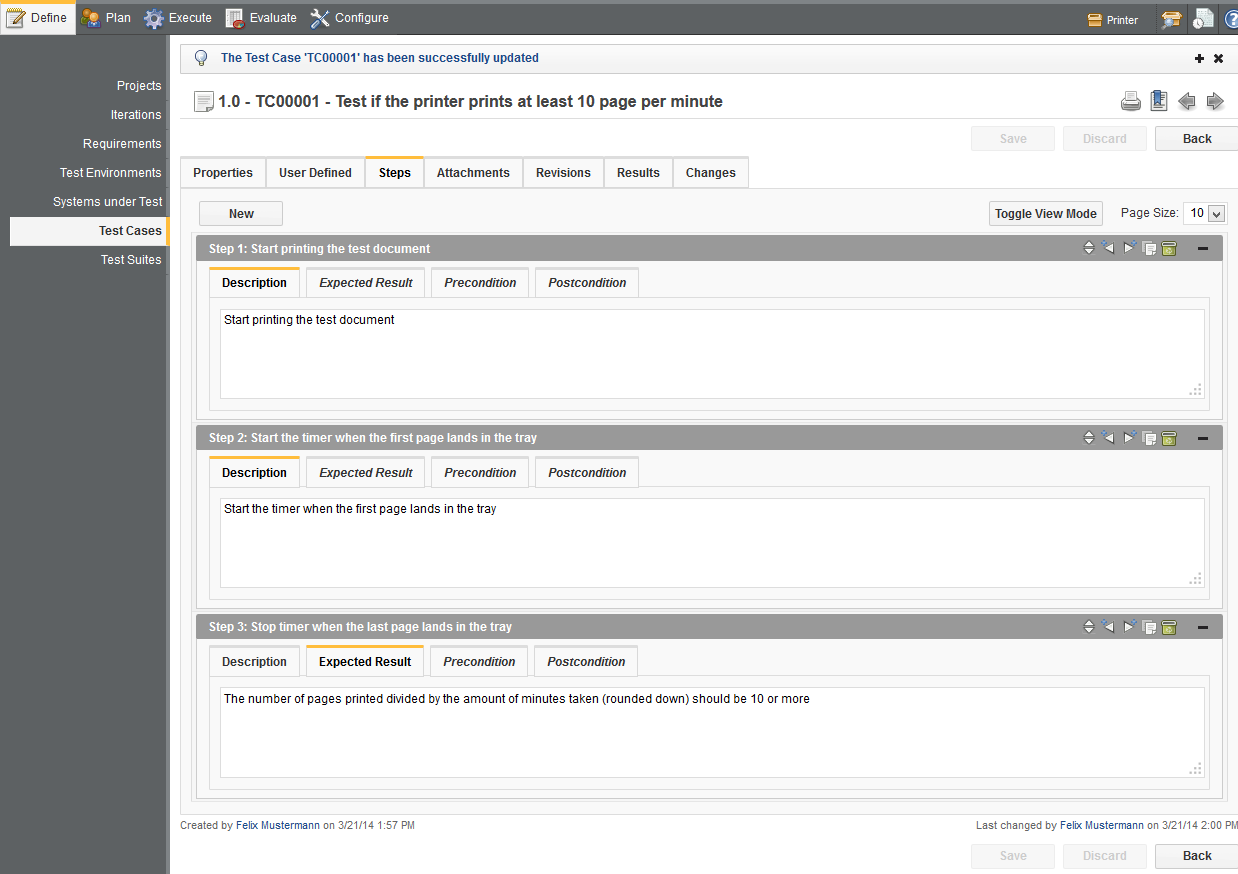
Press the
![]() edit icon on the newly created test case.
edit icon on the newly created test case.
Select the Steps tab.
Create the following Steps:
|
Description |
Expected Result |
|---|---|
|
|
|
|
|
|
|
|
Press the button.
Next, create the following test cases (each with one test case step):
|
Name |
Execution |
Step Description |
Step Expected Result |
|---|---|---|---|
|
|
Manual |
|
|
|
|
Manuel |
|
|
Now you should have three test cases.
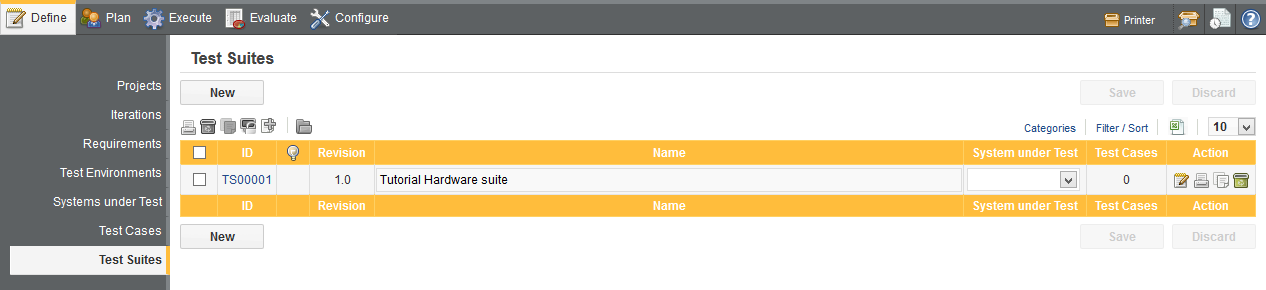
The final step in preparation for testing with Klaros-Testmanagement is the creation of test suites. In Klaros-Testmanagement, test suites represent groups of tests to be carried out in sequence. A test suite contains one or more test cases and can be executed as a unit, which allows test results to be grouped together.
![[Note]](images/note.png) |
Note |
|---|---|
|
A test suite can contain the same test case multiple times. |
Press the Test Suites link in the sidebar.
Press the button.
Enter Tutorial Hardware Suite in the Name field.
Press the button.
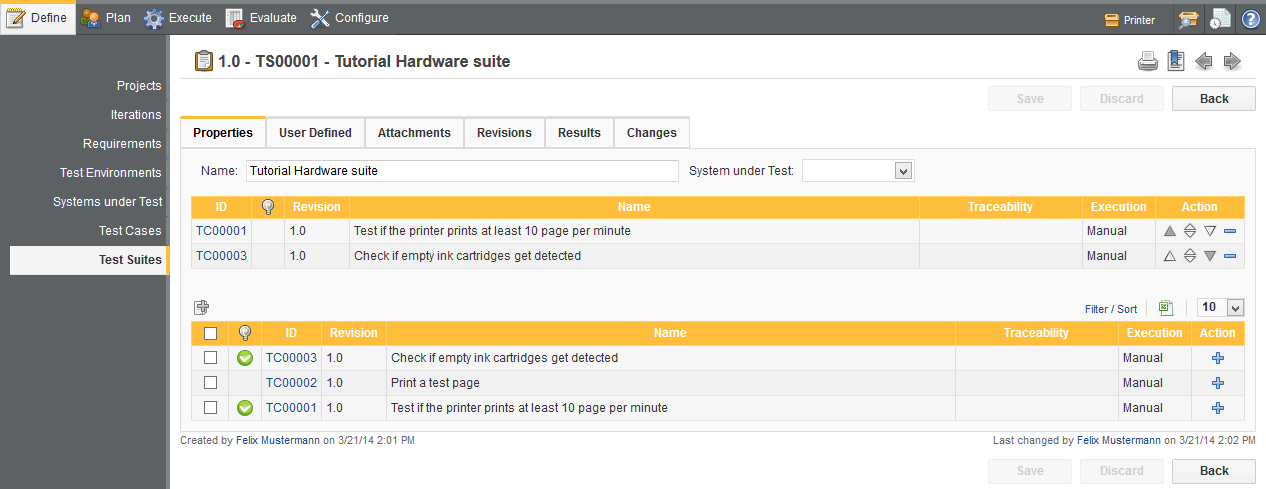
Press the
![]() icon.
icon.
Click on the Properties tab.
Press the
![]() icon on the
icon on the Detects empty
and the Test if the printer prints at least 10 pages per minute
test cases.
Press the button
Now our project is set up and we can begin testing!
Now that we have created some test cases and a test suite, we are ready for some testing. Log out of Klaros-Testmanagement and log in as a tester. This is a more limited account which can execute tests and only data linked to the account.
In this section, we will execute a single test case multiple times with different parameters.
If not already selected, select the Printer project.
Press Execute in the topbar.
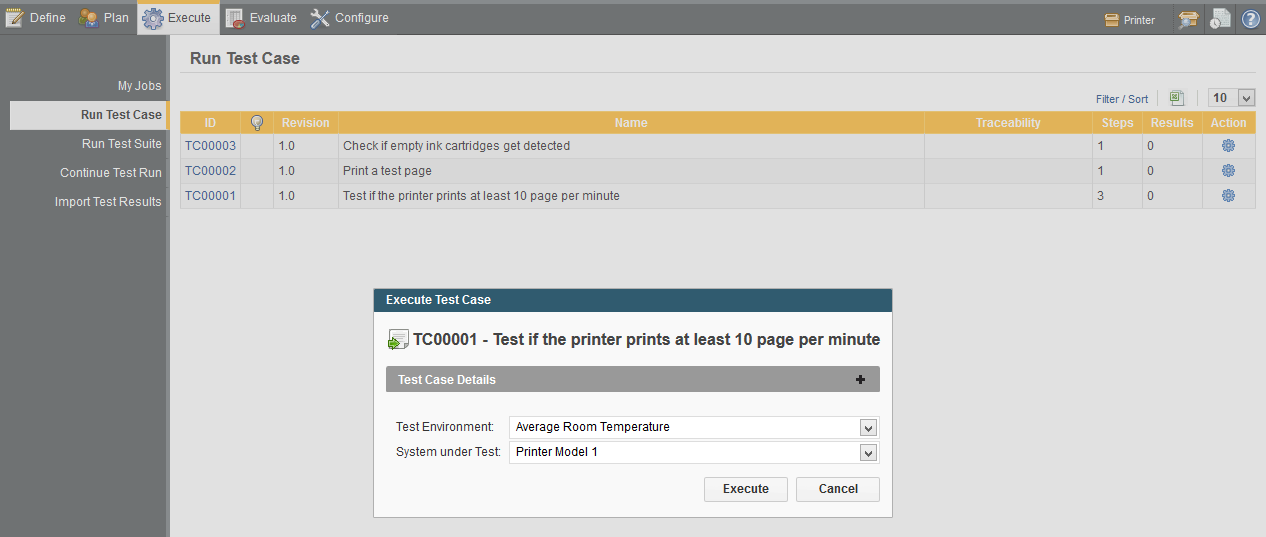
Click on Run TestCase in the sidebar.
The Run Test Case
screen should now be shown. This screen displays the available test cases
along with an execute icon (
![]() )
for each. The icon is blue if the test case can be executed in Klaros-Testmanagement,
i.e. if Execution is set to
Manual, if the test case has at least one step and its
State is either Draft
or Approved.
)
for each. The icon is blue if the test case can be executed in Klaros-Testmanagement,
i.e. if Execution is set to
Manual, if the test case has at least one step and its
State is either Draft
or Approved.
Press the
![]() icon on the
icon on the
Test if the printer prints at least 10 pages per minute
test case
On the next screen, select Average Room Temperature
as the Test Environment
Select Printer Model 1 as the System Under Test.
Press the button.
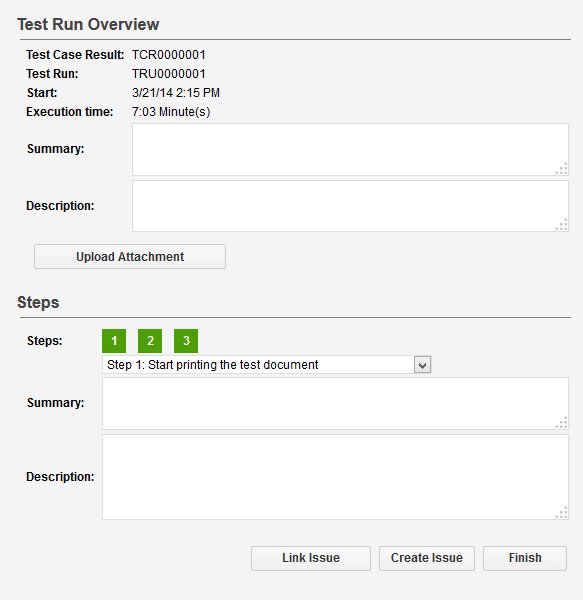
A popup will appear (if it doesn't, be sure to disable the popup blocker in your browser or add the Klaros-Testmanagement address to its exceptions). This is the manual test runner, which guides testers through the testing process. You will see an overview of the test case on the first page of the manual test runner.
The manual test runner will now show the first step. Action shows what we as a tester are supposed to do. Let's assume our printer will start printing the test document with no problems, so the first step is passed.
Press the button.
The second step will now be shown. Mark the rest of the steps as passed.
Now the Test Run overview will be displayed. Since all steps were passed without complication, there is no need to comment or create an issue.
Please confirm the following dialog with .
Press the button.
Press in the sidebar.
Now we will execute the same test case using a different system under test and test environment.
Press the
![]() icon on the
icon on the Test if the printer prints at least 10 pages per minute
test case.
On the next screen, select Maximum Operating Temperature as the Test Environment.
Select Printer Model 2 as the System Under Test.
Press the button.
Press the button.
Press the button.
Press the button.
Printer Model 2 uses the Model 2 printerheads, which have an overheating problem, so this test step will fail in an environment with a high ambient temperature.
Press the button.
Enter Too many pause cycles due to overheating
in the Summary field.
These comments will help reproducing the failure.
Press the button.
If you have set up an issue management system, you can create or link an issue from this screen. The process is described in Section 3.6, “ Issues ”.
Confirm the following dialog by clicking the button.
Press the button.
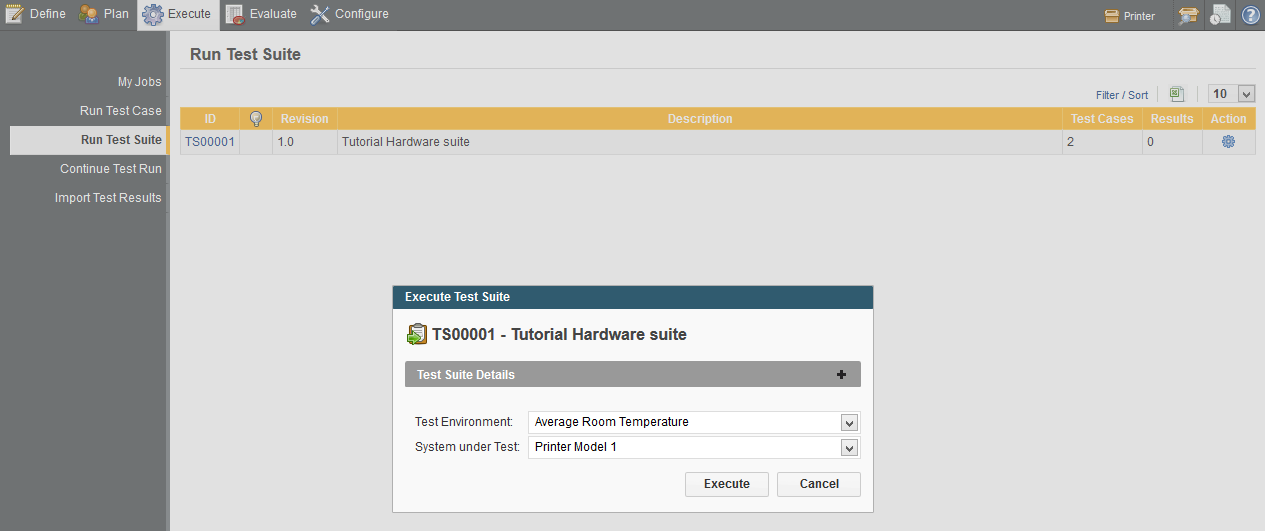
Next we will execute our test suite. The process is very similar to executing a test case, with an additional overview screen at the beginning.
Press in the sidebar.
Press the
![]() icon for Tutorial Hardware suite.
icon for Tutorial Hardware suite.
Select Average Room Temperature as the Test Environment
Select Printer Model 1 as the System under Test.
Press the button.
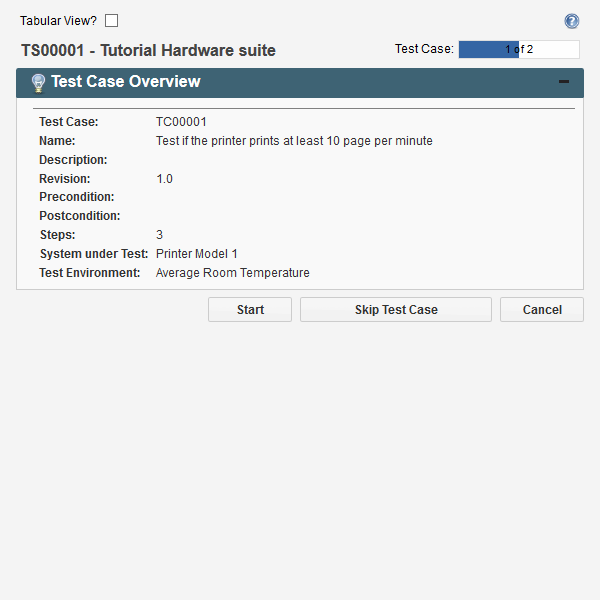
Press the button in the manual test runner.
Press the passed icon for all steps.
Confirm the following dialog by clicking the button.
Repeat for the second test case.
Press the button.
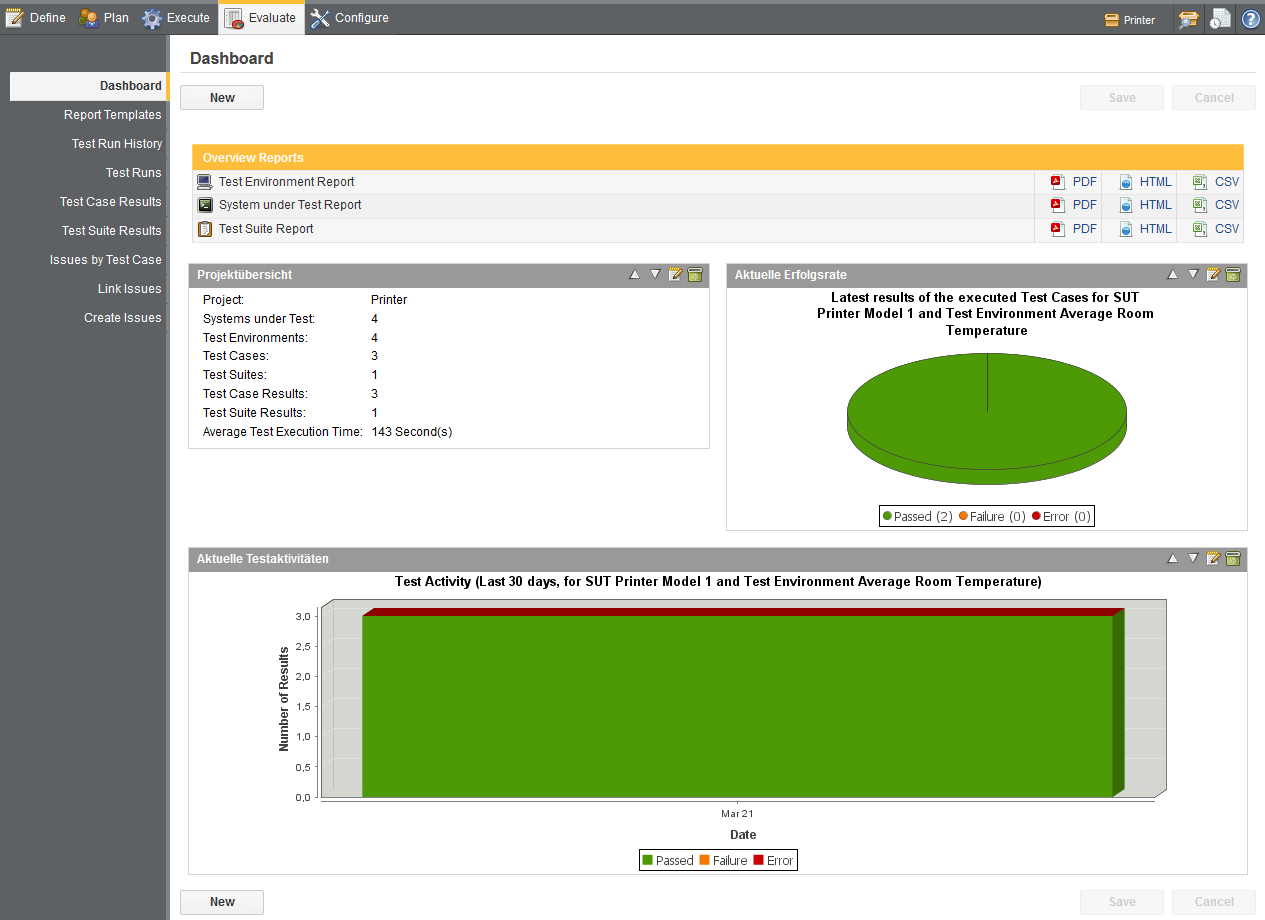
Now it's time to view the test results and reports. Klaros-Testmanagement contains a feature-rich test evaluation section which is best viewed using a manager account.
Log into Klaros-Testmanagement using a manager account.
Select the Printer project if it is not already selected.
Press in the topbar.
Now the dashboard should be displayed, showing some of the default reports for the Printer project. These show relevant details like the number of test cases and test suites in the Project, the overall numbers of passed and failed test runs, and the testing activity in the last 30 days.
The Latest Success Rate report can be changed by clicking on the
![]() Icon. Then you can select the
test system and the test environment to be displayed.
Icon. Then you can select the
test system and the test environment to be displayed.
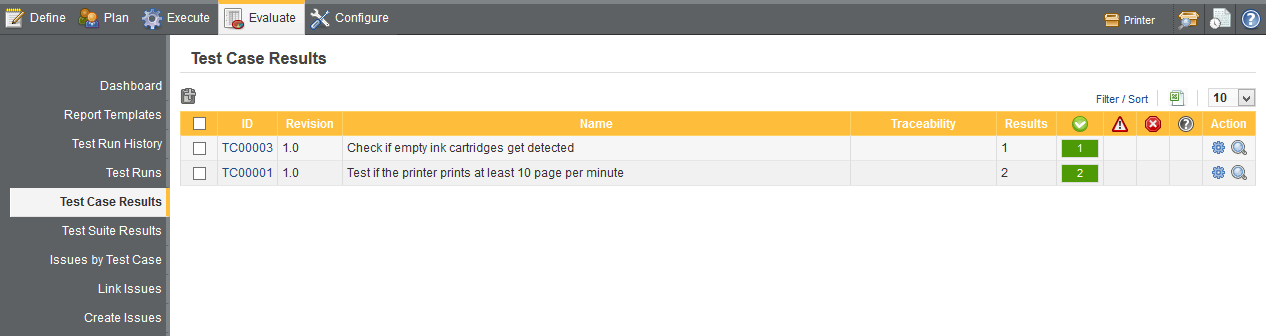
You can also view individual test results for test cases and test suites in the section.
Press the menu entry in the sidebar.
Here you will see the test cases which have been executed in this project, along with a count of test runs with their results.
Press the
![]() icon for the
Test if the printer prints at least 10 pages per minute
test case.
icon for the
Test if the printer prints at least 10 pages per minute
test case.
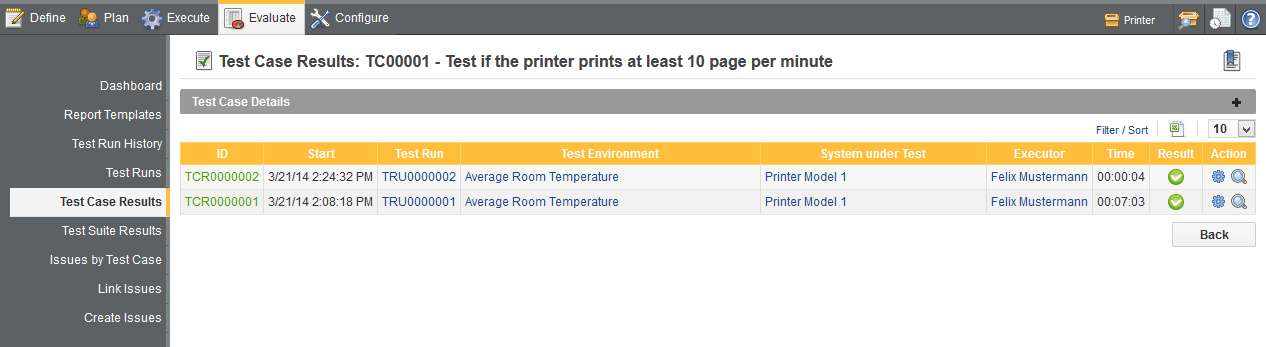
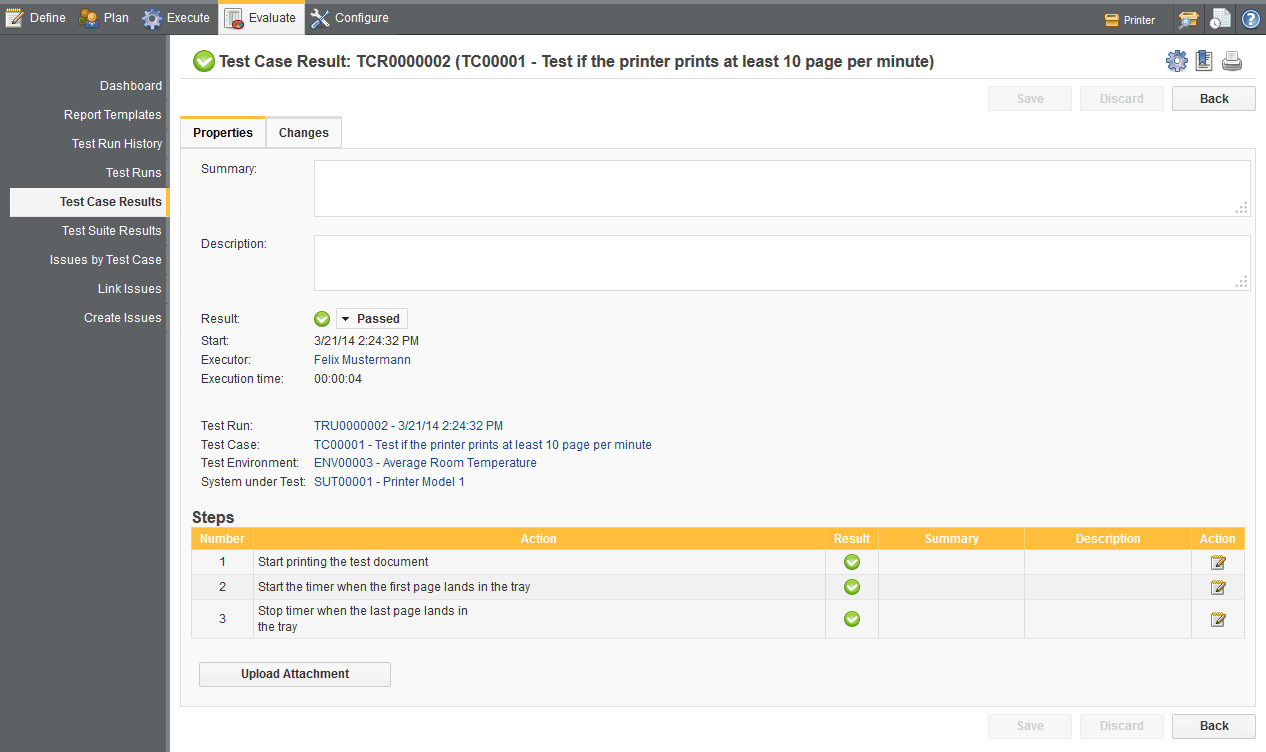
You will now see a screen summarizing each of the test runs for this test case.
Press the
![]() icon for one of the test runs.
icon for one of the test runs.
This screen shows a breakdown of the results of each step in the test case, as well as the summary and description the tester has entered for each of them.
Press Test Results - Test Suite Results in the sidebar.
This page shows results of all test cases which have been run in a similar style to the Test Case Results page. Have a look at the results of the Tutorial Hardware suite.
This rounds up our quick start guide. The following chapter contains in-depth how-tos for most of the available actions in Klaros-Testmanagement.
|
|
|
|
| Chapter 1. Introduction |  |
Chapter 3. How-Tos |