| 9.6. Issues | ||
|---|---|---|

|
Chapter 9. Evaluate |  |
| 9.6. Issues | ||
|---|---|---|
|
|
Chapter 9. Evaluate | |
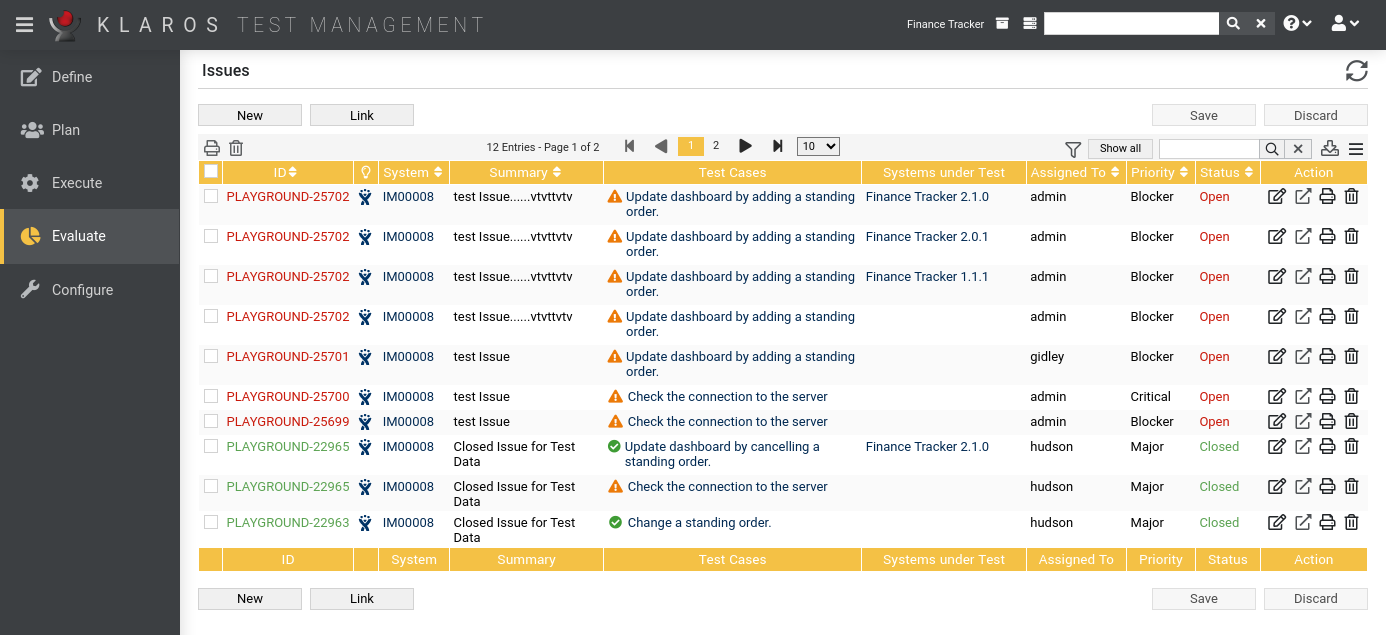
Issues from external issue management systems (like Jira or GitLab) can be linked with test cases and systems under test in Klaros-Testmanagement. In addition to this, issues can be created from Klaros-Testmanagement in connected issue management systems (even during test execution).
For this, at least one issue management system must be configured and assigned to the desired project. The configuration of an issue management system is described in Section 10.5.1, “Issue Management”, Section 6.1.2.6.1, “Issue Management” shows how to assign the issue management system to a project.
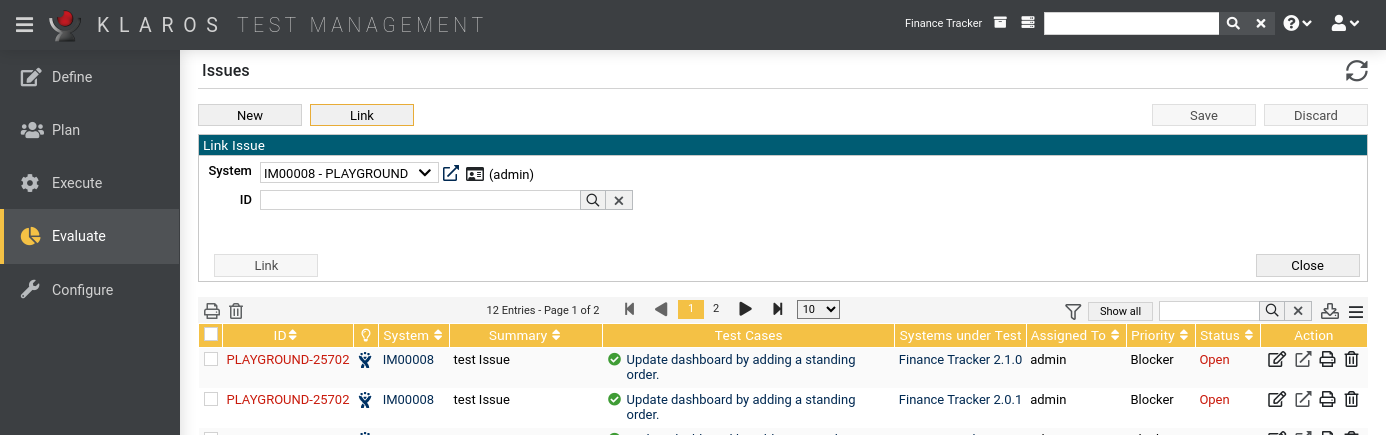
The overview page displays all issues present in the project in a table. This chapter shows how to create, edit and edit issues.
Pressing the button opens up the Section 9.6.6, “Issue Details (Creating a new Issue)” page.
Pressing the button opens up the Link Issues panel, in which existing issues from issue management systems can be linked to test cases and systems under test (see Section 9.6.7, “Link Issue”).
The table shows the following values:
|
ID |
The external issue Id. |
|
Additional Information |
On the one hand, the symbol of the issue management system is displayed here. Clicking
this icon opens the issue in the issue management system. On the other hand, a
can appear.
In this case, the administrator should be informed immediately. Reasons for displaying the
can be among others:
|
|
System |
The ID of the issue management system. |
|
Summary |
The summary of the issue. |
|
Test Cases |
A list of test cases assigned to this issue with the result of their latest execution. |
|
Systems under Test |
A list of systems under test assigned to this issue. |
|
Assigned To |
The username of the responsible user. |
|
Priority |
The priority of the issue. |
|
State |
The state of the issue. |
|
Action |
The executable actions. |
The following actions can be performed in the action column:
If a issue has been deleted, it is internally marked with a deletion marker and is only visible to administrators. For deleted issues, the following actions are available instead of Delete:
![[Important]](images/important.png) |
Important |
|---|---|
|
Pressing the icon does not delete the issue in the issue management system, only the reference in the database! |
On the Issue page, one or more issues can be selected for bulk actions. Bulk actions are described in Section 5.2.3.1.5, “Bulk Actions”.
The following bulk actions are supported for issues:
For additional information, see Section 5.2.3.1.5, “Bulk Actions”.
The following operations can be performed in the line above the table on the right:
All operations are described in detail in Section 5.2.3.1, “Overview Page”.
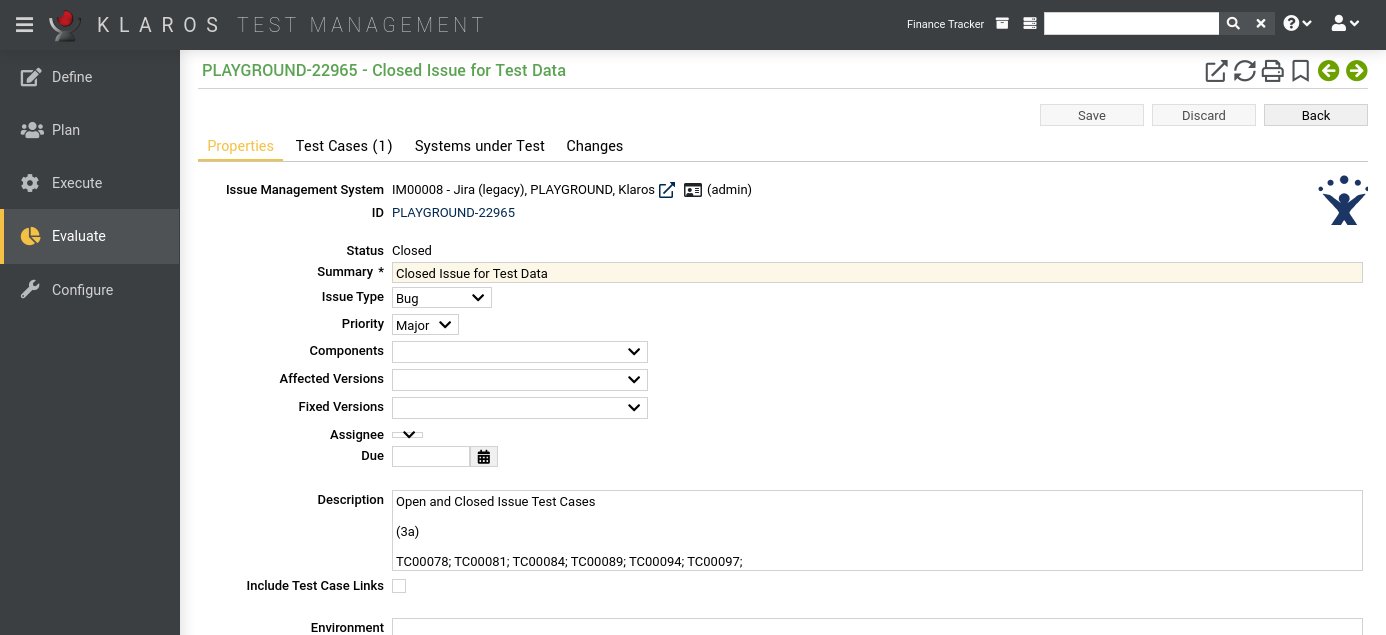
Each issue has its own detail page with several additional tabs. Clicking on the ID of the respective requirement or on the icon on the right in the action column takes you to the tab that was selected last. When called for the first time, this is the Properties tab.
The following tabs are available: Properties, Test Cases, Systems under Test and Changes.
On the detail pages there are more icons in the upper right corner. The following actions can be performed here:
|
Open external link |
Shows the issue in the external issue management system. |
|
Synchronize |
Synchronizes the local issue with the external source. |
|
Open print view |
A print-ready view of the issue can be created here. With a click on the icon this opens in a new browser tab. Print views are described in detail in Section 5.2.3.2.1, “Print Pages”. |
|
Create Bookmarks |
Issues may be linked to from outside of Klaros-Testmanagement using the link on the icon. By clicking on the icon this link will be copied to the clipboard. Bookmarks are described in detail in Section 5.2.3.2.2, “Bookmarks”. |
|
Browse |
Use the green arrows at the very top right to switch between the issues present on the previous page. |
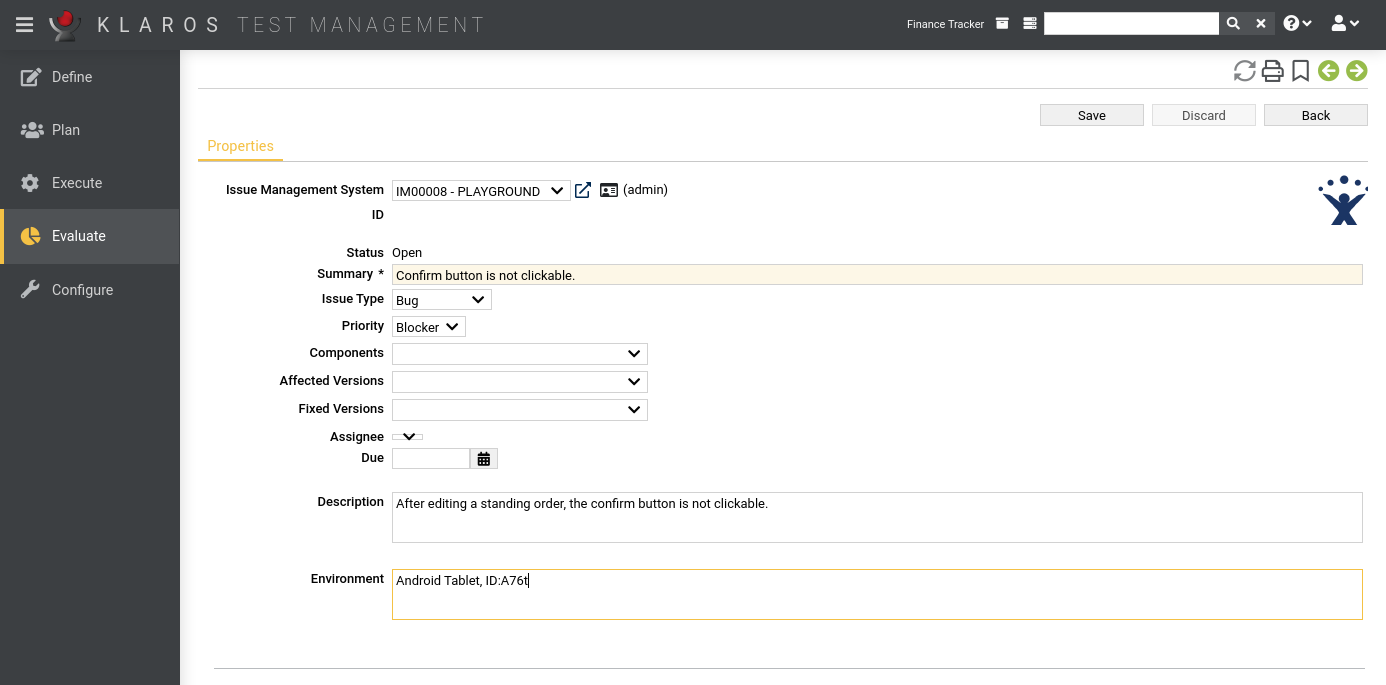
In this tab ( Figure 9.32) several attributes of the issues are displayed and can be edited if the user has the appropriate permission.
The issue ID is a hyperlink to the corresponding issue in the issue management system.
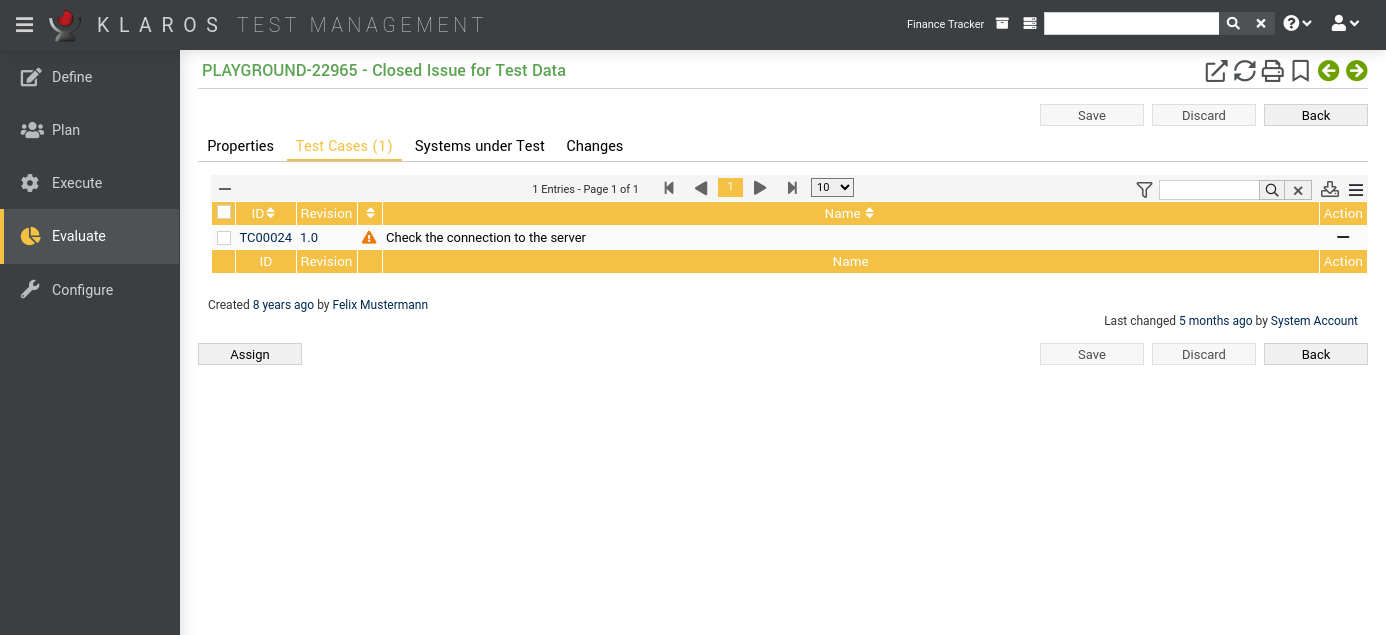
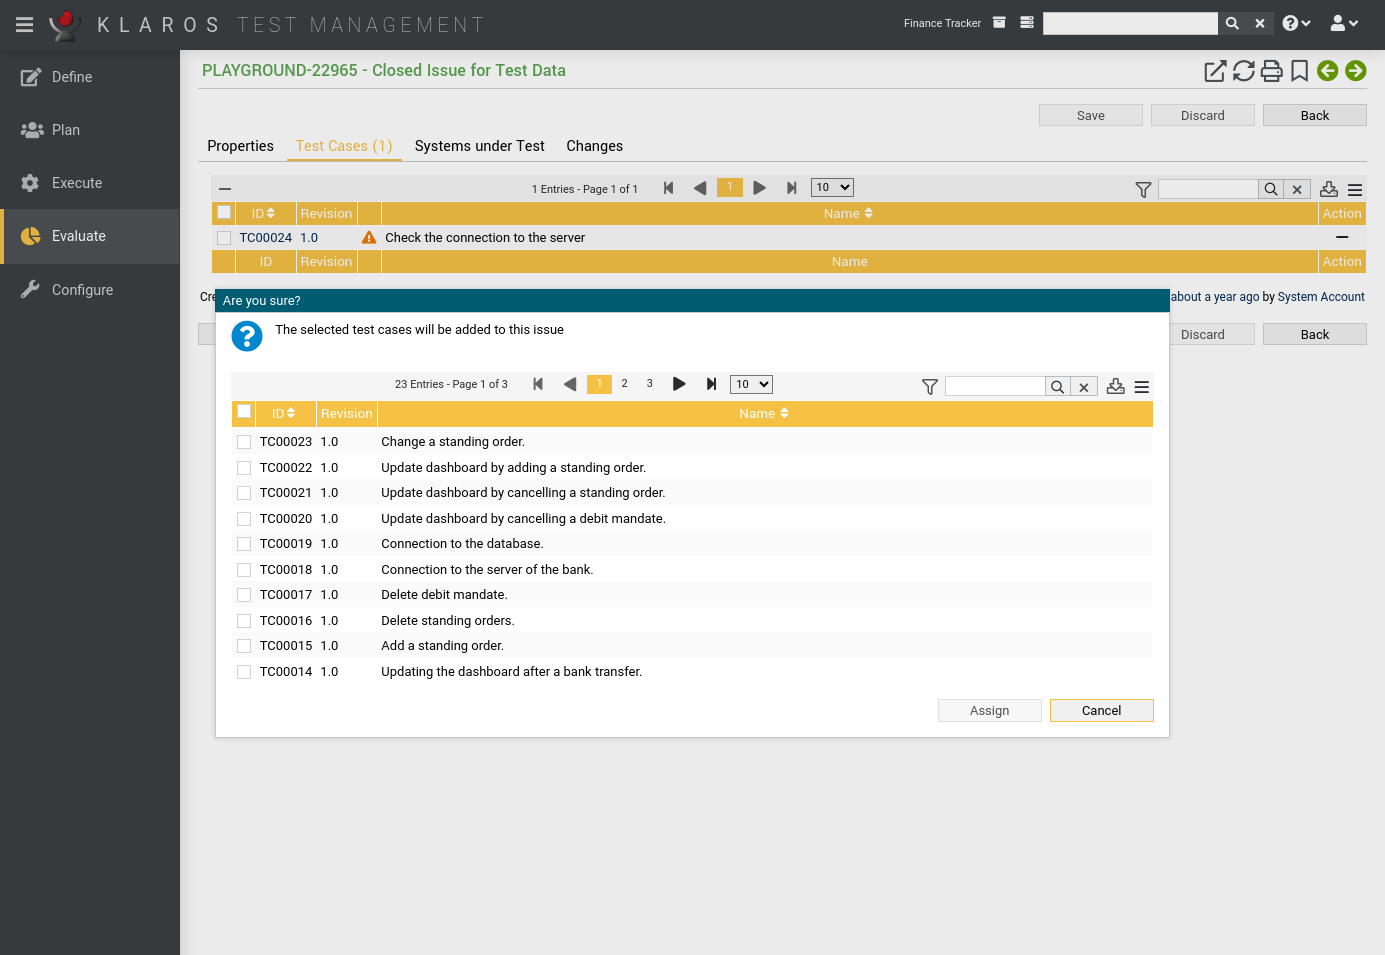
This view lists all test cases that are associated with this issue.
Test cases can be assigned to the issues by clicking the button. This opens up a dialog, where multiple test cases can be selected at once.
The following bulk actions are supported for test cases:
The detail page of a test case shows a list of all issues that are associated with it, as shown in section Section 6.7.2.8, “Issues”.
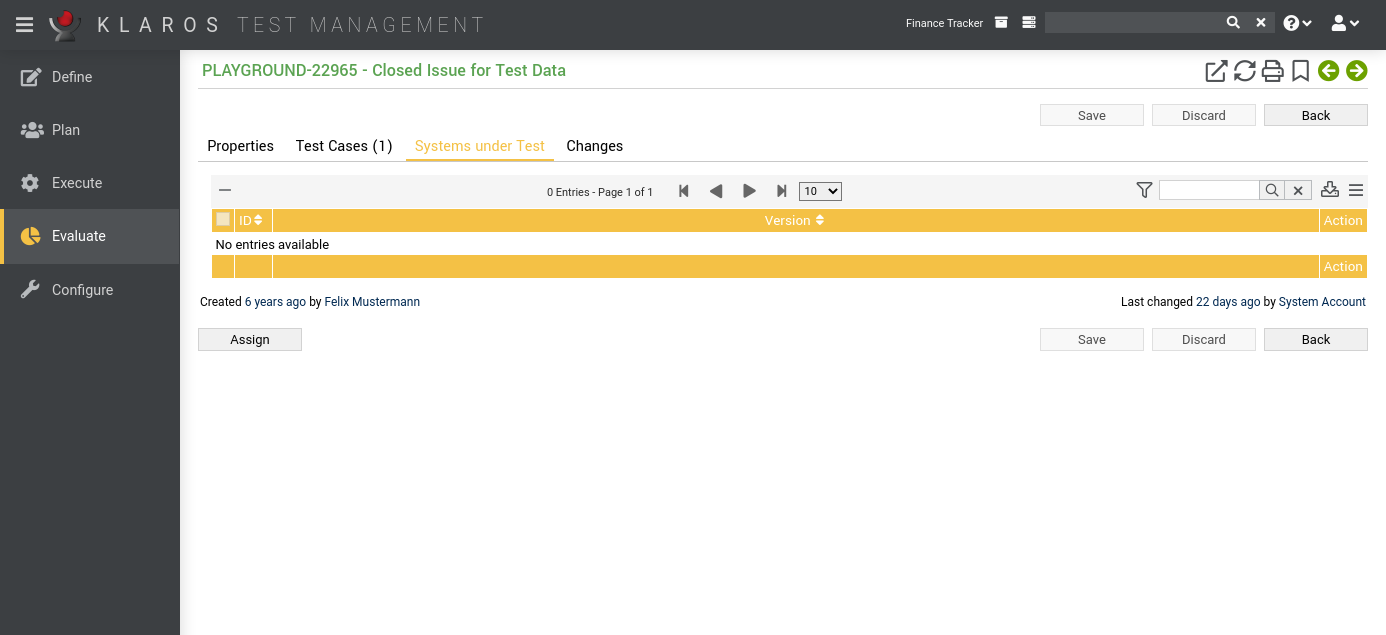
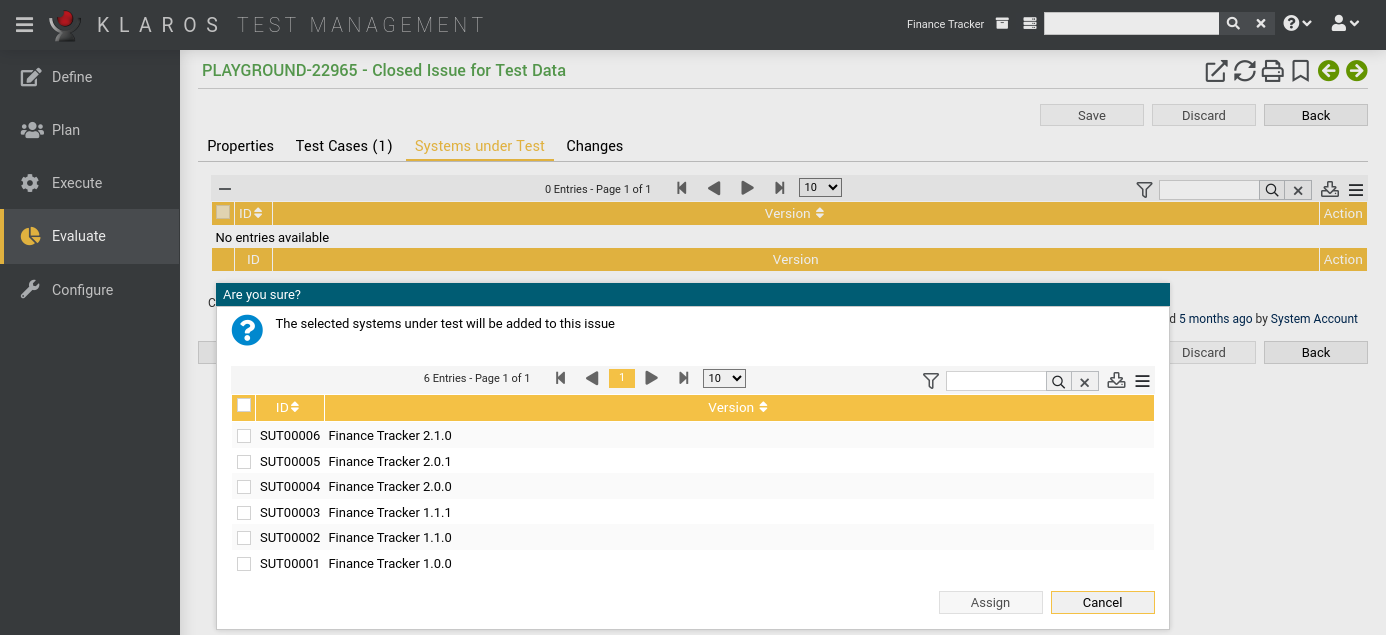
The page lists all systems under test assigned to the issue.
If you want to associate systems under test with the issue, click the button and select one or more systems under test.
The following bulk actions are supported for systems under test:
The detail page of a system under test shows a list of all issues that are associated with it, as shown in section Section 6.5.2.6, “Issues”.
The tab Changes shows the change history of this issue.
For a detailed description of the Changes view, see Section 5.2.3.2.8, “Change History”.
The first defined issue management system of the active project is automatically selected from the Issue-Management-System dropdown list.
![[Note]](images/note.png) |
Note |
|---|---|
|
If the list of issue management systems is empty, then at least one issue management system has to be configured and linked to the active project. The configuration of issue management systems is described in Section 10.5.1, “Issue Management”. Section 6.1.2.6.1, “Issue Management” contains instructions on how to add an issue management system to a project. |
By default Klaros-Testmanagement uses the credentials entered at the login screen to authenticate the user to the issue management system. When using Bugzilla, the email/password combination of the user is tried as well, as this is the common case for a login name there. If the credentials entered at login do not work and the issue management system has not yet been used during the session, Klaros-Testmanagement will request new authentication information in a dialog window.
|
Token based authentication (Jira Cloud instances, GitLab) |
|---|---|
|
Klaros-Testmanagement is supporting token based authentication scheme as well. Just use an empty username and the token as password. Some Vendors like Jira and GitLab limit access to token based authentication Authenticating via username and password is no longer supported for these systems. |
Clicking the icon opens up the external issue management system in a new tab.
Clicking the icon opens up a dialog to change the authentication information.
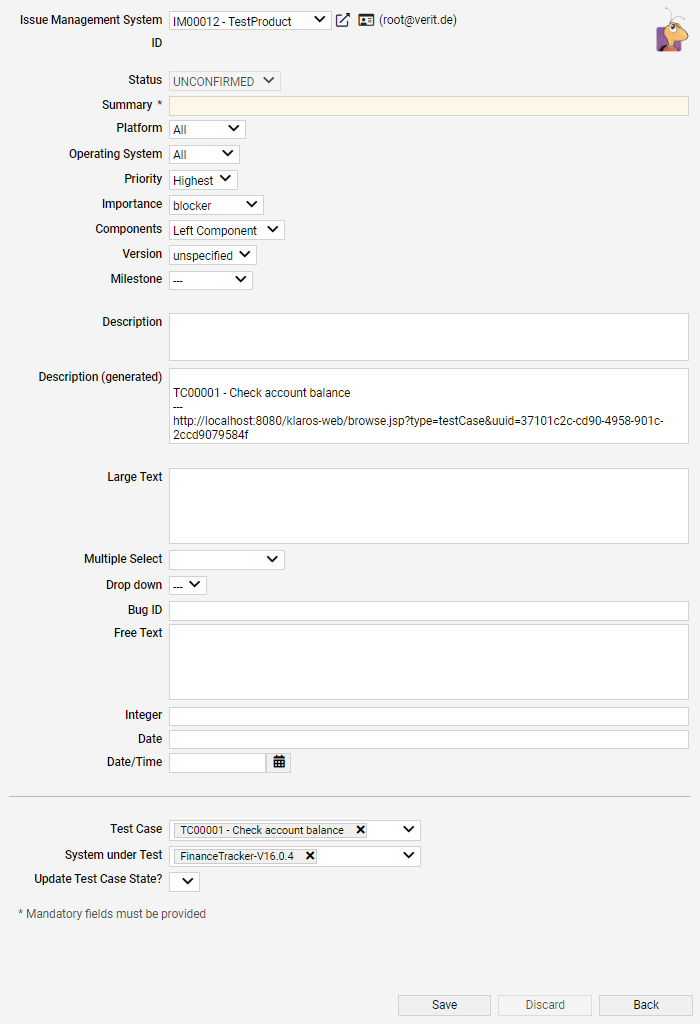
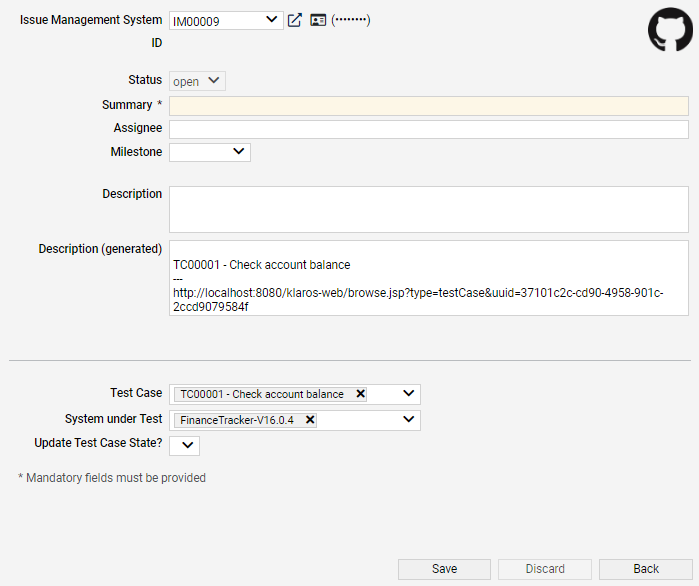
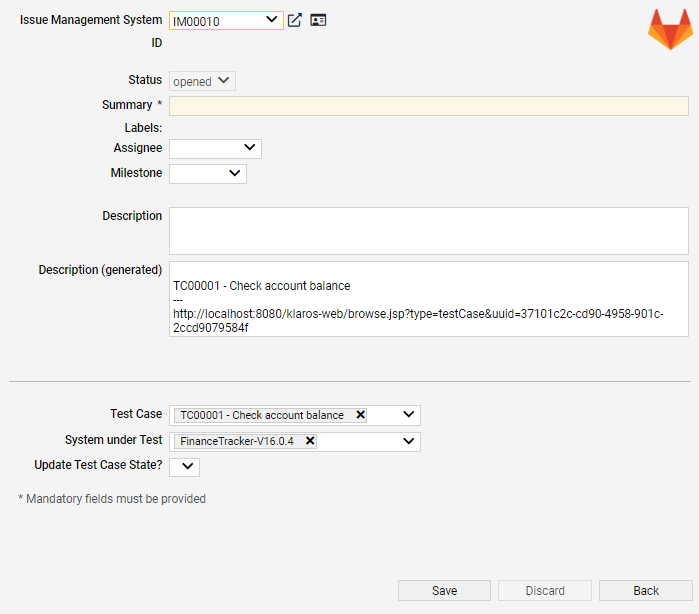
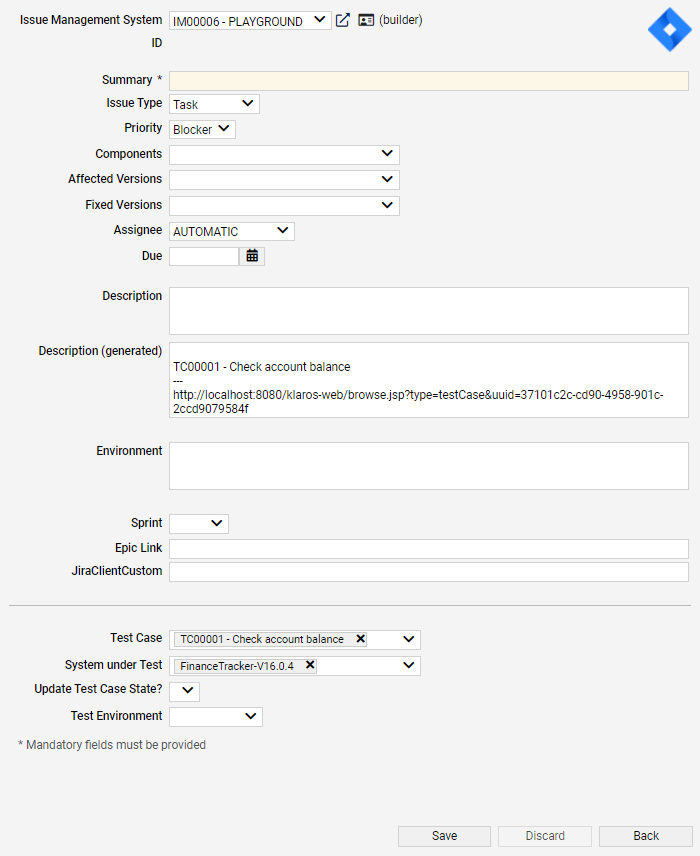
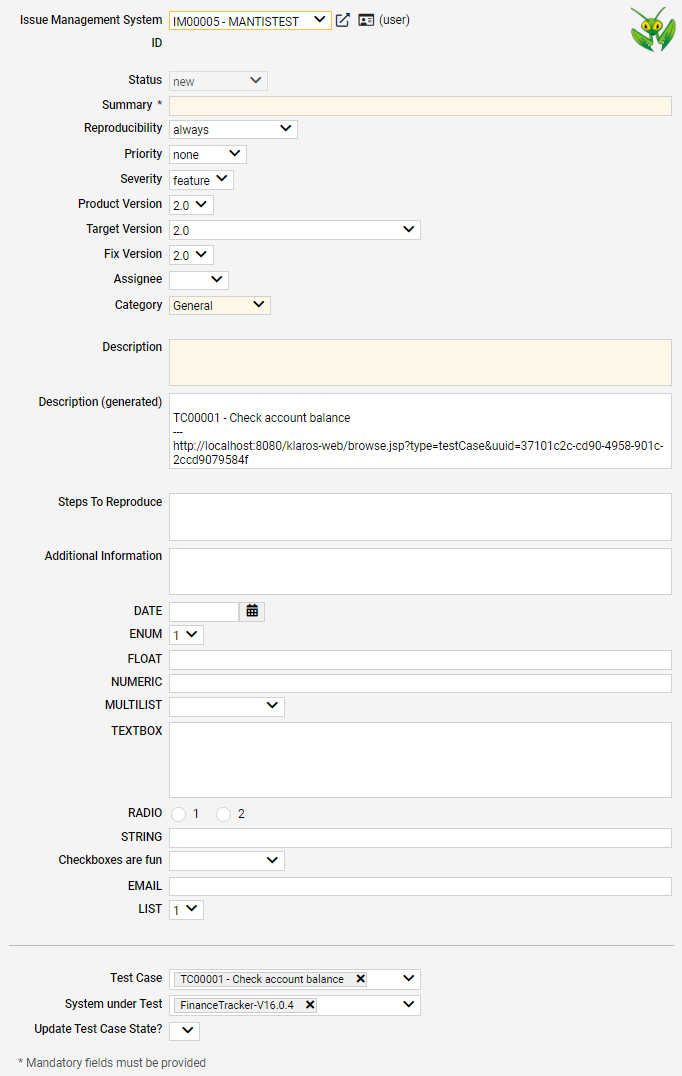
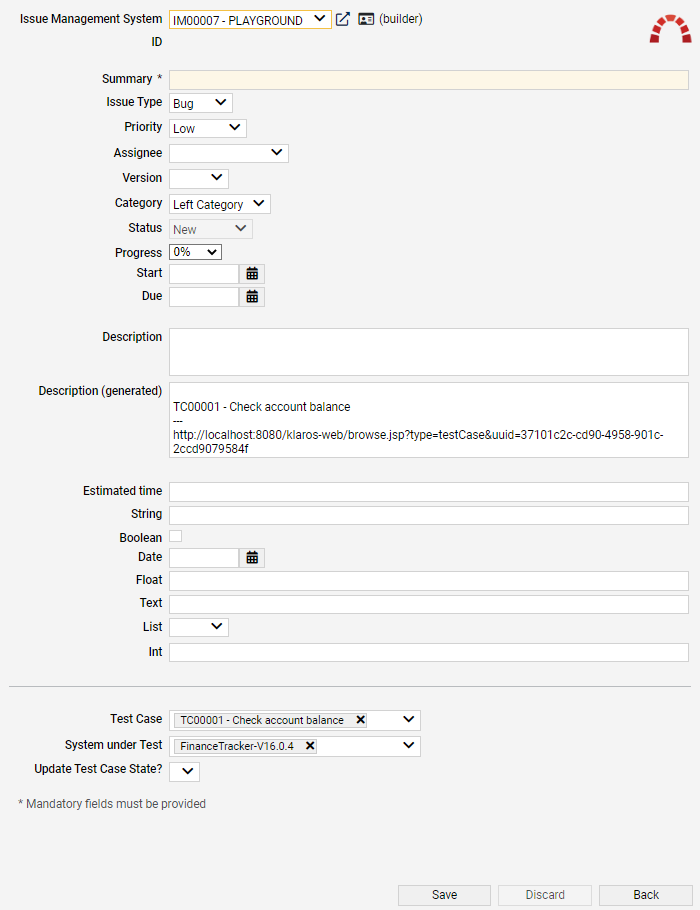
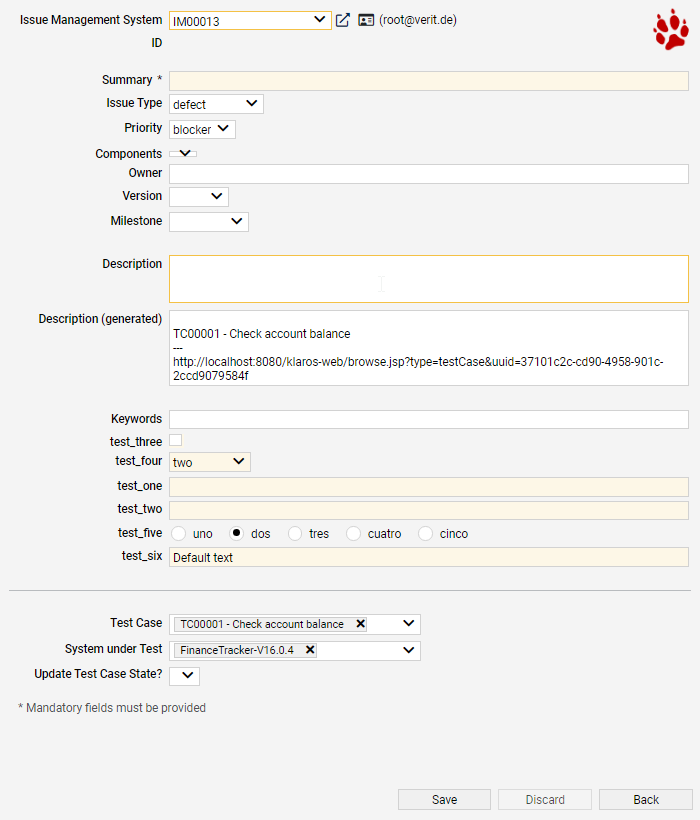
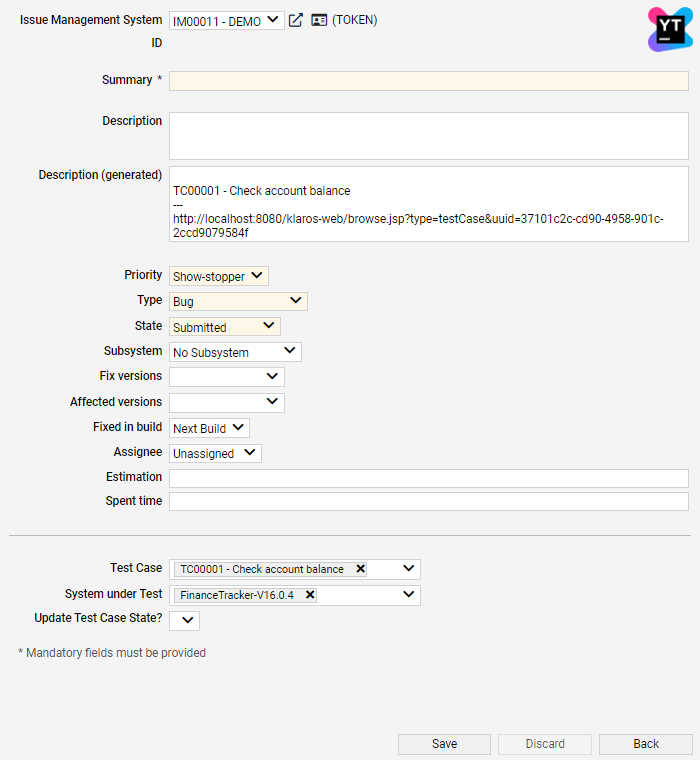
If an issue management system has been selected, a list of issue fields is shown. The exact number and names of those fields vary, depending on the type and configuration of the issue management system. Mandatory fields are shaded in a different color.
|
Note |
|---|---|
|
All mandatory fields need to be filled, otherwise the issue cannot be saved. |
Issue Fields for every Issue-Management-System
|
Test Cases |
The test cases this issue is linked to. |
|
Systems under Test |
The systems under test this issue is linked to. |
|
Update Test Case State |
Selecting this checkbox opens up a new dropdown list in which the new state of the linked test cases can be selected. |
In addition to creating issues from within Klaros-Testmanagement, it is possible to link issues from an issue management system to test cases and systems under test in Klaros-Testmanagement.
To link an issue to a test case or sytem under test, an issue management system must be selected first. Pressing the button links the issue with the entered ID to the selected test cases and systems under test.
|
System |
The issue management system from which issues are to be linked. |
|
ID |
The id of the issue to be linked. |
Pressing the icon searches the issue management system for an issue that matches the entered id. Upon a successful search, pressing the button links the issue to the selected test cases and systems under test.
|
|
 |
|
| 9.5. Test Suite Results |  |
Chapter 10. Configure |